Transfer
In Archivematica, transfer is the process of moving any set of digital objects into Archivematica and turning the materials into a Submission Information Package (SIP). The Transfer tab prepares your content for preservation in Archivematica.
On this page:
- The Transfer tab
- Preparing digital objects for transfer
- Transfer types
- Basic transfers
- Transfers with descriptive and/or rights metadata
- Transfers with submission documentation
- Transfers with existing checksums
- Transferring material with preservation or access derivatives (manual normalization)
- Transferring material with access copies only
- Transferring material with service (mezzanine) files
- Processing a transfer
- Cleaning up the Transfer tab
The Transfer tab
The Transfer tab is where many users begin the process of turning their digital objects into Archival Information Packages (AIPs). On the Transfer tab, users select the material to be preserved, name the transfer, and kick off the transfer process.
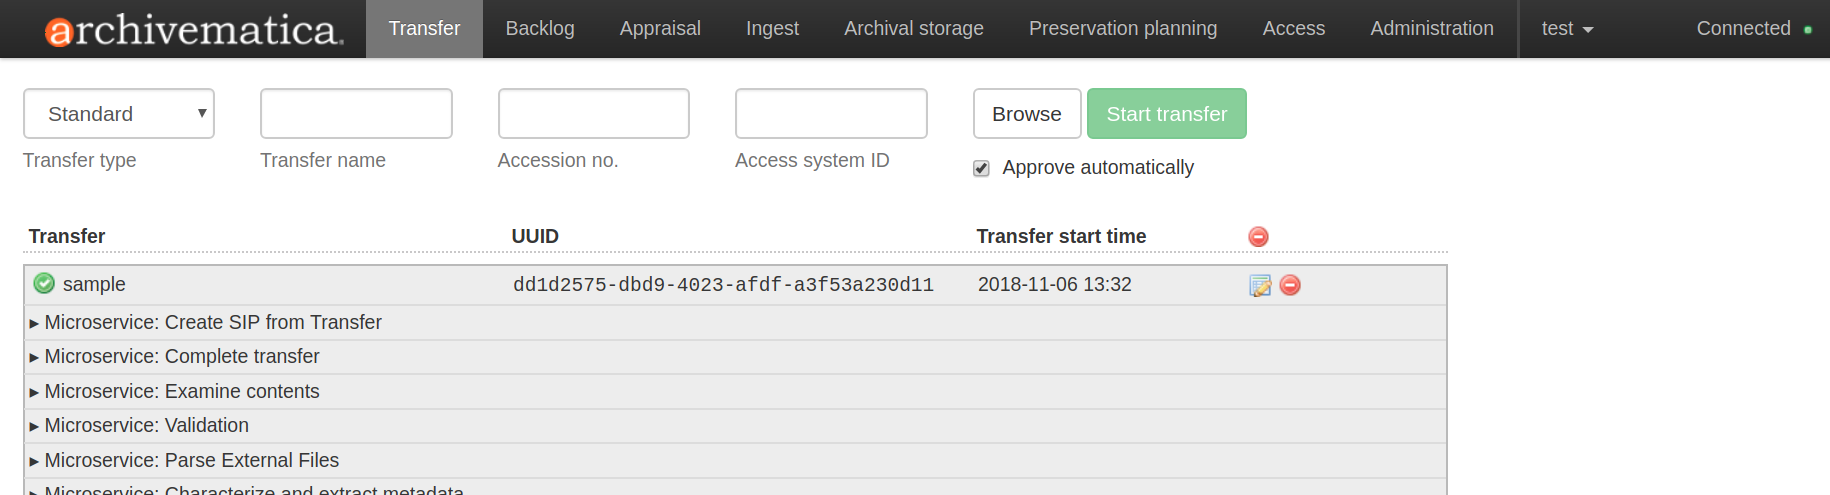
The section at the top of the Transfer tab is where you your materials for
transfer into Archivematica. There are four fields to fill out, as well as the
Browse and Start transfer buttons and the Approve automatically
checkbox.
- Transfer type: The kind of material being transferred. See Transfer types for more information.
- Transfer name: A name for your transfer. This will become the name of the resulting Archival Information Package (AIP). This is a required field.
- Accession no.: Entering an accession number for your transfer will result in the accession number being copied into the AIP METS file as a registration event. It is not used for identifying or searching for the AIP within Archivematica. This field is optional.
- Access system ID: Entering an access system ID field when you are setting up your transfer allows you to automate the process of uploading a DIP to AtoM or Binder. Archivematica will automatically grab this value when it reaches the Upload DIP microservice. See Upload a DIP to AtoM and Upload a DIP to Binder for more information. This field is optional.
- Browse: The Browse button toggles open the transfer browser. This allows users to view and browse through the configured transfer source location(s). For more information about setting up transfer source locations that Archivematica can access, see Administrator manual - Storage Service. Selecting a directory and clicking Add adds the directory of materials to the transfer.
- Start transfer: Once you have given your transfer a name and selected material from the transfer browser, the Start transfer button kicks off the transfer microservices.
- Approve automatically: If this box is unchecked, Archivematica will pause at the first microservice, Approve transfer, and give you a chance to confirm that your transfer has been set up properly. If the box is checked, Archivematica will not pause at this step.
Once a transfer has been started, it appears below the transfer preparation area. Several microservices run on the transferred material to prepare it to become a SIP. The list of microservices should be read from bottom to top.
At the end of the transfer process, the transferred material can be sent to the backlog, where it can be stored until you are ready to turn it into an AIP. The backlog also gives users a chance to carry out appraisal tasks. Alternately, the user can turn the transferred material into a SIP and send it along to the Ingest tab.
You can clean up the Transfer tab by removing completed or rejected transfers. For more information, see Cleaning up the Transfer tab below.
Preparing digital objects for transfer
Archivematica is format-agnostic, meaning that it can accept any file that you pass to the system for processing. A single transfer can be homogenous or it can be a mix of many different formats. However, the way that your material is structured for transfer into Archivematica can have big impacts on how it is processed. Below, there are details about structuring your transfer to accomplish specific digital preservation-related goals with the materials.
How quickly Archivematica can process a transfer depends on two things: the size of the transfer (both the individual objects and the transfer as a whole) and the transfer’s complexity. Speed and efficiency of an Archivematica pipeline is very subjective and much of it depends on the specifications of the Archivematica instance that you are using. For more information on configuring Archivematica to handle large and/or complex transfers, see Scaling Archivematica.
Transfer types
Some materials that are transferred into Archivematica require special processing. To kick off these specialized workflows, you can select a specific transfer type. There are six different transfer types available.
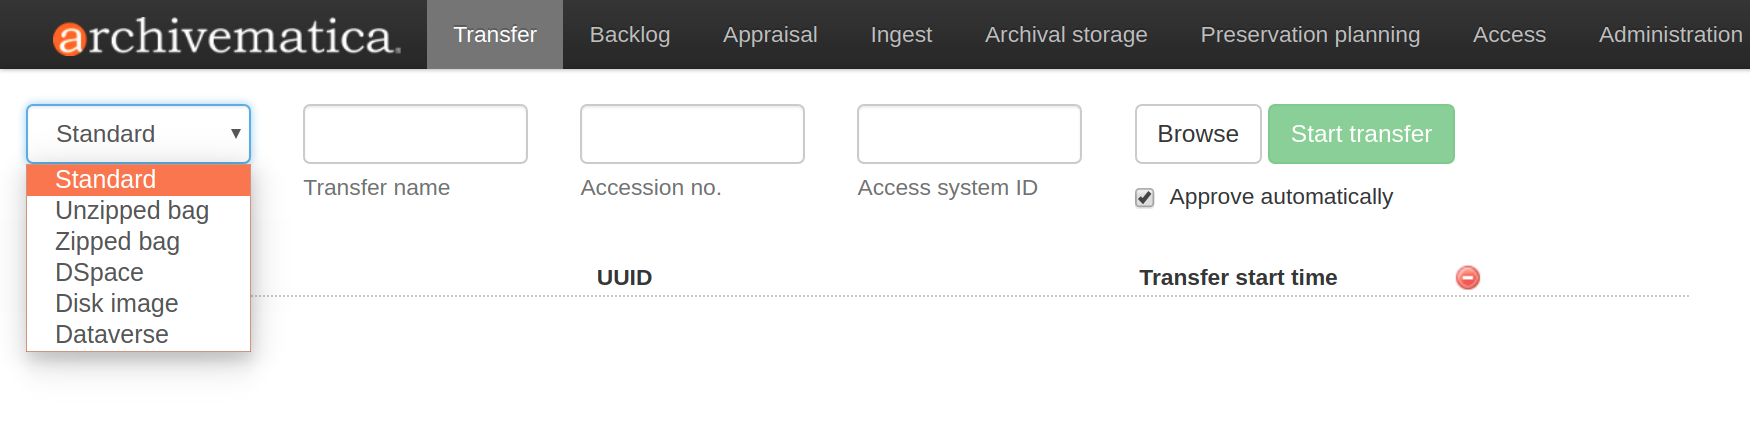
Standard: Standard transfers are the default in Archivematica. All materials can be transferred using the standard transfer type. No special processing tasks are carried out. If you’re unsure which transfer type to choose, start with a standard transfer. For more information on how standard transfers can be structured, see basic transfers and subsequent sections below.
Unzipped bags: Archivematica can recognize and make use of materials that have been packaged according to the BagIt File Packaging Format, colloquially known as bags. If you are in the practice of making bags before transferring material into Archivematica, you can continue to do so. Archivematica will verify the bag early on in the transfer process, looking at manifest information created during the bagging process such as checksums and the payload oxum. The Unzipped bags transfer type can be used for bags that are not saved in a compressed format. For more information about how Archivematica implements bags, see Bags.
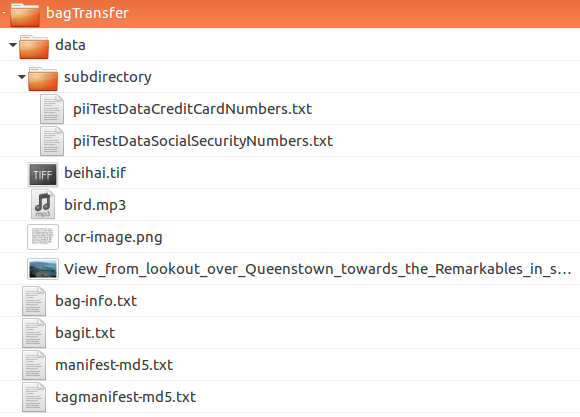
This screenshot shows the layout of a bagged transfer. The bagging process moves
the digital objects to be preserved to a data directory and creates various
metadata files required by the BagIt specification (i.e. bag-info.txt,
manifest-md5.txt).
Zipped bags: Similar to Unzipped bags, the Zipped bags transfer type can br
used for materials that have been packaged according to the
BagIt File Packaging Format. The Zipped bags transfer type should be used for
bags that have been saved in a compressed (or zipped) format. Archivematica
accepts .zip, .tgz, or .tar.gz formats. When you switch the transfer
type to Zipped bags, only files saved as .zip, .tgz, and .tar.gz will be
available to be selected in the transfer browser. For more information about how
Archivematica implements bags, see Bags.
DSpace: When you export materials from a DSpace repository, the export is packaged with a METS file for the export as a whole as well as each individual item. Archivematica can reuse some of the data in these METS files. For more information, see DSpace.
Disk image: Selecting the disk image transfer type is not required to preserve disk images (you can use the standard transfer type or the bag transfer types, if your disk image is also bagged); however, it does give you an extra disk image-specific metadata form where you can record information about the imaging process. For more information, see Forensic disk images.
Dataverse: Similar to the DSpace transfer type, materials exported from a Dataverse repository contain metadata that Archivematica can reuse. For more information, see Dataverse.
Basic transfers
This section describes the basic setup for a standard transfer. If you are planning to use any other transfer type, please see the Transfer types section above for more information about your transfer type.
With the exception of zipped bag transfers, Archivematica requires that all of the materials in the transfer are contained within a top-level directory. The directory structure of the transfer can be simple (i.e. all files located in the same directory) or it can be nested and hierarchical.
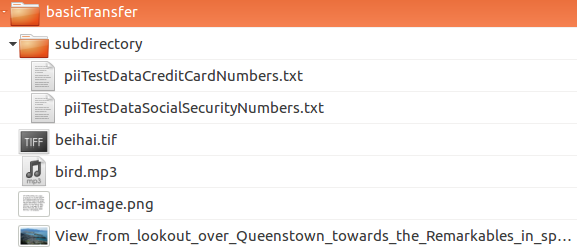
The following screenshot shows a basic transfer called basicTransfer. Four
digital objects sit within the top-level directory, while two more objects are
nested within a subdirectory.
The transfer can have as many subdirectories as you wish, though this may impact processing time. The digital objects can be in any format, though what exactly Archivematica can do with a given file format varies widely. For more information on how Archivematica carries out file format preservation, see Preservation planning.
This is the basic structure of a transfer in Archivematica; however, there are many variations. The following sections build on the basic standard transfer to achieve specific goals relating to the preservation of the digital objects.
Transfers with descriptive and/or rights metadata
Archivematica can recognize descriptive and/or rights metadata that is included with your transfer. As long as the metadata is in a format that Archivematica can understand, Archivematica can parse the metadata to include it in the AIP METS file. If you are using AtoM or ArchivesSpace, the metadata can be passed on to these access systems for further use.
Descriptive and/or rights metadata can be added to standard, unzipped, zipped, and disk image transfer types.
To include descriptive and/or rights metadata with your transfer, you must add a
subdirectory called metadata to the top level of the transfer. The metadata
directory named is a reserved name in Archivematica; it must not be used for
anything else.

For more information about importing metadata into Archivematica, including how to structure the metadata and rights CSV files, see Import metadata.
Adding metadata to a bag
See Adding descriptive/rights metadata and submission documentation to bags for more information.
Transfers with submission documentation
Submission documentation is a concept in Archivematica that accounts for materials that are related to the digital objects being preserved, but aren’t strictly part of the collection - for example, donor agreements, correspondence about the materials, conservation reports, etc. If Archivematica sees that a transfer includes submission documentation, it can include descriptions of this material in the AIP METS file.
Submission documentation can be added to standard, unzipped, zipped, and disk image transfer types.
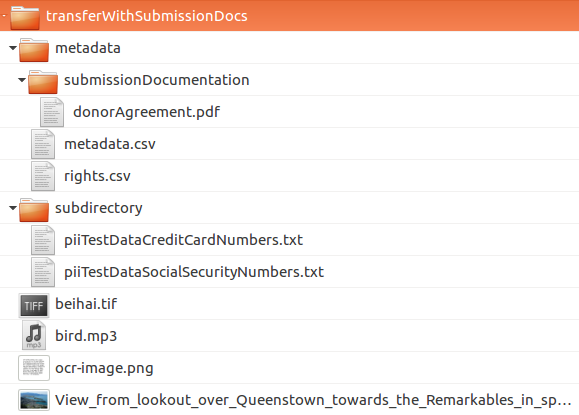
To create a transfer that includes submission documentation, your top-level
directory must contain a metadata directory. Inside the metadata directory,
a nested directory called submissionDocumentation contains the submission
documentation files.
Adding submission documentation to a bag
See Adding descriptive/rights metadata and submission documentation to bags for more information.
Create a transfer with existing checksums
Archivematica can verify MD5, SHA1, and SHA256 checksums that were created outside of Archivematica. Creating checksums outside of Archivematica is a good idea if you are concerned about loss of data integrity during the move into Archivematica. Checksums are checked during the Verify transfer checksums microservice on the Transfer tab.
Checksums can be added to standard, DSpace, and disk image transfer types. Note that checksums are added to both unzipped and zipped transfer types as part of the bag requirements.
Checksum files are placed in the metadata directory. Note that you can also
place descriptive and rights metadata CSVs in this directory, as per the
Transfers with descriptive and/or rights metadata
section above.
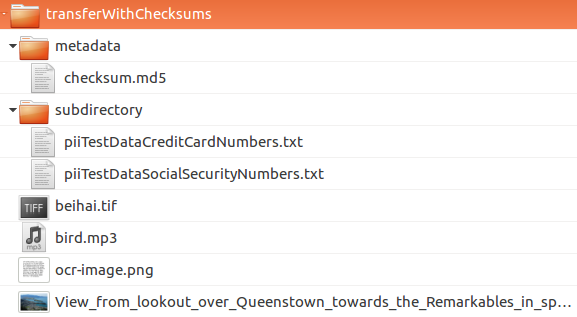
Checksum files should be named checksum.md5, checksum.sha1, or
checksum.sha256. The file itself should contain one line for each checksum,
beginning with the checksum, followed by a space, followed by the file name:
2121dca88ad7f701d3f3e2d041004a56  beihai.tif
7f42199657dea535b6ad1963a6c7a2ac  bird.mp3
6dc1519418859ea5c20fd708e89d7254  ocr-image.png
4737e4dacfc9510915ea58cf12e51712  View_from_lookout_over_Queenstown_towards_the_Remarkables_in_spring.jpg
75388a532283b988f79206d63f65e9a2  subdirectory/piiTestDataCreditCardNumbers.txt
1d7193ea3b2193c79f55ea7e645503a9  subdirectory/piiTestDataSocialSecurityNumbers.txt
If your checksum check fails, the Verify transfer checksums microservice will show an error and the transfer will fail. Expanding the microservice will show that the job Verify metadata directory checksums is red. To review the error, click on the gear icon for the job.
Important
If you are creating bags, checksum files will be created as part of the bagging process. You do not need to create checksums manually.
Transferring material with preservation or access derivatives (manual normalization)
Archivematica’s main strategy for preserving files is to normalize them according to preservation planning rules. However, you may have created - or may want to create - preservation or access copies of your digital objects before transferring your materials into Archivematica (i.e. during a digitization project). Archivematica can recognize manual normalization work and use the preservation and action copies instead of creating new derivatives.
Preservation or access derivatives can be added to standard transfer types.
In order to have Archivematica recognize manually normalized files, the transfer
needs to be structured in a specific way. Your top-level directory must contain
a manualNormalization directory. Inside the manualNormalization directory,
a preservation directory is where you will store preservation derivatives
and an access directory is where you will place the access derivatives. You
can include both of these directories or just one, depending on the kinds of
derivatives that you have created.
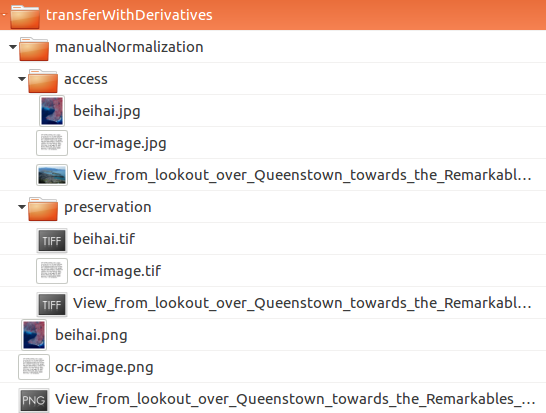
In the example shown above, the original files are PNGs (i.e. beihai.png).
For each file, there is an access copy in the form of a JPG (beihai.jpg) and
a preservation copy in the form of a TIF (beihai.tif). Note that the base
filenames (before the extension) must match in order for Archivematica to
recognize the links between the original file and the manually normalized
preservation and access versions.
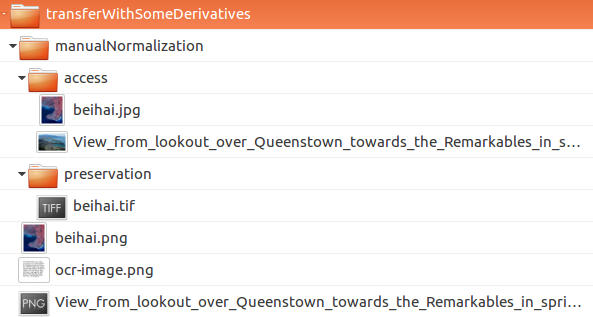
You do not need to have matches for every original file. If you only have manually normalized derivatives for some files, Archivematica can fill in the gaps and create any missing access or preservation derivatives during the normalization microservice.
Note
You can also add manually normalized files during the ingest phase in Archivematica.
Transferring material with access derivatives
If you are only transferring originals plus their access derivatives, there is a slightly more streamlined workflow than the manual normalization option described above.
Access derivatives can be added to standard transfer types.
Inside your top-level directory, create an access subdirectory and place the
access copies of your originals inside this file.
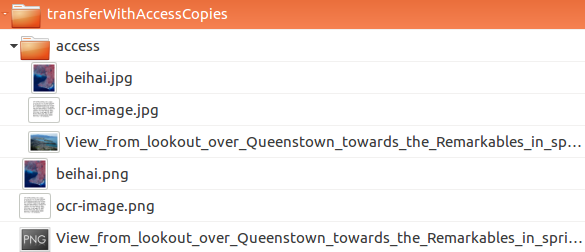
In the example shown above, the original files are PNGs (i.e. beihai.png).
For each file, there is an access copy in the form of a JPG (beihai.jpg).
Note that the base filenames (before the extension) must match in order for
Archivematica to recognize the links between the original file and access copy.
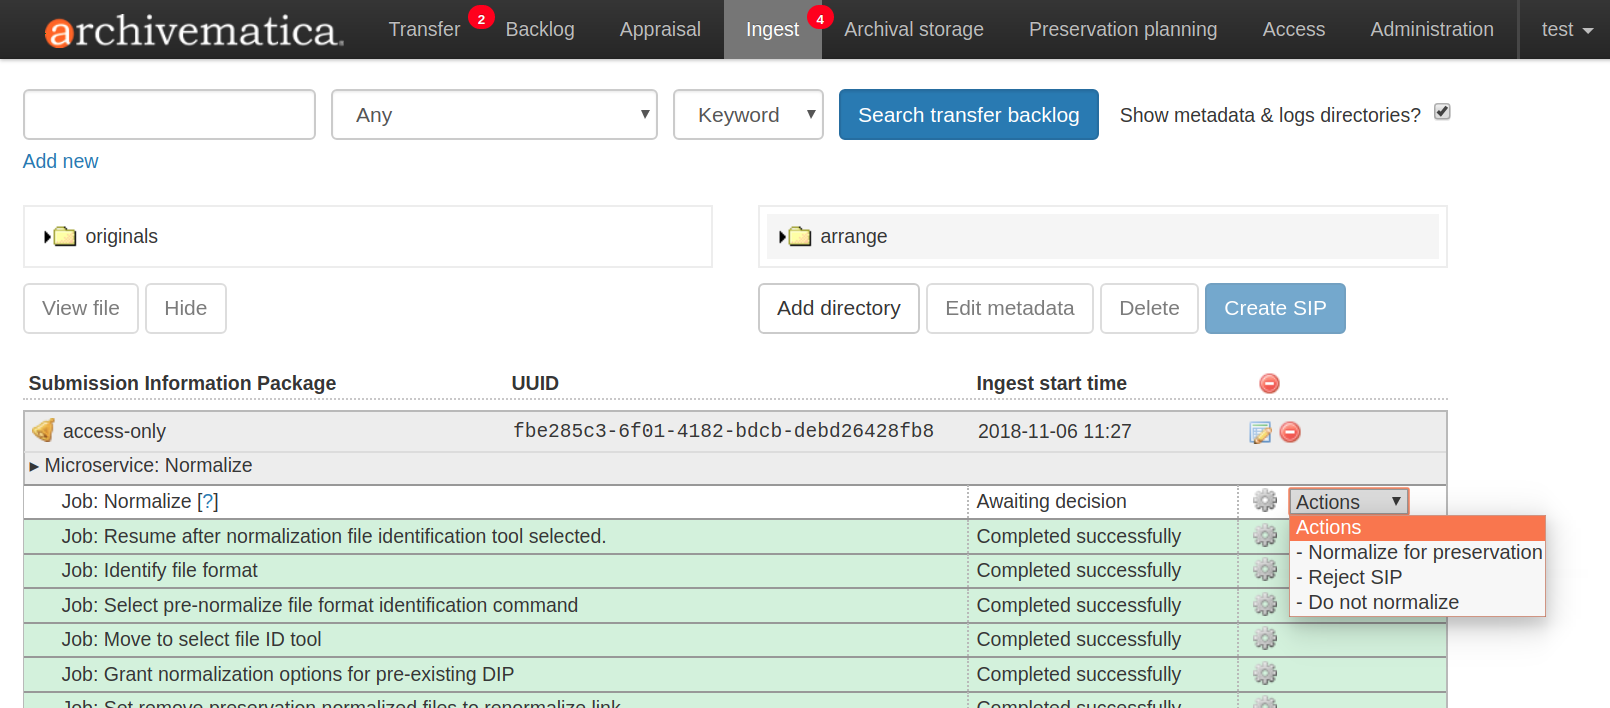
When you process this transfer, Archivematica will automatically recognize the existence of the access copies. At the normalization microservice on the Ingest tab, fewer normalization options will appear because Archivematica will always make a Dissemination Information Package (DIP) from the provided access copies.
Transferring material with service (mezzanine) files
Somewhat similar to the manual normalization and manual normalization options described above, Archivematica can also recognize the presence of service (or mezzanine) files. Service files are high-quality derivatives created from the original file, which are then used to create every other derivative. For example, during a digitization project you may scan an image as a very high-quality TIFF, then generate a high-quality JP2000 from the TIFF. Instead of accessing the TIFF every time a new access derivative is required, you would then use the JP2000 to make new copies of the file.
Service (or mezzanine) files can be added to standard transfer types.
Inside your top-level directory, create a service subdirectory and place the
service copies of your originals inside this file.
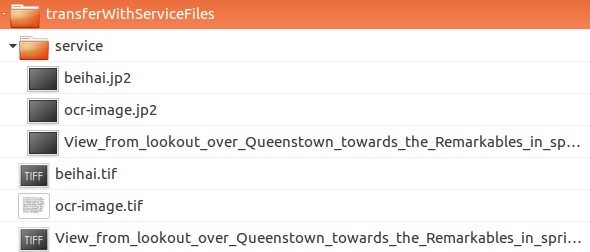
In the example shown above, the original files are TIFFs (i.e. beihai.tif).
For each file, there is a service copy in the form of a JP2000 (beihai.jp2).
Note that the base filenames (before the extension) must match in order for
Archivematica to recognize the links between the original file and the service
copy.
When you process this transfer, Archivematica will automatically recognize the existence of the service copies. At the normalization microservice on the Ingest tab, you will be given the option to use the service copies to generate access derivatives, rather than the original files.
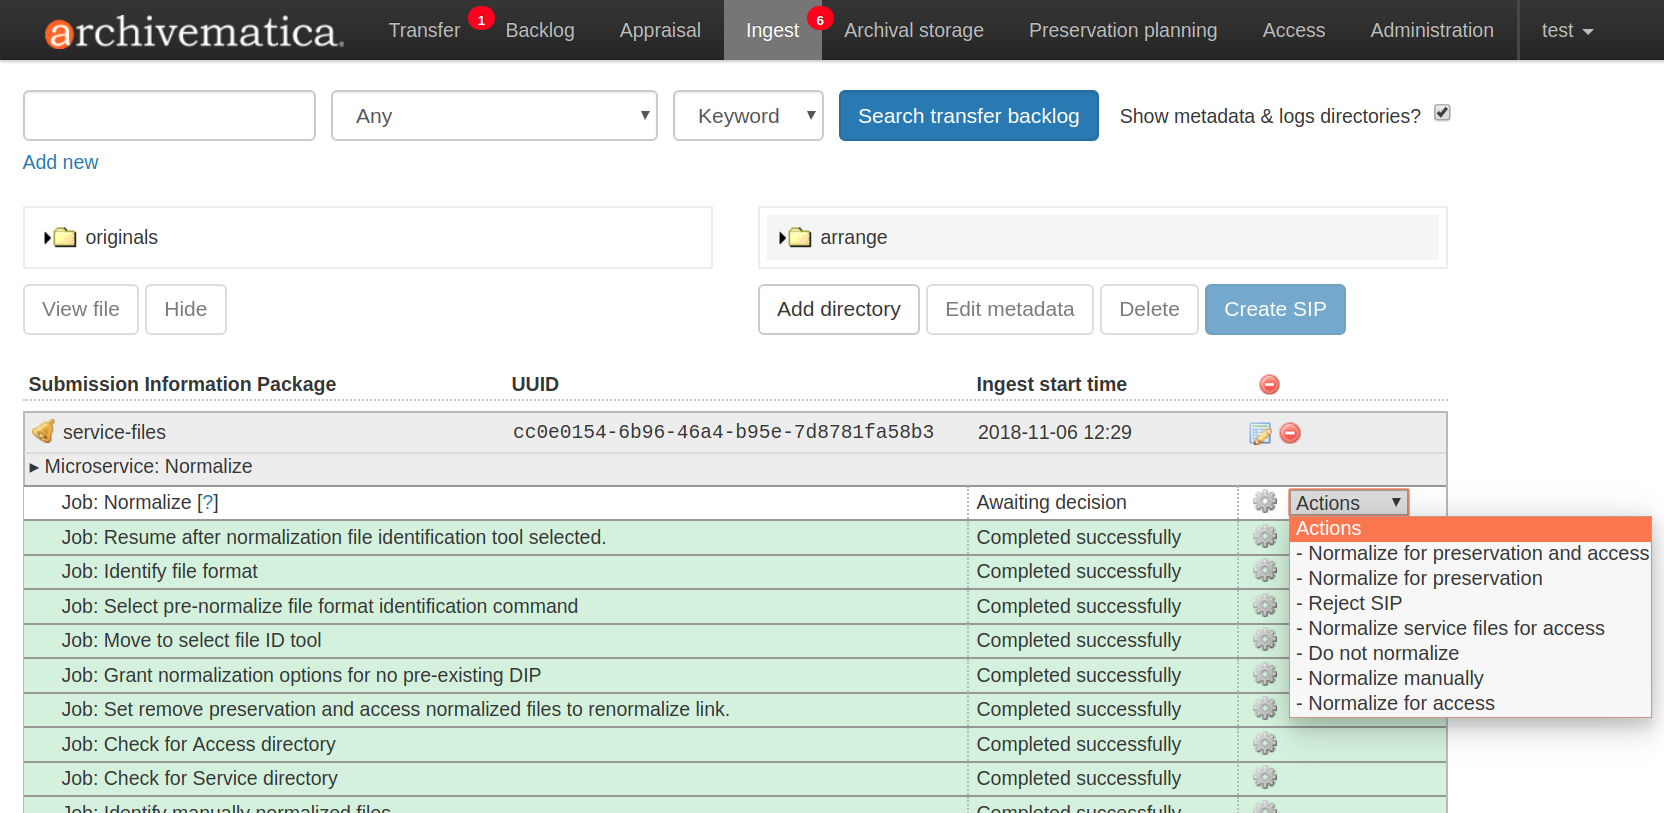
Note
If you want to create access copies from your service files, select Normalize service files for access at the Normalize microservice. If you have included access copies as per the instructions in Transferring material with access derivatives above, select Do not normalize at the Normalize microservice - the DIP will be automatically created because Archivematica has detected the access directory.
Processing a transfer
Once your material is packaged for Archivematica, you can begin the transfer process.
Start a transfer
Sign in to Archivematica and navigate to the Transfer tab by clicking on
Transferor the Archivematica logo.Select your transfer type from the Transfer types dropdown menu.
Name your transfer. The transfer name will become the name of your AIP, so make sure that the name is meaningful.
If needed, also add an accession number and/or access system ID, and check or uncheck the
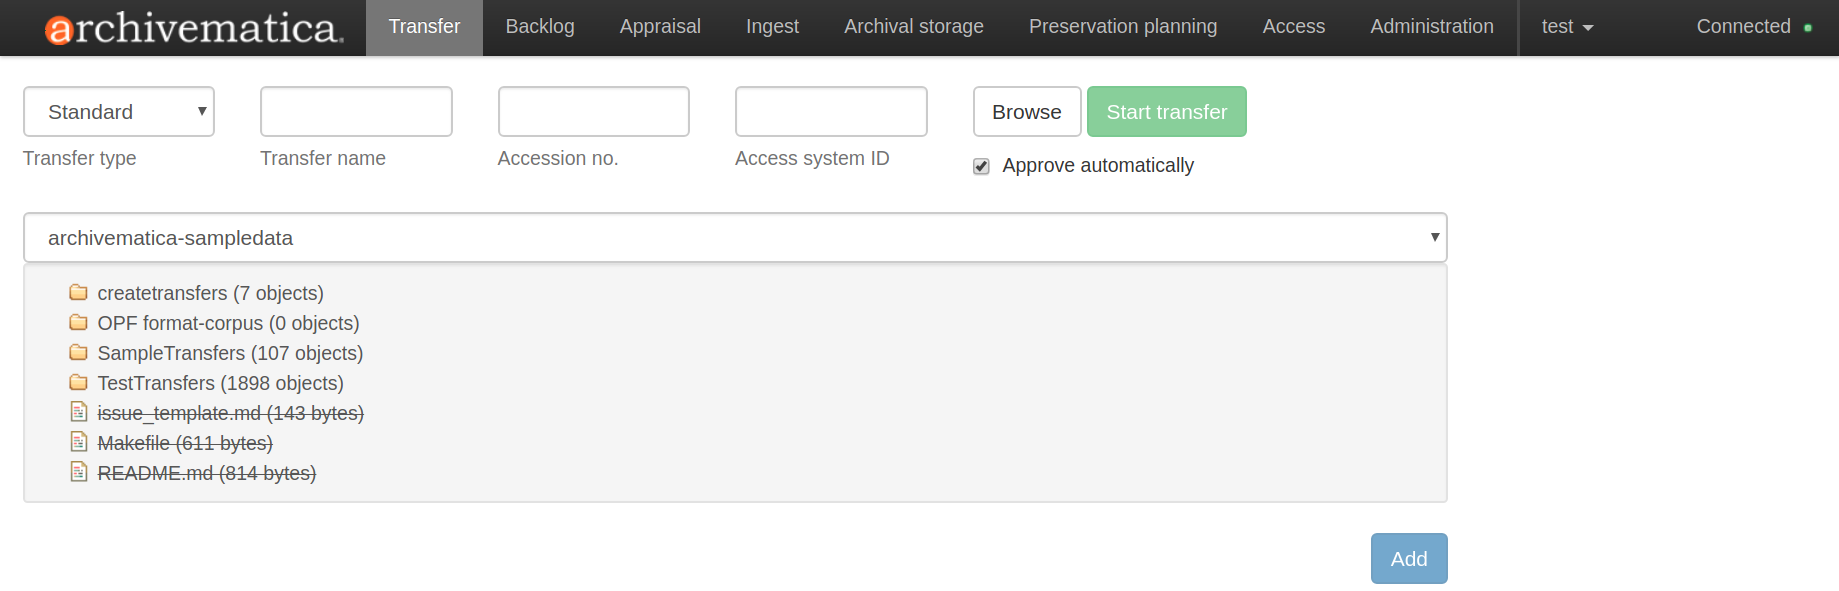
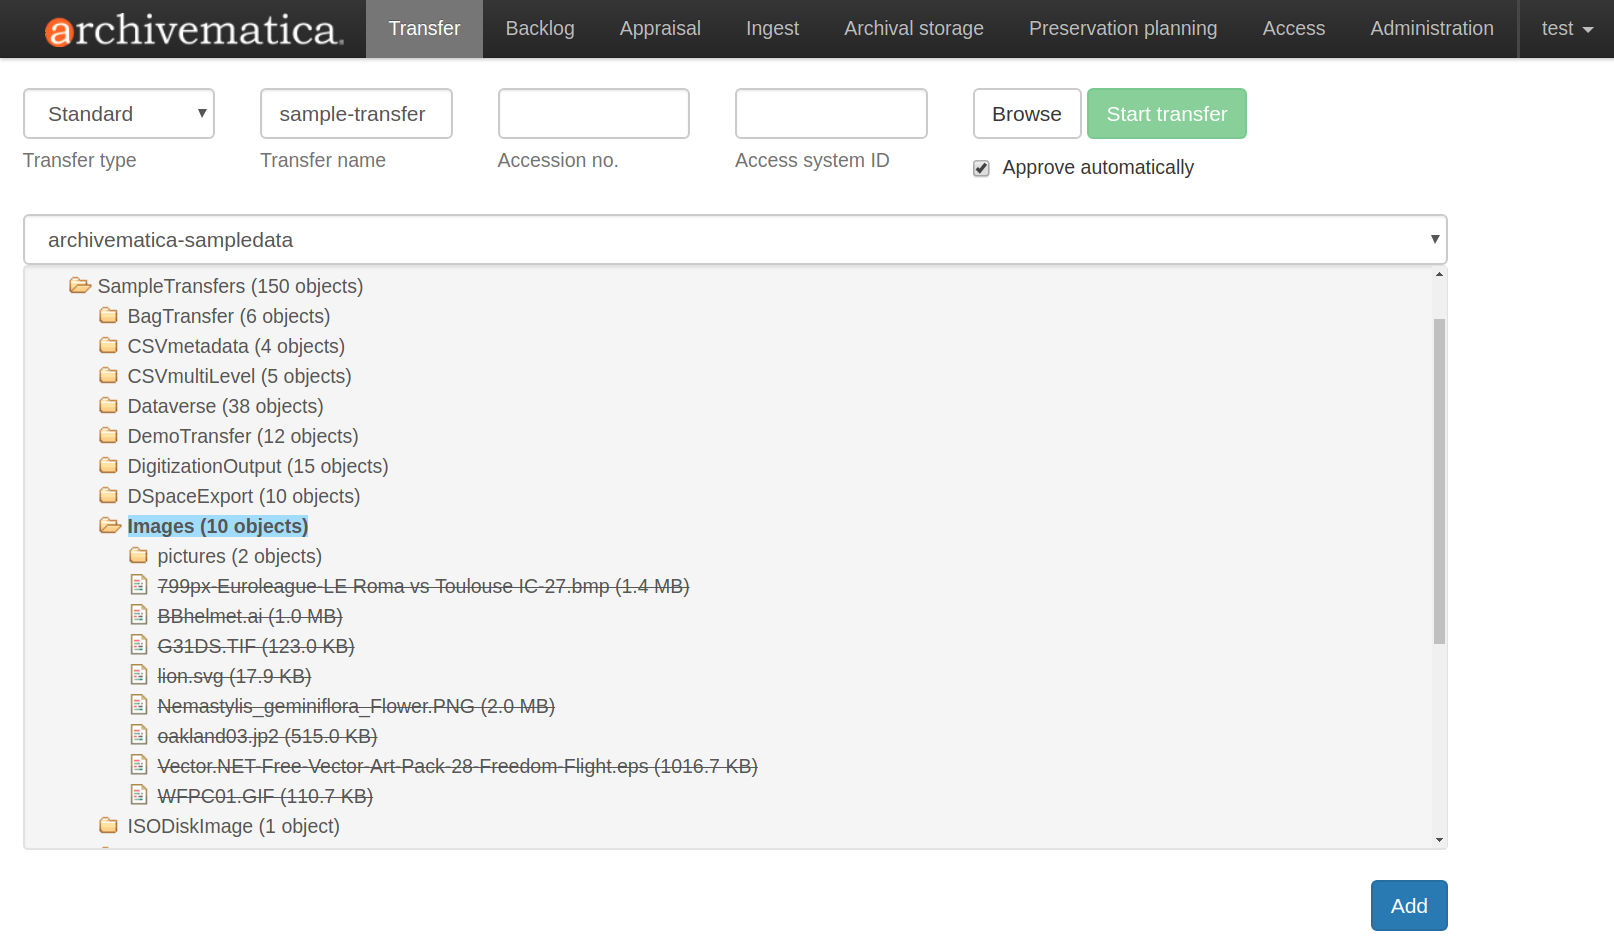
Approve transfercheckbox.Click Browse to open the transfer browser, where you can select a the digital object(s) you want to preserve. You can toggle between transfer source locations by clicking on the top bar of the transfer browser (called
archivematica-sampledatain the screenshot below).Click on the yellow folder icon to explore nested directories. To select the material that you want to preserve, click on the name of the folder (or .zip file, if you are transferring a Zipped Bag) so that it is highlighted and click Add. To close the browser, click on Browse again.
Once you are happy with your transfer preparation, click the Start transfer button.
Transfer tab microservices
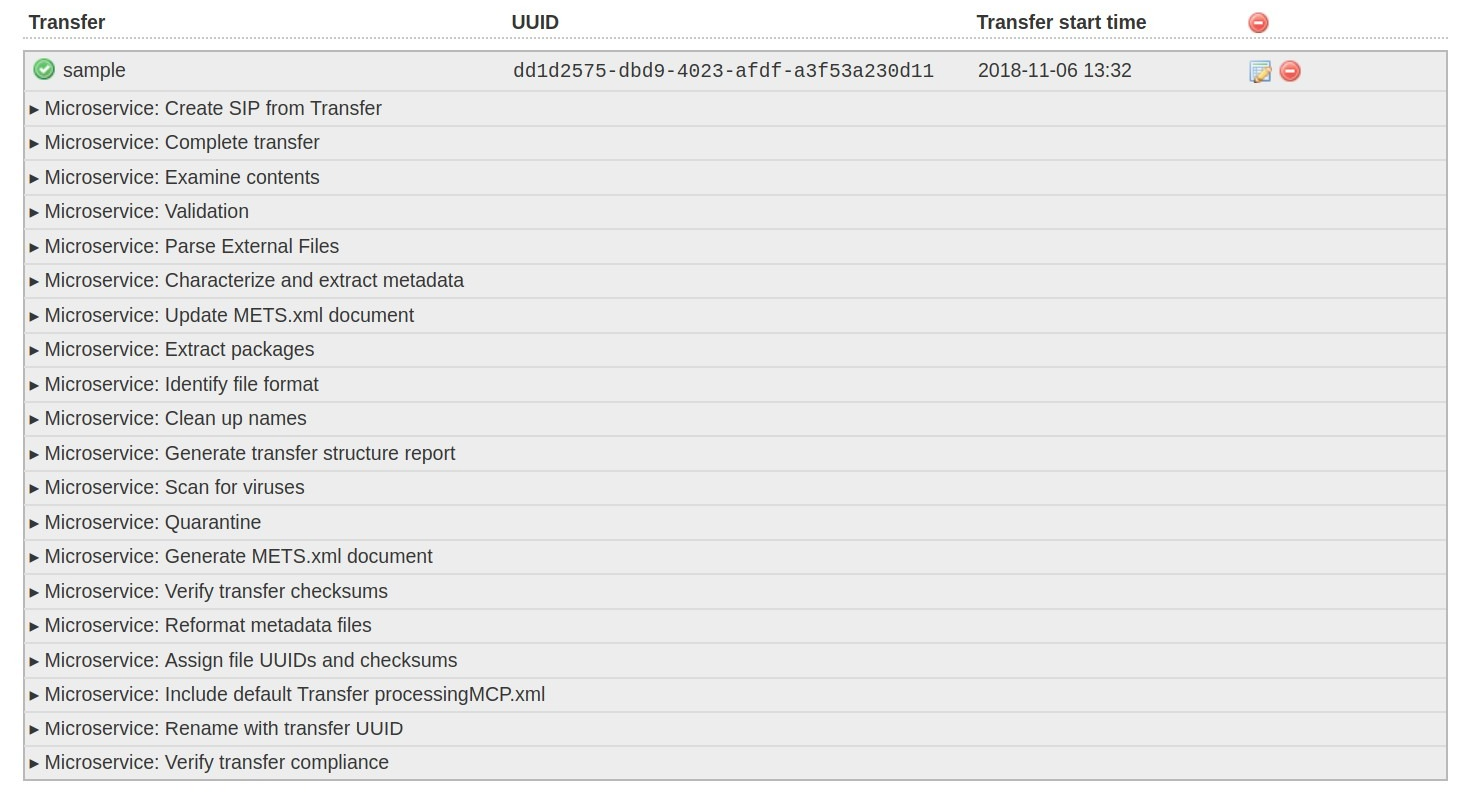
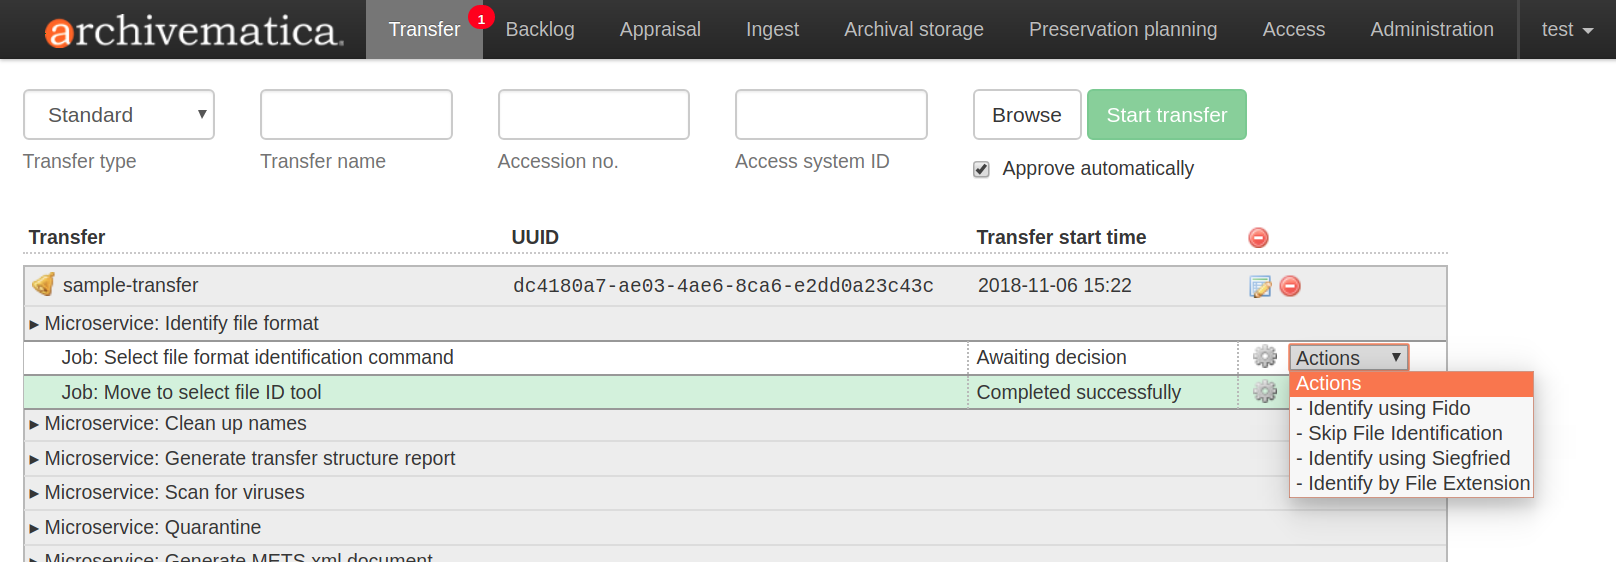
Once you click on Start transfer, the transfer should appear below the transfer preparation area. This should only take a few seconds, though there might be a longer delay if the transfer is very large. If the transfer never appears, do not try to start another transfer - instead, contact your systems administrator as it is possible that you have run out of processing space and starting another new transfer will only compound the issue.
Each microservice in the Transfer tab is carrying out some step towards preparing your material to become a Submission Information Package (SIP) and then an Archival Information Package (AIP). For more information about Archivematica’s microservice architecture, please see microservices.
Some microservices occur with no human intervention, while others will prompt the user for a decision. An early example is the Identify file format microservice, which prompts the user to decide which tool to use to identify file formats.
Note that it is possible to automate all decision points in Archivematica. For more information, see Processing configuration.
The microservices that run on the Transfer tab include:
- Verify transfer compliance: verifies that the transfer is properly structured according to the requirements of the transfer type.
- Rename with transfer UUID: assigns a unique universal identifier for the transfer as a whole.
- Assign file UUIDs and checksums to objects: assigns a unique universal identifier and checksums to each digital object.
- Verify transfer checksums: verifies any checksums included with the transfer.
- Generate METS.xml document: creates a METS file capturing the original order of the transfer. This METS file is added to any SIPs generated from this transfer.
- Quarantine: quarantines the transfer for a set duration. Sending the transfer to quarantine can give you a chance to update virus definitions before the transfer is scanned for viruses.
- Scan for viruses: scans for viruses and malware. For more information, see Scan for viruses.
- Generate transfer structure report: generates a directory tree of the original transfer and places as a text file in the AIP.
- Clean up names: removes prohibited characters from folder and filenames, such as ampersands.
- Identify file format: allows the user to choose between various format identification tools, or to skip format identification at this stage. See Identification for more information.
- Extract packages: extracts contents from zipped or otherwise packaged files. See Extraction for more information.
- Characterize and extract metadata: extracts technical metadata embedded in the files. See Characterization for more information.
- Validation: validates file formats against the format’s specification. See Validation for more information.
- Examine contents: runs Bulk Extractor.
- Create SIP from transfer: gives users the chance to send the transfer to the Backlog tab, where it can be stored for processing later. Using the backlog also gives users a chance to carry out appraisal tasks. Alternately, the user can turn the transferred material into a SIP and send it along to the Ingest tab. The transfer can also be rejected at this point.

Note
If you are running Archivematica without Elasticsearch, you may not have the option to send the transfer to the backlog.
A transfer that is in the middle of processing will show which microservices have been completed (green) and which are in progress (orange). When a microservice fails or encounters an error, the microservice background turns from green to pink and a “failed” icon appears next to the transfer or SIP name. See Error handling for more information about how to handle an error.
Cleaning up the transfer dashboard
The dashboard in the Transfer tab should be cleaned up from time to time. As the list of transfers grows, it takes Archivematica longer and longer to parse this information which can create browser timeout issues.
Remove a single transfer
- Ensure that the transfer you want to remove doesn’t require any user input. You must complete all user inputs and either complete the transfer (i.e. send to backlog or create a SIP) or reject the transfer before it can be removed from the dashboard.
- When you are ready to remove a transfer from the dashboard, click the red circle icon to the right of the transfer name.
- Click the Confirm button to remove the transfer from the dashboard.
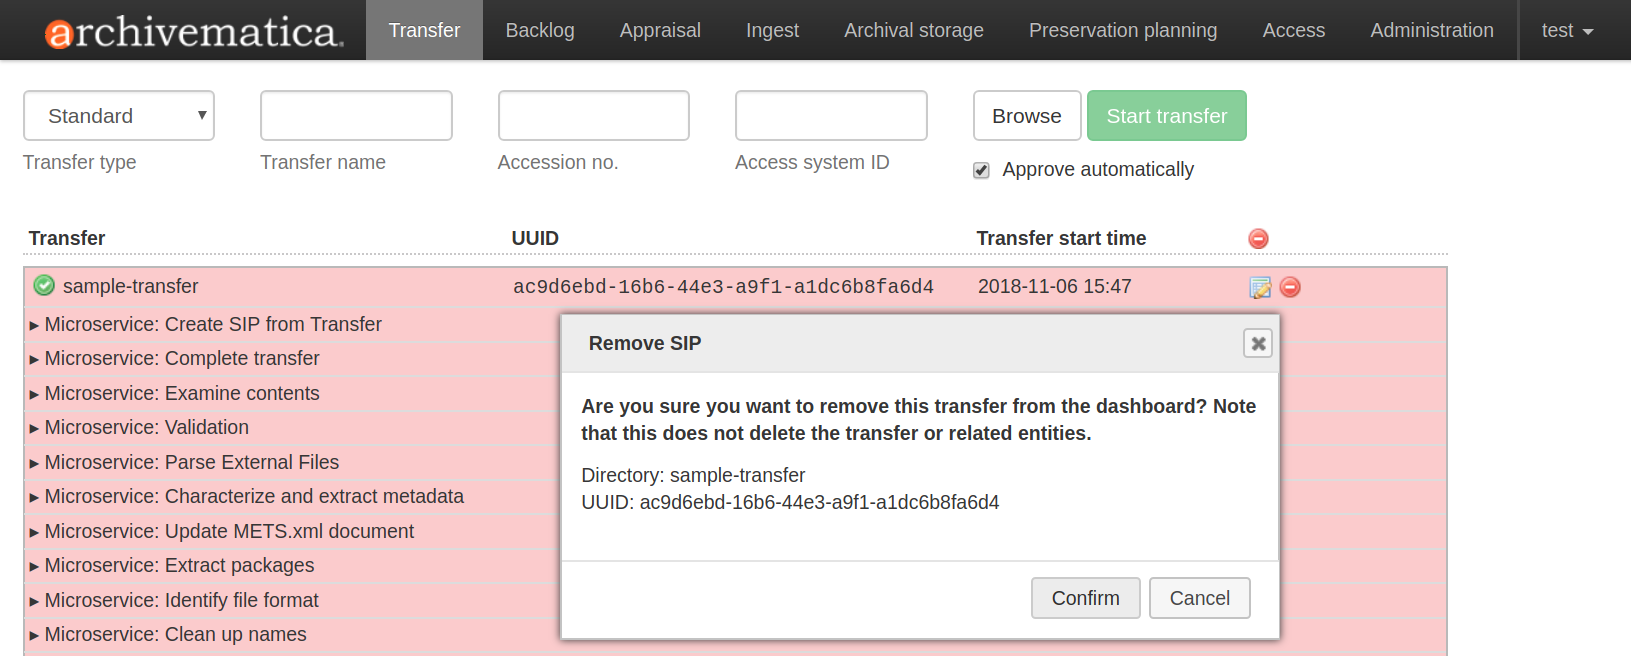
Note
This does not delete the transfer or related entities, including the source directory. It merely removes them from view on the dashboard.
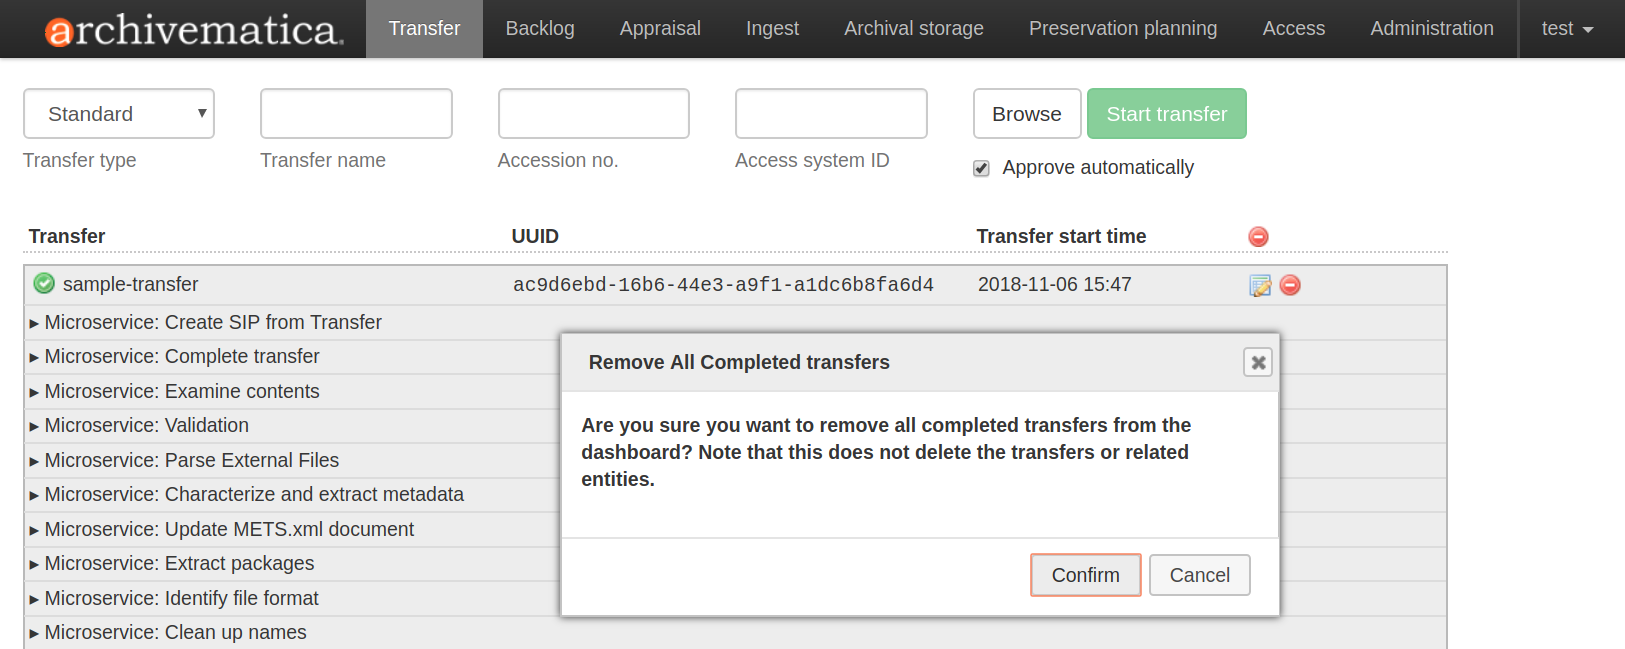
Remove all completed transfers
- Ensure that the transfers you want to remove are complete (i.e. sent to backlog or ingest). Note that this feature only works on completed transfers; rejected transfers will have to be removed one at a time.
- When you are ready to remove all completed transfers, click the red circle icon in the table header of the list of transfers.
- Click the Confirm button to remove all completed transfers from the dashboard.
Archivematica 1.8.1
Contents
- Transfer
- The Transfer tab
- Preparing digital objects for transfer
- Transfer types
- Basic transfers
- Transfers with descriptive and/or rights metadata
- Transfers with submission documentation
- Create a transfer with existing checksums
- Transferring material with preservation or access derivatives (manual normalization)
- Transferring material with access derivatives
- Transferring material with service (mezzanine) files
- Processing a transfer
- Cleaning up the transfer dashboard
Search
Open the general index or type your search in the search box.
Available projects
Archivematica
- Version 1.18.0 (stable-current)
- Version 1.17.1 (stable-previous)
- Version 1.16.0 (legacy)
- Version 1.15.1 (legacy)
- Version 1.14.1 (legacy)
- Version 1.13.2 (legacy)
- Version 1.12.2 (legacy)
- Version 1.11.2 (legacy)
- Version 1.10.2 (legacy)
- Version 1.9.3 (legacy)
- Version 1.8.1 (legacy)
- Version 1.7.2 (legacy)
- Version 1.6.1 (legacy)
- Version 1.5 (legacy)
- Version 1.4 (legacy)
Archivematica Storage Service
- Version 0.24.0 (stable-current)
- Version 0.23.0 (stable-previous)
- Version 0.22.0 (legacy)
- Version 0.21.1 (legacy)
- Version 0.20.1 (legacy)
- Version 0.19.0 (legacy)
- Version 0.18.1 (legacy)
- Version 0.17.1 (legacy)
- Version 0.16.1 (legacy)
- Version 0.15.1 (legacy)
- Version 0.14.1 (legacy)
- Version 0.13.0 (legacy)
- Version 0.12.0 (legacy)
- Version 0.11.1 (legacy)
- Version 0.10 (legacy)
- Version 0.9 (legacy)
- Version 0.8 (legacy)
License
Archivematica documentation by Artefactual Systems Inc. is licensed under a Creative Commons Attribution-ShareAlike 4.0 International License.
