Access
During ingest, Archivematica can generate access copies of digital objects and package them into a Dissemination Information Package (DIP). DIPs can be uploaded to an access system or stored for future use. As a general rule, we recommend only creating DIPs when you need them to save on storage space - you can create DIPs on demand by re-ingesting your AIP at a later date.
After a DIP has been uploaded and/or stored it is moved to the uploadedDIPs directory. If this data is no longer needed, the uploadedDIPs directory can be cleared out. See Processing storage usage for more information.
Archivematica’s Access tab displays DIPs that have been uploaded to AtoM or Binder. It does not display DIPs that have been sent to other access systems, like ArchivesSpace.
On this page:
- Access systems
- Upload a DIP to AtoM
- Upload a DIP to Binder
- Upload a DIP to ArchivesSpace
- Upload a DIP to Archivists’ Toolkit
- Store DIP
- Review/Download DIP
- Access tab
Access systems
If you have chosen to create a Dissemination Information Package (DIP) by
selecting either Normalize for preservation and access or Normalize for
access at the Normalization microservice, you can upload it to a content
management tool as a way of providing access to your archival material. For more
information on normalization options in Archivematica, please see
Normalize.
The DIP includes access copies of the original digital objects in the transfer, created through either Archivematica’s normalization rules or a manual normalization process. The DIP also includes a DIP METS file and, optionally, a thumbnail for each digital object.
A content management tool called AtoM is Archivematica’s default access system. AtoM is a web-based, open source application for standards-based archival description and access in a multilingual, multi- repository environment. Access integration workflows also exist for ArchivesSpace, Archivists’ Toolkit , CONTENTdm, and Binder.
Upload a DIP to AtoM
To upload DIPs to AtoM, you must first have a working AtoM instance. An administrator will need to configure the AtoM instance to talk to Archivematica. For more information about setting up an integration with AtoM, see Using AtoM 2.x with Archivematica.
Important
You must create the target description in AtoM before uploading the DIP. You will need to indicate part of the description’s URL or a target collection in order to send the DIP to the appropriate place during DIP upload.
Digital objects uploaded to AtoM are added as children of the target description
and are by default given the level of description of item. It is possible to
arrange your transfer to crate a hierarchy that AtoM will recognize by
arranging materials for AtoM on the Appraisal or
Ingest tab.
You can also add descriptive metadata to your transfer using either the metadata form or the metadata CSV file. This descriptive metadata will be passed to AtoM. Note that the AtoM DIP upload integration supports Dublin Core descriptive metadata only.
There are two ways to provide the target description to Archivematica. The first is by providing the slug during the Upload DIP microservice.
- Process your transfer. You must select
Normalize for preservation and accessorNormalize for accessat the Normalization microservice. When you reach the Upload DIP microservice, select “Upload DIP to AtoM/Binder” from the drop-down menu. - A dialogue box will appear. Enter the permalink of the description in the
dialogue box. For example, if the URL of the archival description is
http://myAtoM.ca/my-target-description;rad, enter
my-target-
description
. Seeslugin the AtoM glossary for more information.
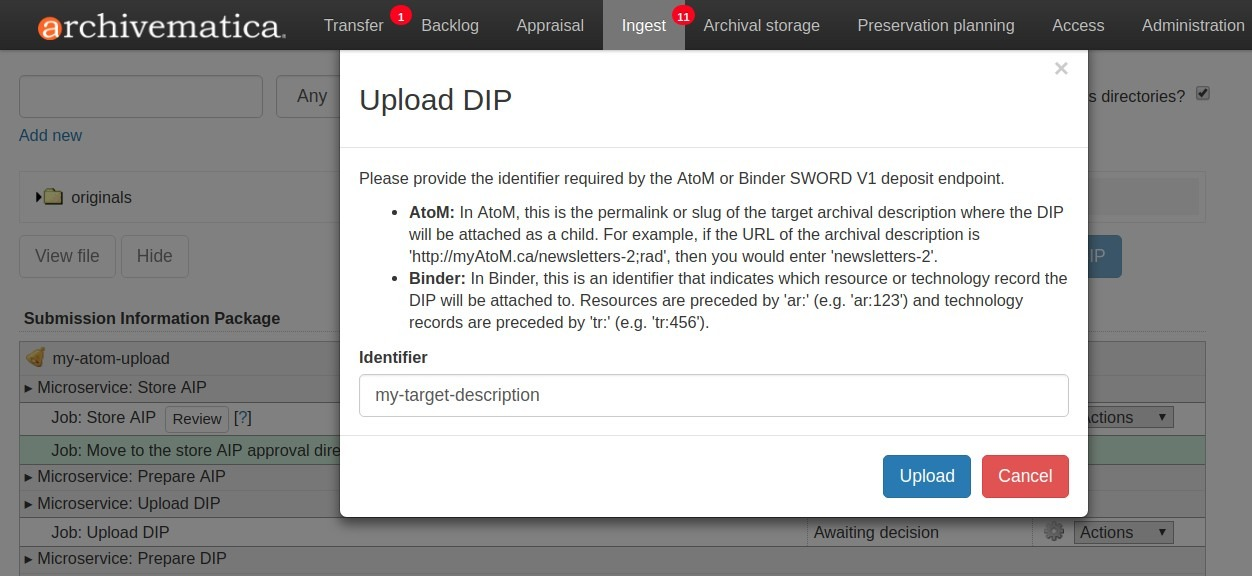
- Click the blue “Upload” button. Digital objects will be uploaded as child items within the target description.
- When the DIP has finished uploading, open the Access tab in the dashboard.
This tab shows the AIP and the uploaded DIP. Note that due to a known issue,
if you want to navigate to the uploaded DIP using the link provided, you must
manually edit the URL to remove
/sword/deposit. - Check the target description in AtoM. The digital object(s) should be displayed as child objects of the record.
In a more automated environment, you can add the slug to the Access system ID box when you are setting up your transfer. Archivematica will automatically grab this value when it reaches the Upload DIP microservice.
- Create a new transfer. In the
Access system IDbox, enter the permalink of the description in the dialogue box. For example, if the URL of the archival description is http://myAtoM.ca/my-target-description;rad, entermy-target-description. Seeslugin the AtoM glossary for more information.
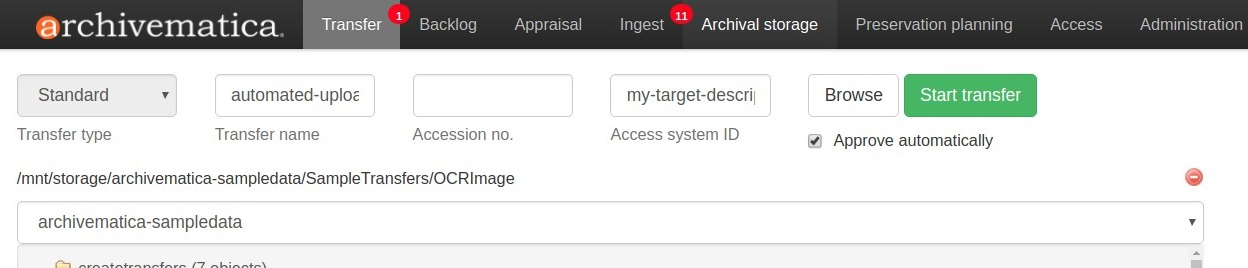
- Process your transfer. You must select
Normalize for preservation and accessorNormalize for accessat the Normalization microservice. When you reach the Upload DIP microservice, select “Upload DIP to AtoM/Binder” from the drop-down menu (or set this as the preconfigured choice in the processing configuration). - Check the target description in AtoM. The digital object(s) should be displayed as child objects of the record.
Metadata-only upload to AtoM
In Archivematica 1.6 and higher, you can send AIP object metadata to AtoM without uploading access copies of the files. This may be a helpful workflow if you have digital objects which you wish to make discoverable but you can’t display online for copyright or privacy reasons.
Important
AtoM 2.4 or higher is required to use this workflow.
Note
The following AtoM-Archivematica workflows are not currently supported with this workflow:
- Descriptive metadata: if descriptive metadata is included by csv or entering in the user interface, the metadata will not display in AtoM in this workflow.
- SIPs with levels of description assigned using the arranging for AtoM workflow - the levels of description will be ignored in this workflow.
- Navigate to Archival Storage and search or browse for the AIP. Click on the name of the AIP, or “View”.
- Under “Actions,” in the Upload DIP tab enter the slug of the AtoM description you wish to upload to.
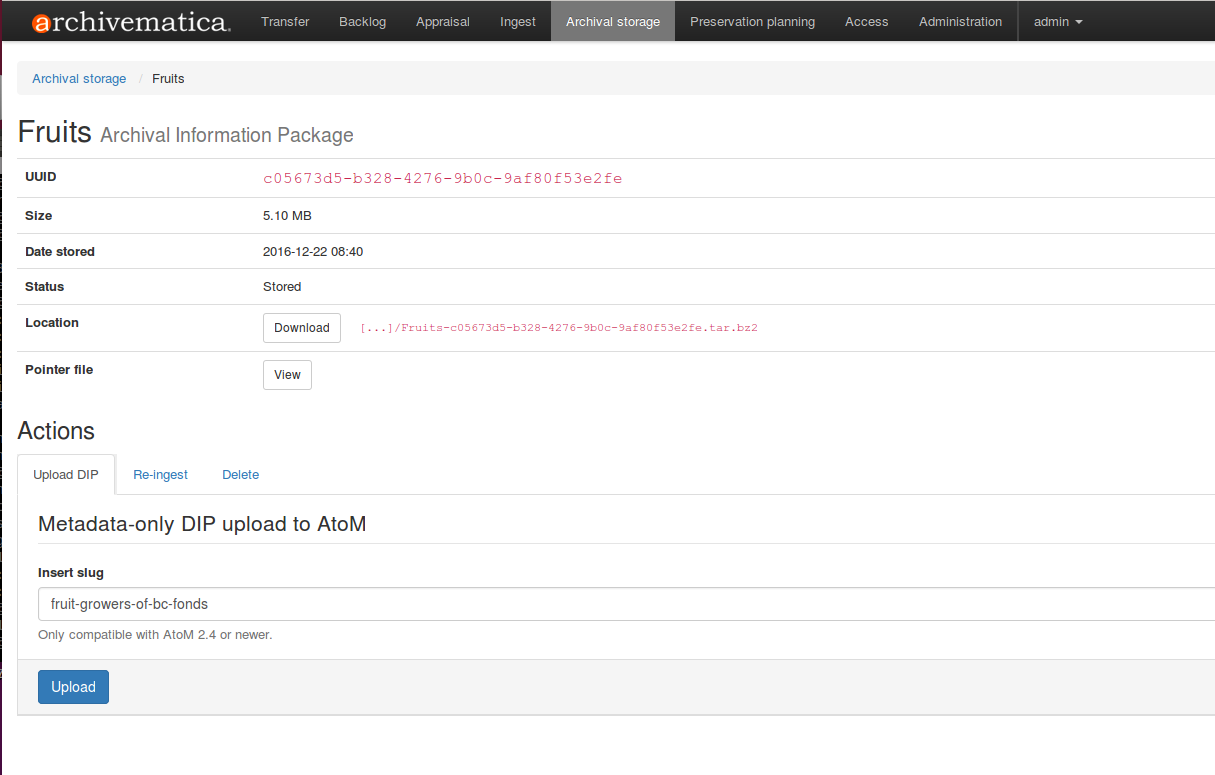
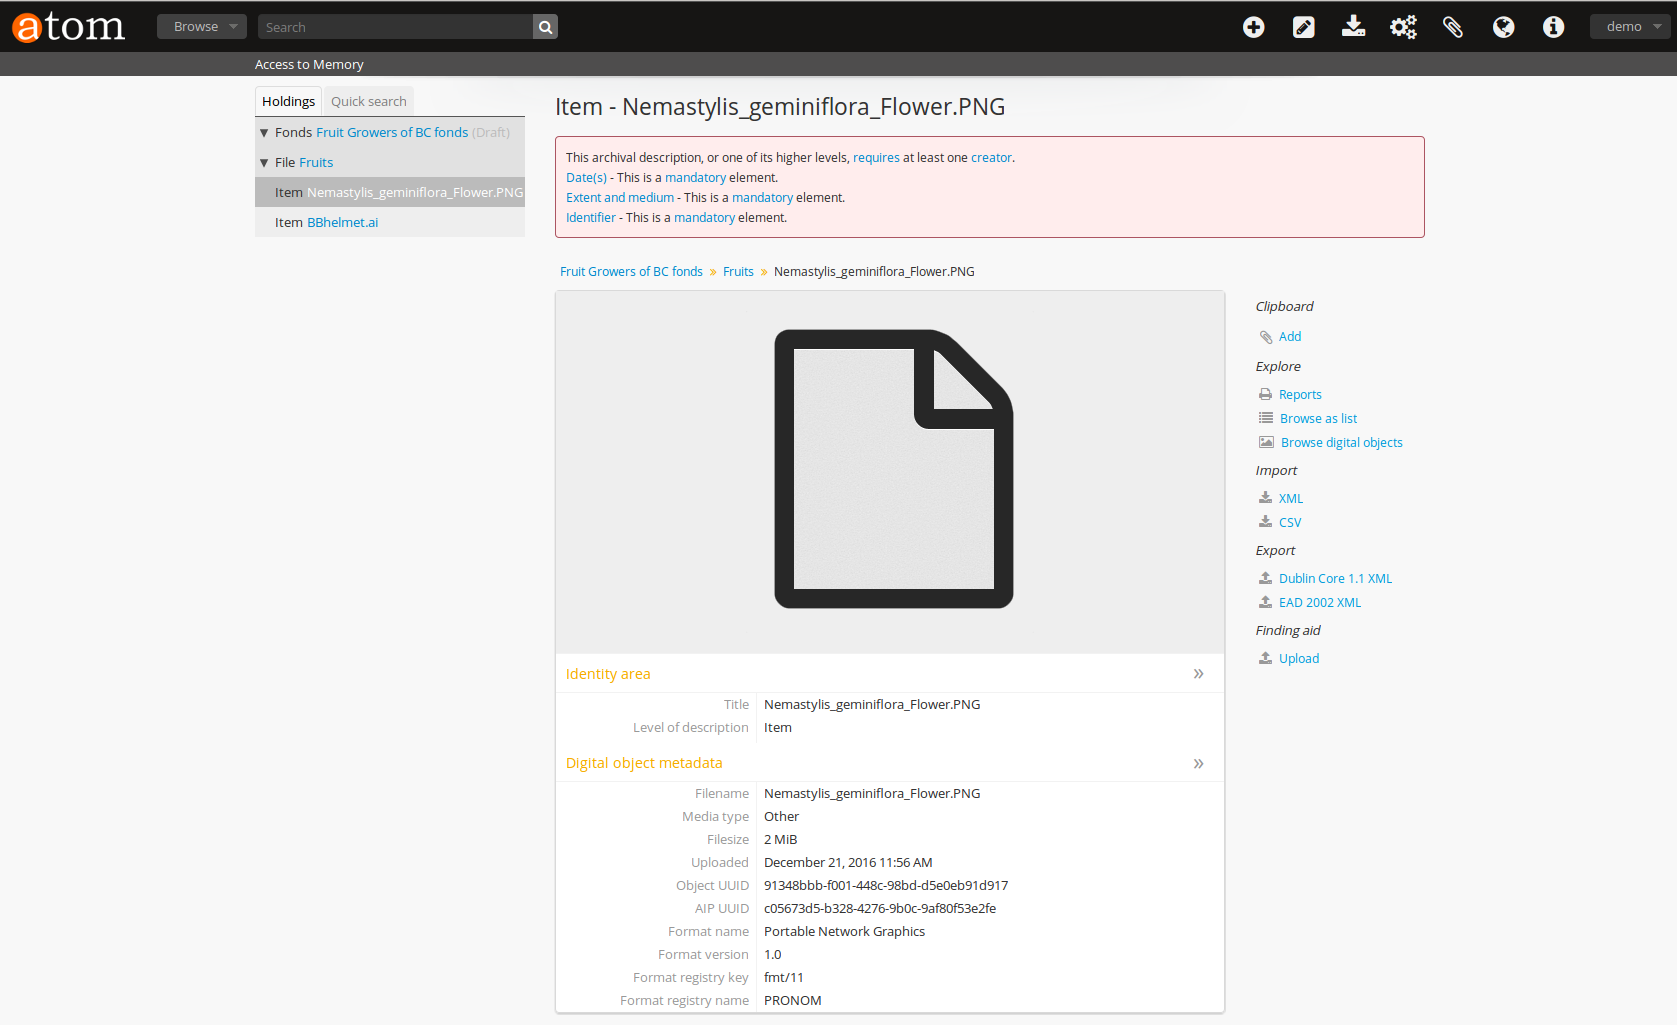
- Upon successful upload, AtoM will have created a File level description for the AIP and an Item level description for each object.
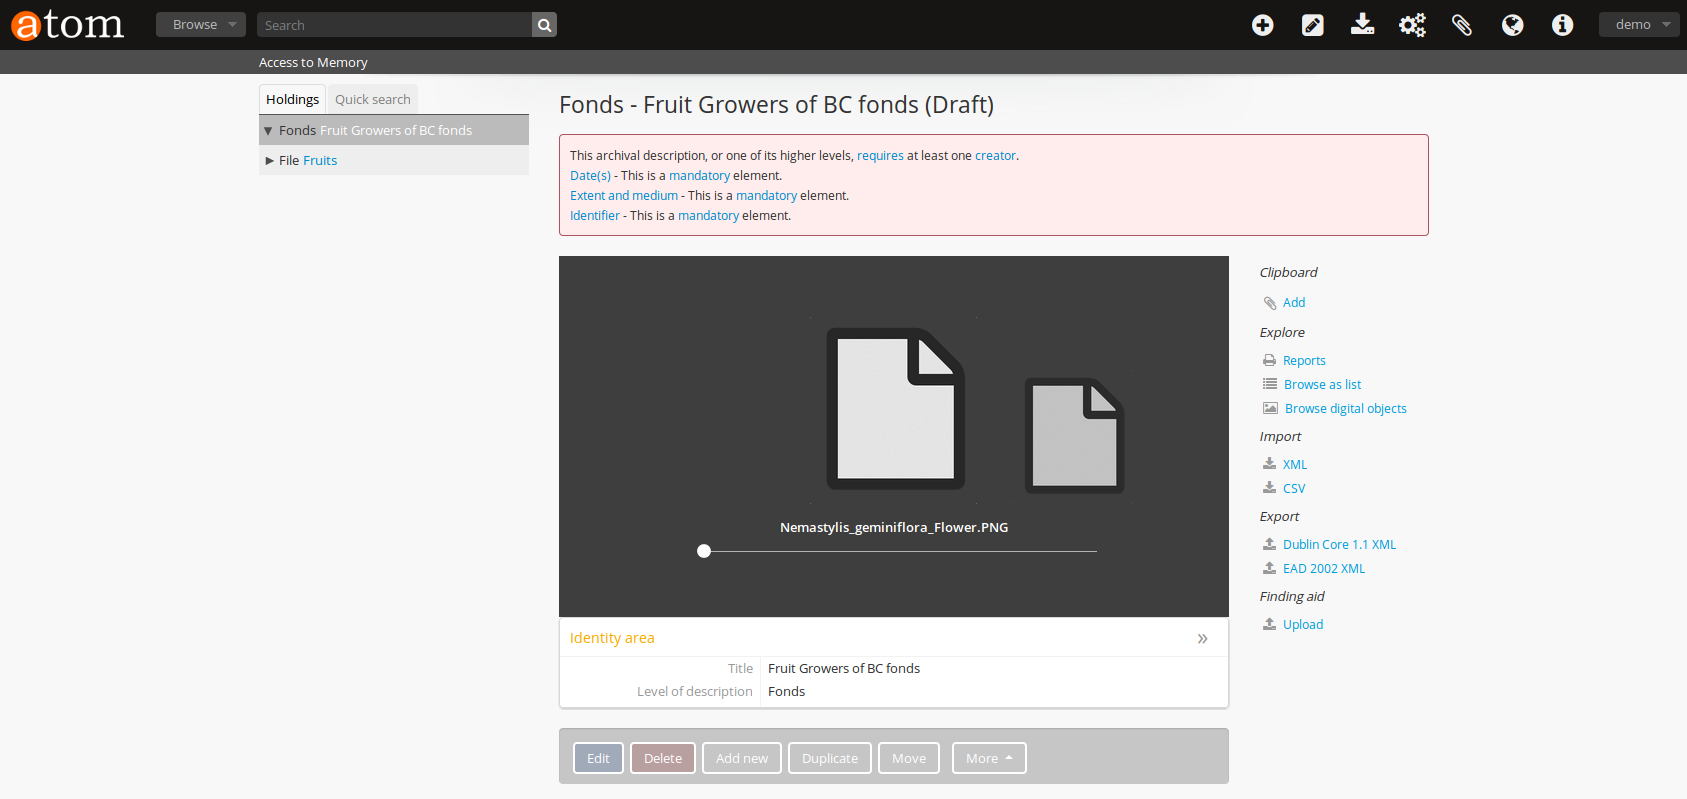
Each item will have a generic thumbnail associated with it and digital object metadata about the original object, including filename, filesize, date uploaded, object and AIP UUIDs, format name, format version, format registry and key.
Upload a DIP to Binder
To upload DIPs to your Binder instance, you must enter your Binder information and credentials in the Administration tab. See AtoM/Binder DIP upload for more information.
Important
You must create the target resource in Binder before uploading the DIP. You will need to indicate the resource’s identifier in order to send the DIP to the appropriate place during DIP upload.
For artwork records, the access system identifier is listed as the Object
ID in the TMS metadata. For a supporting technology record, the access
system identifier is the ID value that is automatically generated by
Binder, not the Dublin Core metadata identifier that you can add when you
create the record.
DIPs can be uploaded to an artwork record or a supporting technology record in Binder.
There are two ways to provide the target resource to Archivematica. The first is by providing the identifier during the Upload DIP microservice.
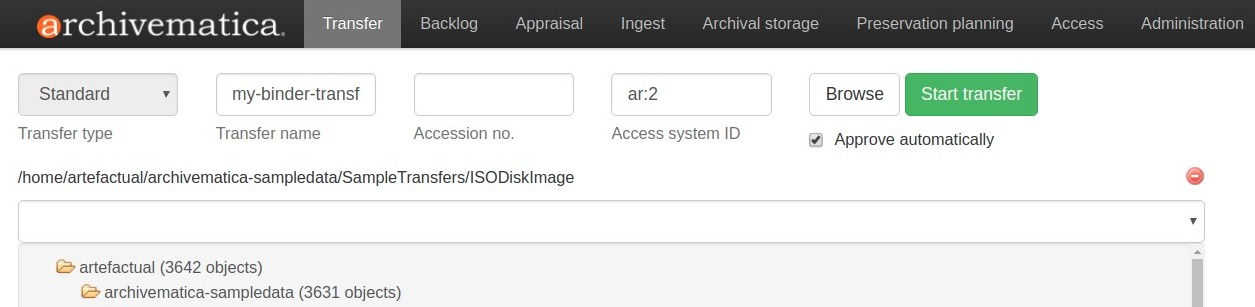
- Process your transfer. You must select
Normalize for preservation and accessorNormalize for accessat the Normalization microservice. When you reach the Upload DIP microservice, select “Upload DIP to AtoM/Binder” from the drop-down menu. - A dialogue box will appear. Enter the identifier for the resource in the
dialogue box, preceded by either
ar:for an artwork record ortr:for a supporting technology record. For example, if the identifier for an artwork record is “2”, enterar:2. If the identifier for a supporting technology record is “5779”, entertr:5779.

- Click the blue “Upload” button. The DIP will be uploaded to Binder and connected to the appropriate resource.
In a more automated environment, you can add the identifier to the Access system ID box when you are setting up your transfer. Archivematica will automatically grab this value when it reaches the Upload DIP microservice.
- Create a new transfer. In the
Access system IDbox, enter the identifier for the resource, preceded by eitherar:for an artwork record ortr:for a supporting technology record. For example, if the identifier for an artwork record is “2”, enterar:2.
- Process your transfer. You must select
Normalize for preservation and accessorNormalize for accessat the Normalization microservice. When you reach the Upload DIP microservice, select “Upload DIP to AtoM/Binder” from the drop-down menu (or set this as the preconfigured choice in the processing configuration). - Check the target description in AtoM. The digital object(s) should be displayed as child objects of the record.
Upload a DIP to ArchivesSpace
To upload DIPs to your ArchivesSpace instance, you must enter your ArchivesSpace information and credentials in the Administration tab. See ArchivesSpace dashboard configuration for more information.
Create a SIP using the Transfer process as normal. During Normalization, choose one of the options that normalizes the package for access. During the Upload DIP microservice, select Upload DIP to Archives Space. The Match page should automatically open.
- Find the ArchivesSpace collection to which you would like to upload the DIP. By clicking on the name of the resource, you can drill down into the collection to upload the DIP at a lower level of description.
- When you have navigated to the level of description where you want to store the DIP, select Assign DIP objects to this resource.
- On the Assign Objects screen, select which objects you would like to assign to which resources. Using the filter boxes in the top right allow you to search for specific objects or resources by name.
- Once you have selected the objects and the resource you would like to pair them with, click Pair in the top right corner. Repeat steps 2-4 as needed.
- When you are done pairing objects and resources, click on Review matches.
- To remove all pairs and restart, click on Restart matching.
- If everything is correct, click on Finish matching.
This will take you back to the Ingest tab, where you can finish ingesting the AIP.
Alternatively, you can manually create the matches and place them in the metadata folder of the transfer in a file named archivesspaceids.csv. For example, given the following transfer tree:
pictures
├── extra
│   └── oakland03.jp2
├── Landing zone.jpg
├── MARBLES.TGA
└── metadata
  └── archivesspaceids.csv
The CSV file needs two columns, one with a relative path to the original file in the transfer directory and the other with the Ref ID from the ArchivesSpace Archival Object, which can be obtained from the “Basic information” section in the Archival Object view page. E.g.:
"Landing zone.jpg",49807e9587de87dbafb459b34bd20b78
MARBLES.TGA,468050a6add84d6d89d47a975ce5440f
extra/oakland03.jp2,40caf1e2dd47675a92e25011c190fed5
If the Upload DIP to ArchivesSpace option is selected in the working processing configuration, the CSV file will be used to create the matches in the upload. Otherwise, after selecting Upload DIP to ArchivesSpace in the ingest tab you will be taken to the Match page and, to check the matches created from the CSV file instead of creating new ones, you can click directly on Review matches and finalize or restart the matching.
Upload a DIP to Archivists’ Toolkit
To upload DIPs to your Archivists’ Toolkit instance, you must enter your Archivists’ Toolkit information and credentials in the Administration tab. See Archivists’ Toolkit dashboard configuration for more information.
Create a SIP using the Transfer process as normal. During Normalization, choose one of the options that normalizes the package for access. During the Upload DIP microservice, select Upload DIP to Archivists’ Toolkit. The Match page should automatically open.
- A page will open allowing the user to select the Archivists’ Toolkit collection where the objects should be added. This page allows the user to match digital objects to resource components in Archivists’ Toolkit.
- Archivematica will upload the DIP metadata to Archivists’ Toolkit.
Store DIP
Archivematica also provides the option to store the DIP to a location that you have configured via the Storage Service. This can be configured to be a local server, NFS-mounted or another storage protocol such as DuraCloud.
To store a DIP:
- Ensure that at least one DIP storage location has been configured in the Storage Service.
- At the Store DIP job at the Upload DIP microservice on the Archival Storage tab, choose Store DIP.
- At Store DIP location, select the DIP storage location from the configured options.
Review/download DIP
Regardless of the access path chosen (an integrated access system, or storing the DIP) the dashboard will present the operator with the option of reviewing and downloading the DIP objects. When the Upload DIP microservice is complete, a “review” link will appear:
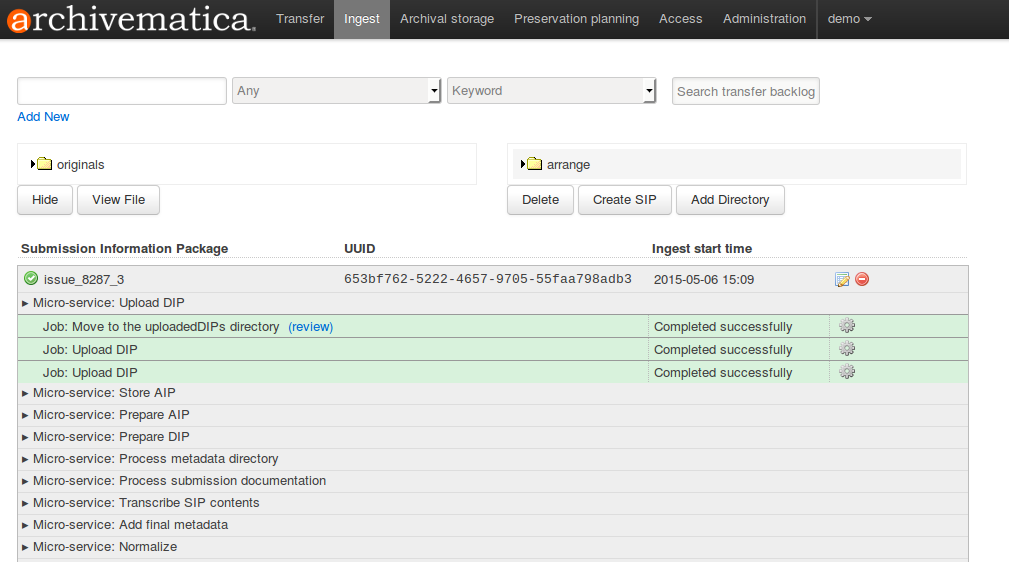
This will present the operator with a page displaying the uploadedDIPs directory which can then be navigated to locate any DIP in this directory. As shown below, when expanded, the DIP objects, thumbnails and METS files can be viewed or downloaded within the browser window.

Your ability to view the objects in the browser will be dependent on your browser having plugins for the particular filetypes. However, all files can be downloaded locally in this manner.
Access tab
By clicking the Access tab in the Dashboard, you can see a table showing all DIPs upload to AtoM or Binder including the URL, the associated AIP, the upload date and status, and the option to delete from the Access tab. Note that this link will delete the record of the DIP in the Access tab, not the actual DIP.
At this time, the Access tab only provides links to DIPs uploaded to AtoM, not to other access systems or DIPs that have been stored.
Archivematica 1.8.1
Contents
Search
Open the general index or type your search in the search box.
Available projects
Archivematica
- Version 1.18.0 (stable-current)
- Version 1.17.1 (stable-previous)
- Version 1.16.0 (legacy)
- Version 1.15.1 (legacy)
- Version 1.14.1 (legacy)
- Version 1.13.2 (legacy)
- Version 1.12.2 (legacy)
- Version 1.11.2 (legacy)
- Version 1.10.2 (legacy)
- Version 1.9.3 (legacy)
- Version 1.8.1 (legacy)
- Version 1.7.2 (legacy)
- Version 1.6.1 (legacy)
- Version 1.5 (legacy)
- Version 1.4 (legacy)
Archivematica Storage Service
- Version 0.24.0 (stable-current)
- Version 0.23.0 (stable-previous)
- Version 0.22.0 (legacy)
- Version 0.21.1 (legacy)
- Version 0.20.1 (legacy)
- Version 0.19.0 (legacy)
- Version 0.18.1 (legacy)
- Version 0.17.1 (legacy)
- Version 0.16.1 (legacy)
- Version 0.15.1 (legacy)
- Version 0.14.1 (legacy)
- Version 0.13.0 (legacy)
- Version 0.12.0 (legacy)
- Version 0.11.1 (legacy)
- Version 0.10 (legacy)
- Version 0.9 (legacy)
- Version 0.8 (legacy)
License
Archivematica documentation by Artefactual Systems Inc. is licensed under a Creative Commons Attribution-ShareAlike 4.0 International License.
