Ingest
During ingest, digital objects are packaged into SIPs and run through several microservices, including normalization, packaging into an AIP and generation of a DIP.
If you would like to skip some of the default decision points or make preconfigured choices for your desired workflow, see User administration - Processing configuration.
Should you run into an error during ingest, please see Error handling.
On this page:
- Create a SIP
- Arrange a SIP from backlog
- Arrange a SIP for AtoM
- Add descriptive metadata
- Add PREMIS rights
- Normalize
- Transcribe SIP contents
- Store AIP
- Upload DIP
- Reingest AIP
- Clean up the ingest dashboard
Create a SIP
Process transfers as described in Transfers. If you selected “Create single SIP and continue processing” on the Transfer tab, your SIP has been created and Archivematica will begin running Ingest tasks. Click on the Ingest tab to continue working with your SIP.
The single SIP will move through a number of microservices. If you have preconfigured Archivematica to do so, processing will stop at a decision point that allows you to choose a file identification method to base normalization upon or to choose to use pre-existing data gathered during identification at the transfer stage. Archivematica default is to use pre-existing data. For more about this option, see Processing configuration.
Once the SIP reaches “Normalize”, you will be given several options for how Archivematica should normalize the SIP. Choose the option most suitable for your workflow.
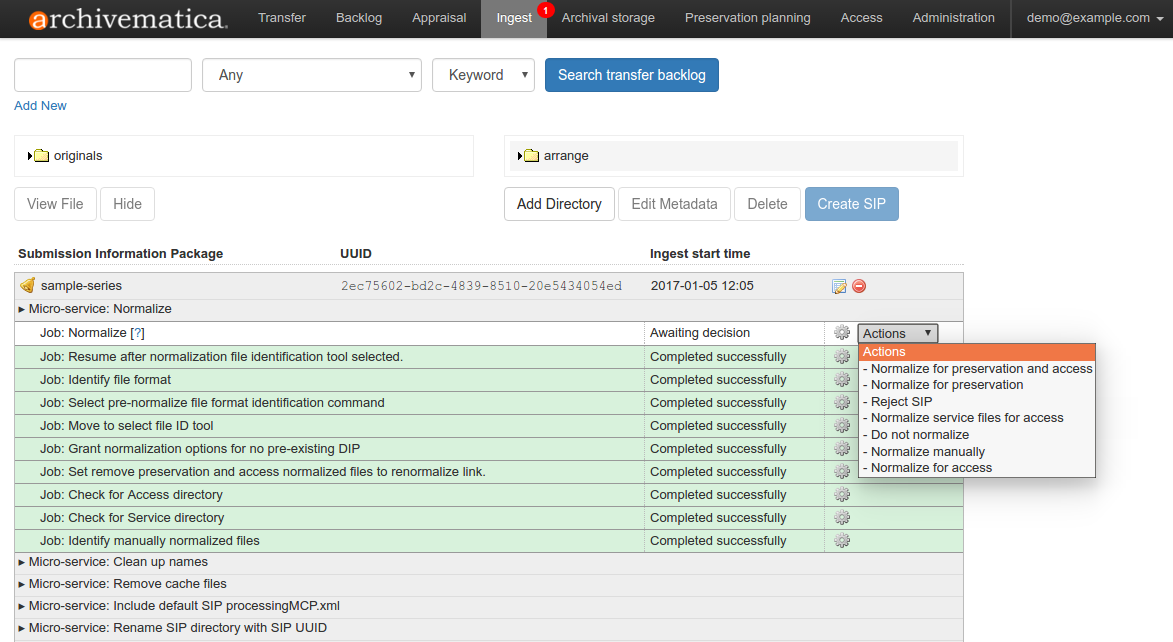
Normalization microservice
To add descriptive metadata, see Add metadata, below.
To add PREMIS rights information, see Add PREMIS rights, below.
For selecting a normalization option, see Normalization, below.
Arrange a SIP from backlog
This section refers to the backlog arrangement feature on the ingest page, rather than the Backlog tab. For more information on the Backlog tab, see Backlog.
Select content from the backlog by either searching for it through the backlog search bars at the top of the Ingest tab or by browsing the backlog by clicking on the folder icons in the Originals pane. Note: Multi-item select is not yet included in this feature, though entire folders/directories can be moved.
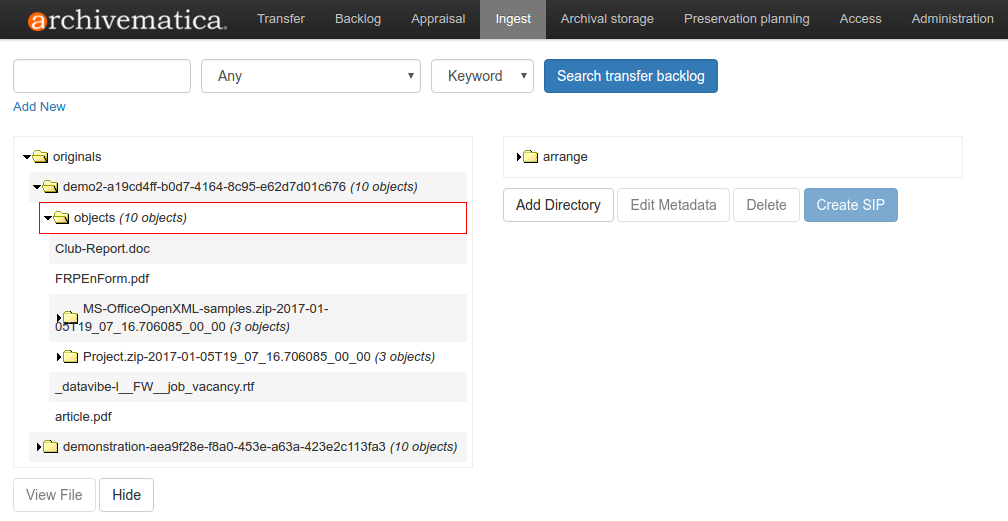
Transfer backlog search results in populating Originals pane
Archivematica will display the directories available in Transfer backlog, including the number of objects in each directory. To hide directories from the Originals pane, click on the directory and click Hide.
Drag and drop the transfer directory(ies) and/or object(s) you wish to arrange from the Originals pane to the Arrange pane. By dragging and dropping, you can create an arrangement structure for your SIP. Note that all metadata, submission documentation, and other associated data is also copied to the arrange pane with your object(s). A copy also remains with anything you leave in the Originals pane. These files are hidden because they cannot be arranged independently of the objects to which they relate.
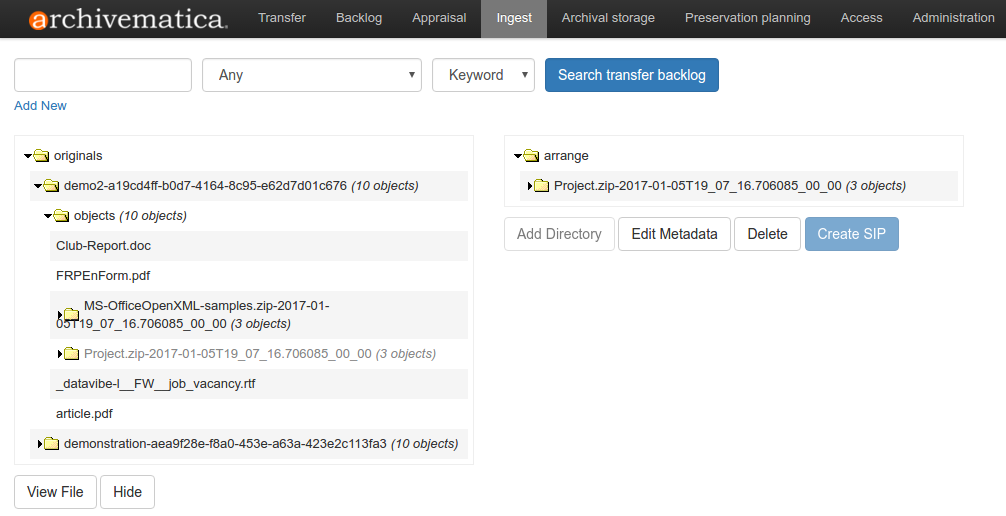
Drag and drop from Originals pane to Arrange pane
Note
In the above example, the Project.zip directory was dragged from the Originals pane to the Arrange pane. Note that the Project.zip directory in the Originals pane has been greyed out to indicate that the file has been added to a potential SIP.
Click on the directory in the Arrange pane to select, and then click Create SIP. Archivematica will confirm that you wish to create a SIP from the selected objects and then proceed through the ingest microservices.
To arrange your SIP, create one or more directories in the Arrange pane by clicking Add Directory. You can create directories nested inside of each other. Note: You cannot rename a directory once you have created it; you must delete it and create a directory with a new name.
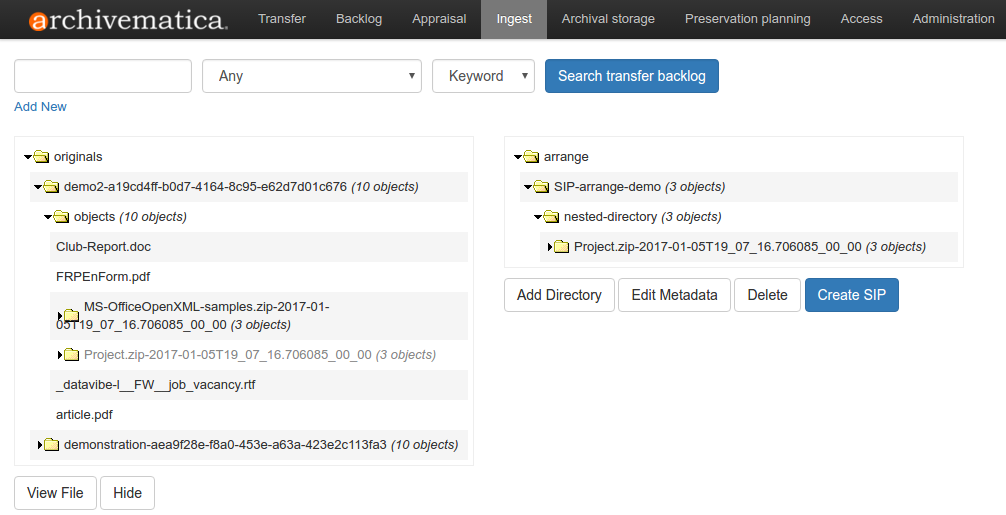
Create a new directory in Arrange pane
Click and drag files from the Originals pane into your desired directory in the arrange panel. You can move either individual files or entire directories. Note: all files must be in a directory inside of Arrange. “Arrange” cannot be used as the top directory.
When you have completed moving files and directories into the Arrange pane, select your desired top-level directory - this is the directory that will become your SIP. Click on Create SIP. Any files or directories which are not inside the directory you choose will remain in the Arrange pane until you create a SIP that includes these files and directories.
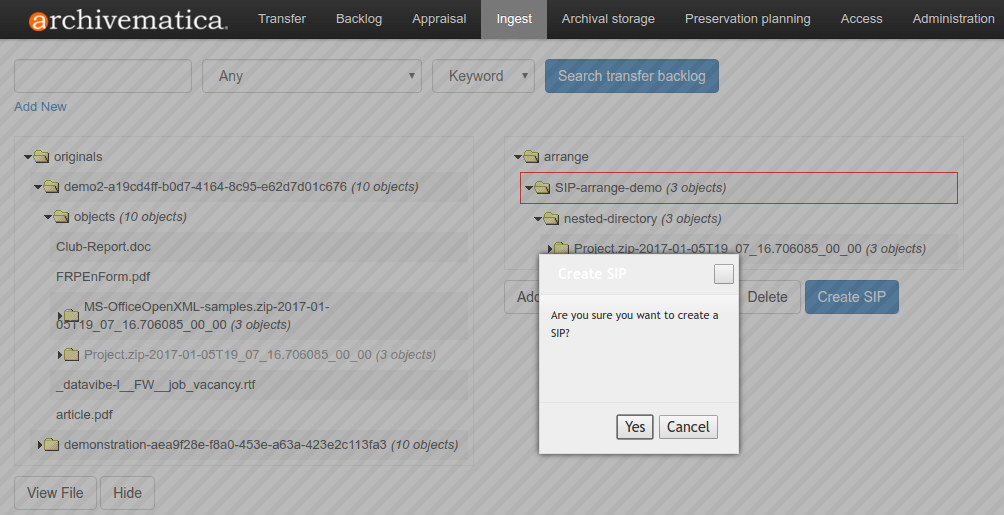
Create a new SIP by clicking on a directory within Arrange pane
Archivematica will confirm that you wish to create a SIP and, after receiving confirmation, will proceed to the Ingest microservices.
Arranging a SIP for AtoM
If you plan to create a DIP to Upload to AtoM, you may wish to add levels of description to your directories and/or objects. Archivematica will add a logical structMAP to the METS file, which AtoM will use to create information objects, applying the chosen levels of description. Note that if you do not apply a level of description to a digital object, AtoM will automatically assign it the level of “item”.
This functionality is supported with AtoM 2.2 and higher.
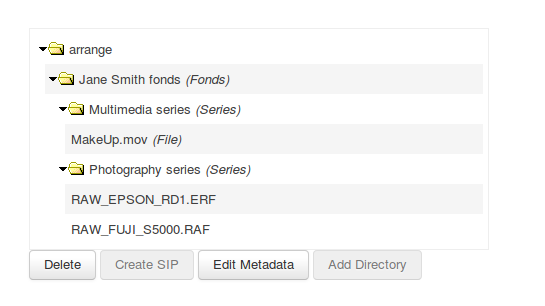
Select a directory or object in the Arrange pane. Click Edit metadata to choose the level of description.
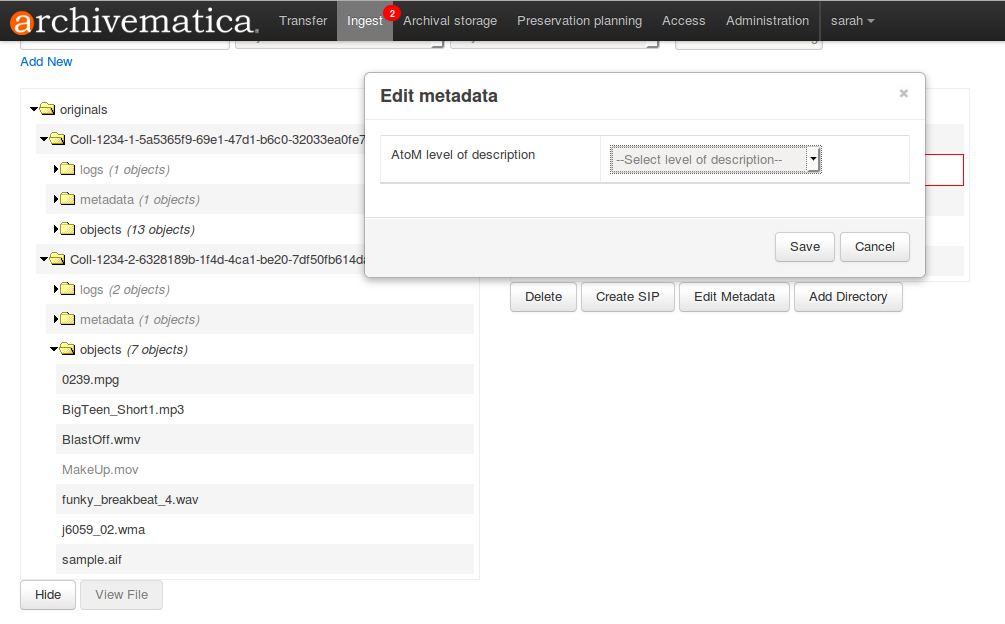
As you add levels of description they will be shown in the arrange pane for you to review before finalizing your SIP.
Note
To have the AtoM levels of description appear you must have entered your AtoM credentials in Administration. See Administer, AtoM DIP upload. Levels of description in AtoM are managed as a taxonomy. To edit, see Terms.
Tip
If you choose not to assign levels of description to directories in SIP arrange, AtoM will flatten the DIP so that all digital objects are child-level descriptions of the target description.
Add descriptive metadata
Archivematica can accept descriptive metadata about your digital objects. For information on including descriptive metadata prior to starting your transfer, see Transfers with descriptive and/or rights metadata. This section will describe how to add descriptive metadata to your materials once processing has begun in Archivematica.
Archivematica can be configured to prompt you with a reminder to add metadata by
setting the processing configuration field
Reminder: add metadata if desired to None. This reminder occurs at the
last moment that it is possible to add metadata; once the ingest proceeds past
this point, it is no longer possible to add metadata to the SIP.
There are two methods for adding metadata while materials are being processed: by entering it into a form or by uploading a CSV file.
If you are planning to pass descriptive metadata to AtoM, see AtoM Dublin Core for information about the Dublin Core elements available.
Adding metadata using the user interface form
This method is best for users who are creating transfer-level metadata at the time of processing, or who don’t wish to do the extra work to prepare a CSV to upload metadata to Archivematica. The metadata form implements the Dublin Core Metadata Element Set.
Note that this method only allows you to add descriptive metadata to the transfer as a whole. To add metadata on a per-item basis, you must import metadata using a CSV file and either include the CSV with your transfer before transfer or upload the CSV through the user interface.
Important
You must carry out the following steps before the microservice
Reminder: add metadata if desired is completed. After this point, any
metadata that is entered will not be properly attached to the SIP or entered
into the METS.
While on the Transfer or Ingest tab, click on the metadata template icon to the right of the transfer name.
To add metadata, click on the template icon
This will take you to the SIP detail page. Under the Metadata heading, click Add.
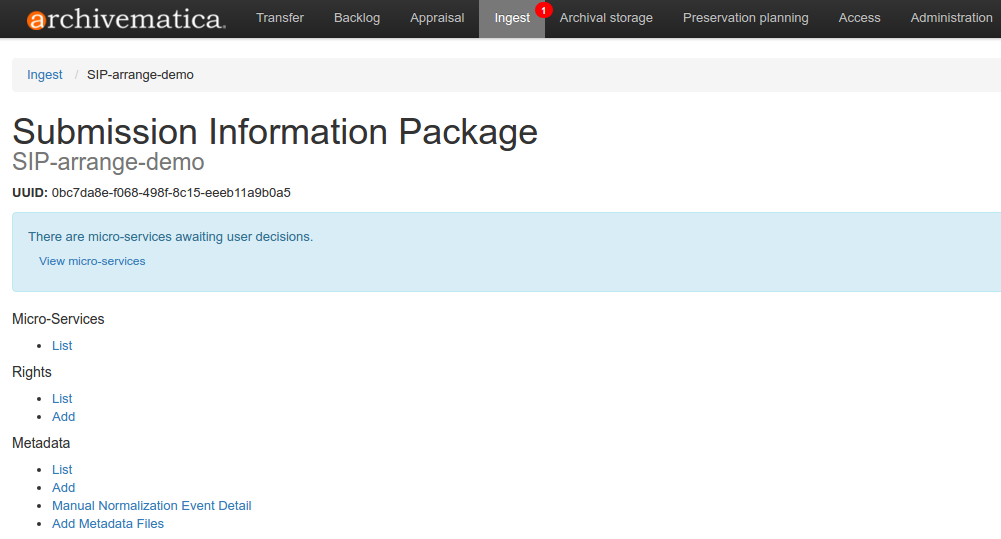
SIP information page
Add metadata as desired and save it by clicking Create at the bottom of the screen. Clicking and hovering over a field will show a tooltip that defines element and provide a link to the Dublin Core Metadata Element Set.
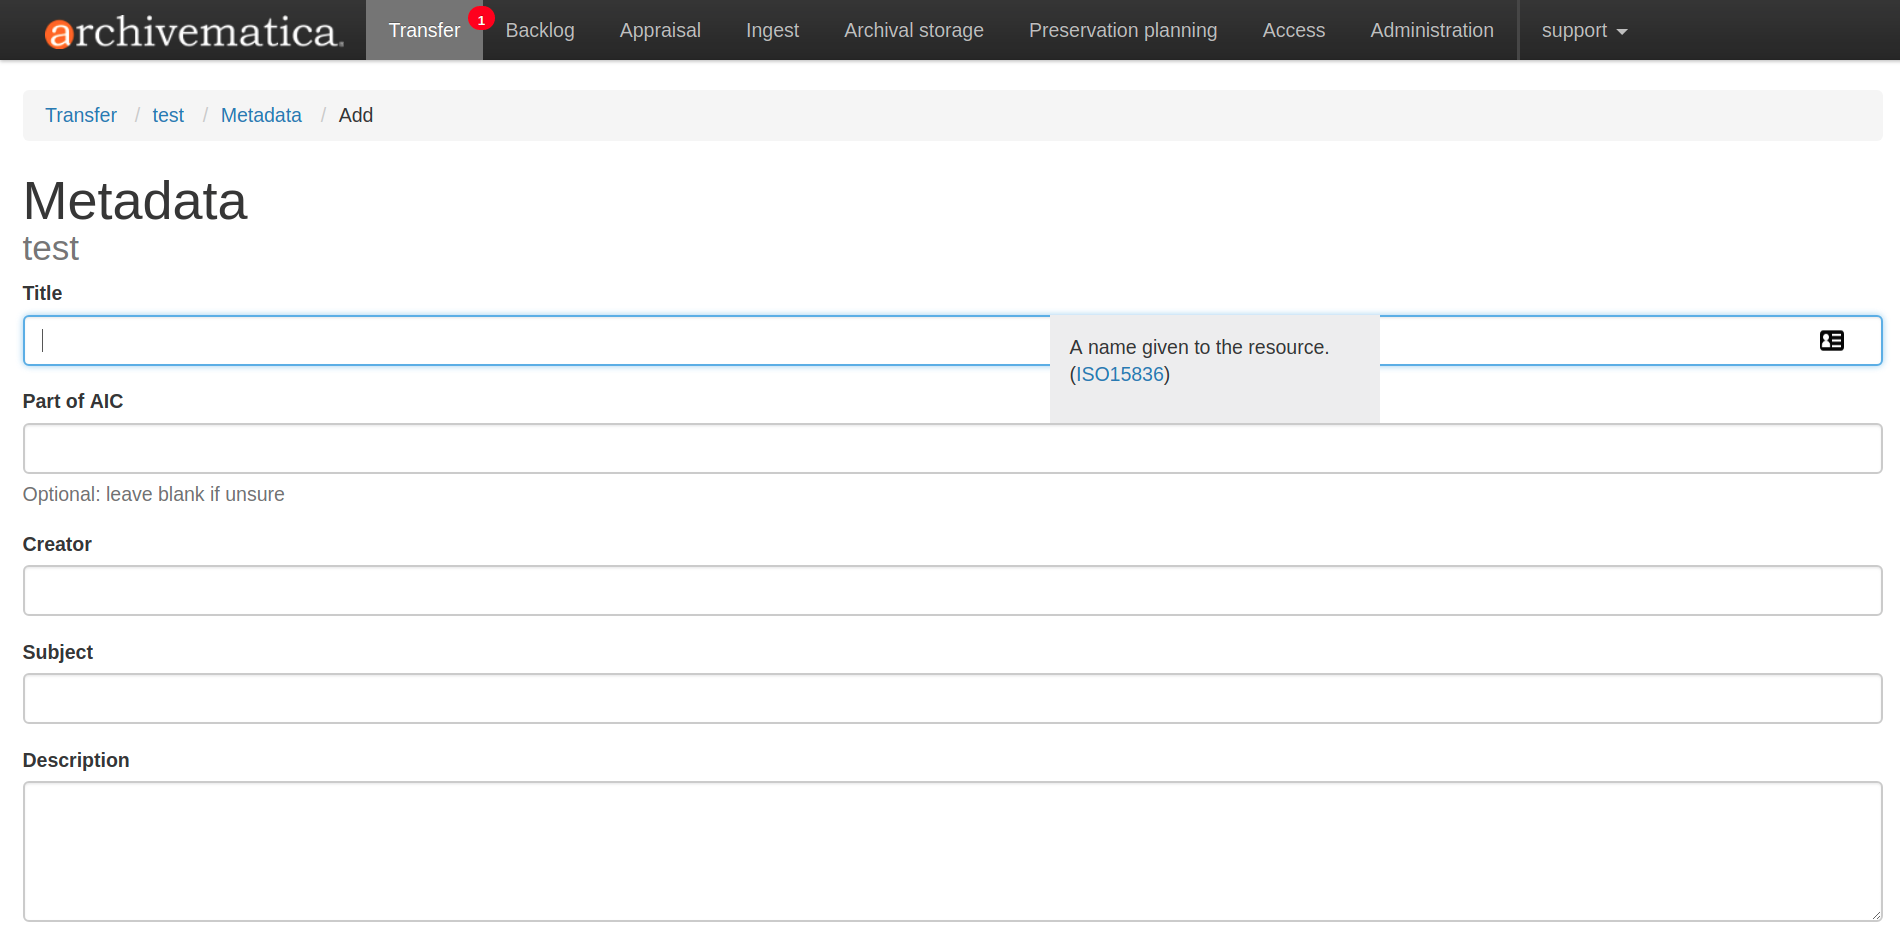
Metadata entry form
When you click Create, you will see the metadata entry in the list page. To edit it further, click Edit on the right-hand side. To delete it, click Delete. To add more descriptive metadata, click the Add button below the list.

SIP metadata list
Return to the Transfer or Ingest tab to continue processing the SIP.
Uploading metadata CSV files through the user interface
Descriptive metadata CSV files are ideal if you are creating hierarchical metadata, want to apply metadata to individual objects, or if you want to use metadata fields other than those available in the Dublin Core Metadata Element Set.
In order to upload a CSV file, it must be available in a transfer source location connected to Archivematica, the same way that digital objects are made available. For more information about transfer source locations, see Transfer source locations.
For more information about importing metadata into Archivematica, including how to structure metadata CSV files, see Import metadata.
Important
You must carry out the following steps before the microservice
Reminder: add metadata if desired. After this point, any metadata that is
entered will not be properly attached to the SIP or entered into the METS.
While on the Ingest tab, click on the metadata template icon to the right of the transfer name.
To add metadata, click on the template icon
This will take you to the SIP detail page. Under the Metadata heading, click Add metadata files.
SIP information page
Select a transfer source location and click Browse. Navigate through the folders to find your CSV file. Once you have located the CSV file, click Add to the right of the file name. Repeat as needed.
Once you’ve added all of your files, click Add files. A spinning wheel will indicate that the file is being uploaded. Once it disappears, return to the Ingest tab to continue processing the SIP.
Add PREMIS rights
Archivematica can accept PREMIS rights metadata about your digital objects and parse this information into the METS file. For information on including rights metadata prior to starting your transfer, see Transfers with descriptive and/or rights metadata. This section will describe how to add rights metadata to your materials once processing has begun in Archivematica.
Archivematica can be configured to prompt you with a reminder to add metadata by
setting the processing configuration field
Reminder: add metadata if desired to None. This reminder occurs at the
last moment that it is possible to add metadata; once the ingest proceeds past
this point, it is no longer possible to add metadata to the SIP.
Note
The rights form consists of two pages: one for the rights basis, and another for acts. For more information about Archivematica’s PREMIS rights implementation, see PREMIS template.
While on the Transfer or Ingest tab, click on the metadata template icon to the right of the transfer name.
To add rights, click on the template icon.
This will take you to the SIP detail panel. On the left-hand side, under Rights, click Add.
SIP detail panel
Add the rights basis information and save the data by clicking the Save button at the bottom of the screen, or click Next if you are finished and ready to move on to the second page of data entry.
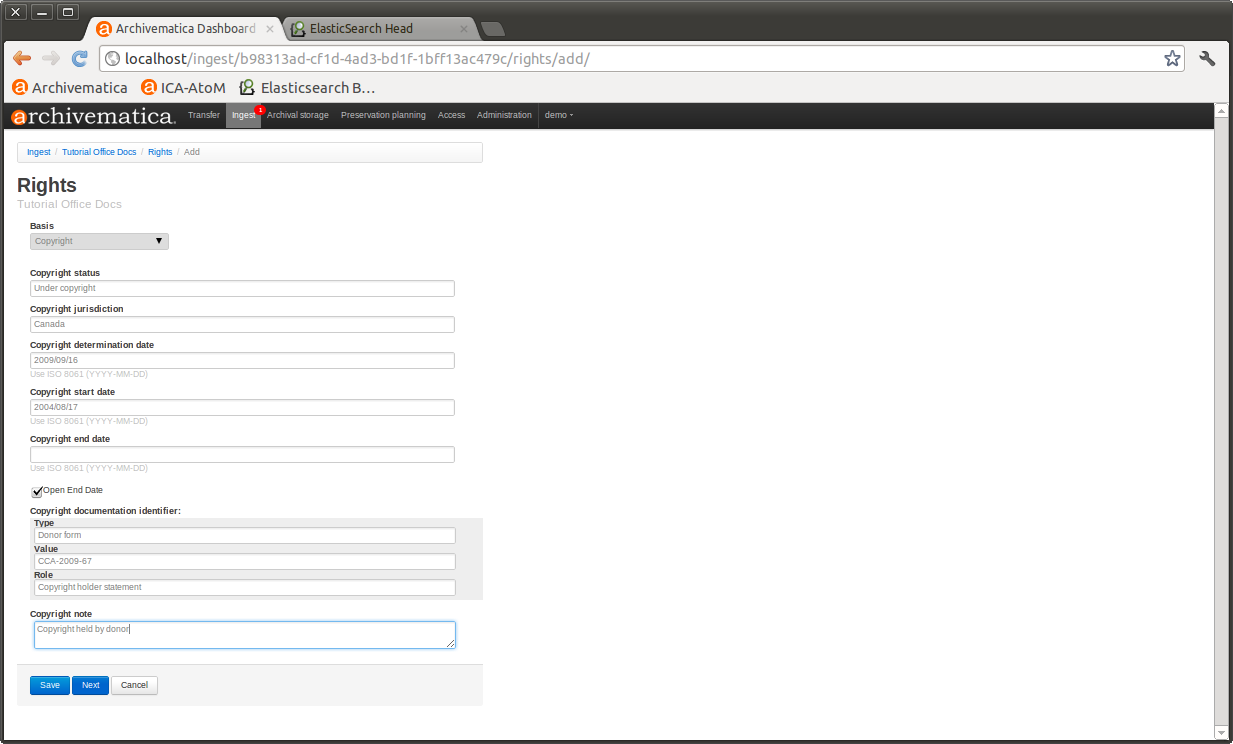
SIP rights template- first page
Enter act information and the associated grants/restrictions and save the data by clicking Save.
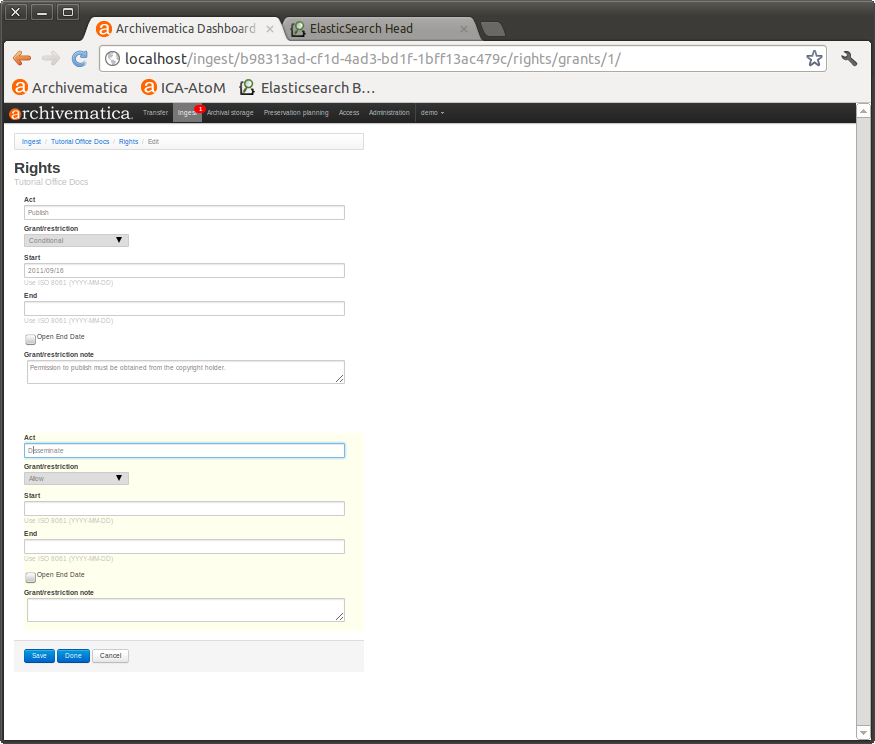
SIP rights template- second page
When you click Save on the acts page, you will be given the option to add another act and further grants/restrictions.
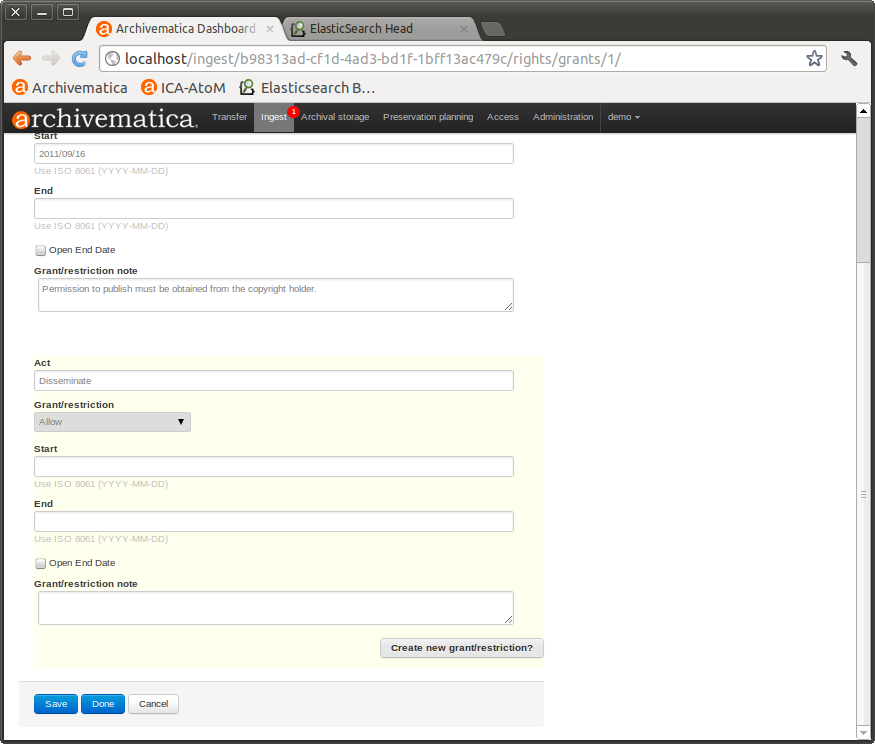
Repeatable acts in rights template
Once you have finished adding acts, click Done. You will see the rights entry in the list page. You can add more rights by clicking Add again, or edit or delete existing rights from this page.
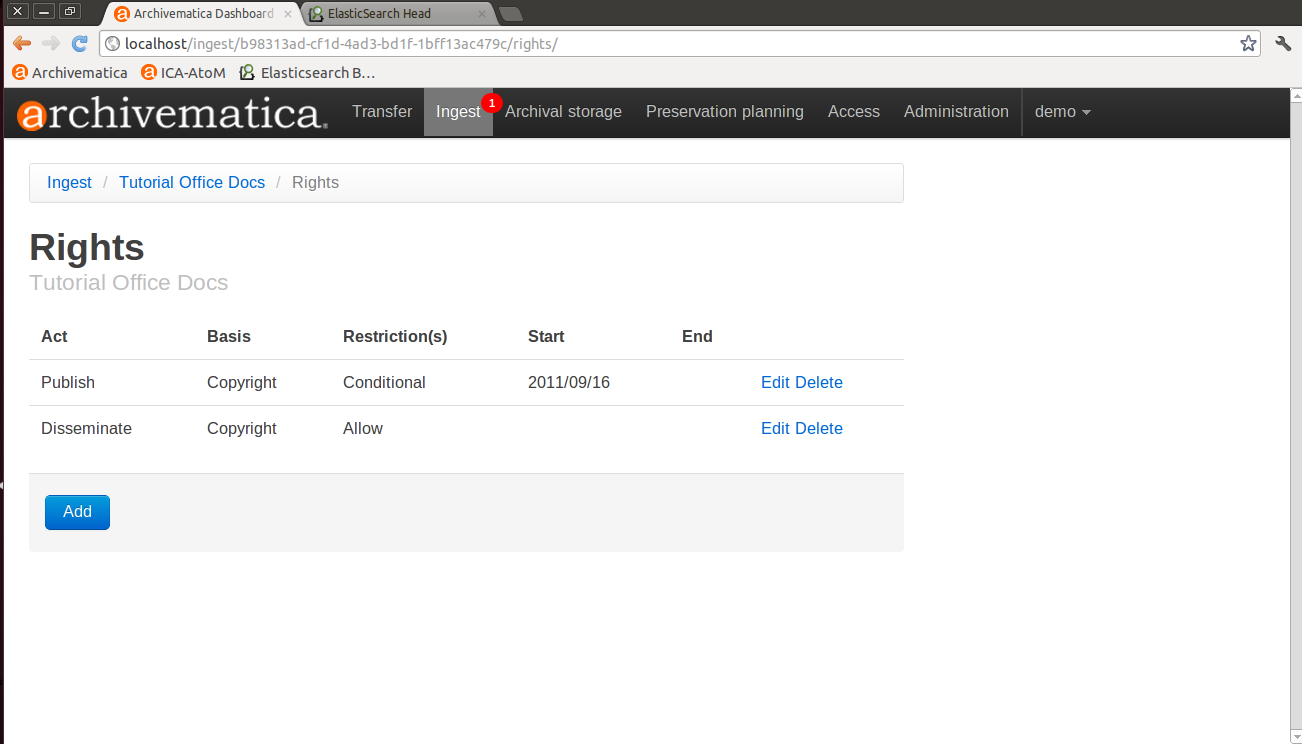
SIP detail panel with rights
- Return to the Transfer or Ingest tab to continue processing the SIP.
Normalize
Normalization is the process of converting an ingested digital object to a preferred preservation and/or access format.
Note that the original objects are always kept along with their normalized versions. For more information about Archivematica’s preservation strategy, go to the Preservation Planning section of the manual.
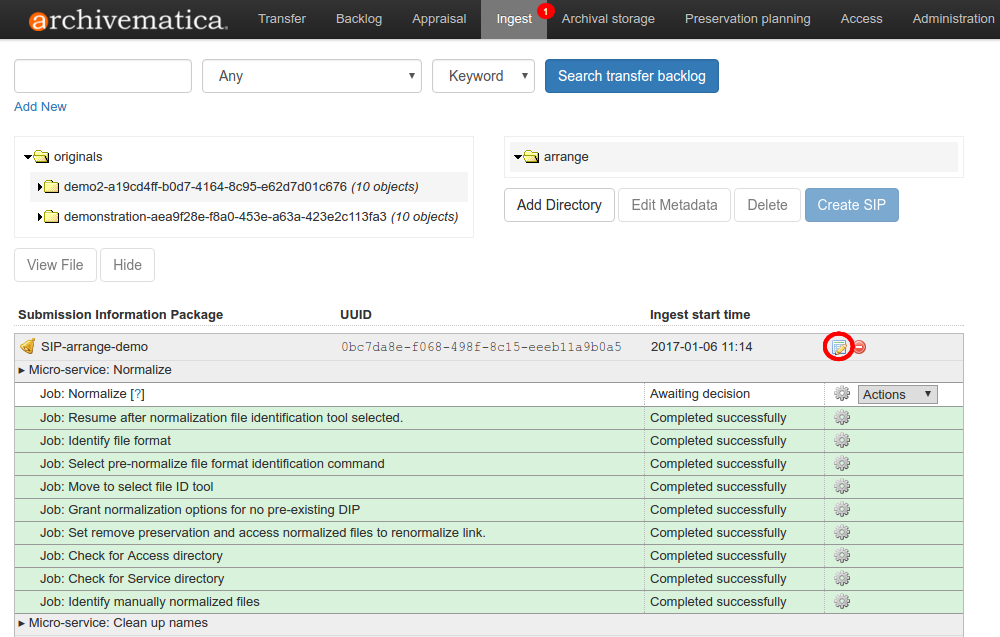
- At the normalization microservice, the SIP will appear in the dashboard with a bell icon next to it. Select one of the normalization options from the Actions drop-down menu:
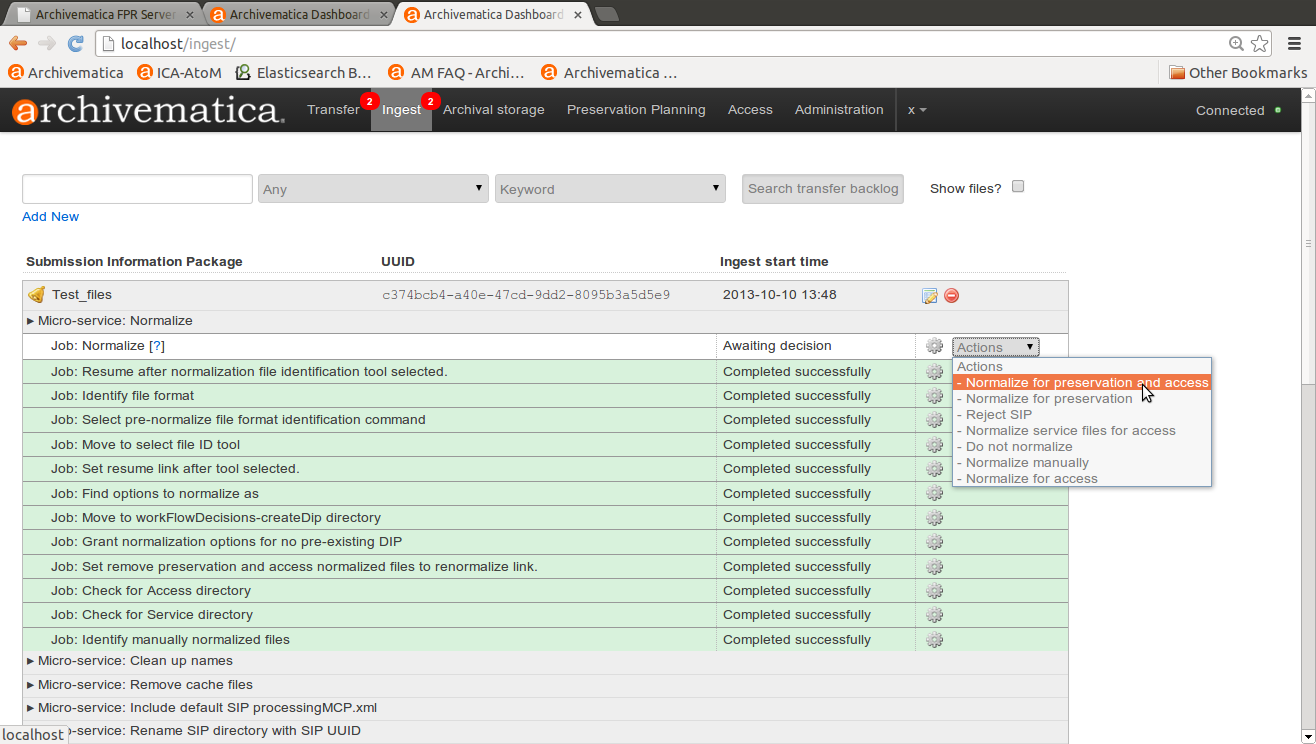
Selecting a normalization option
- None - the user is prompted for a decision.
- Normalize for preservation and access - creates preservation copies of the objects plus access copies which will be used to generate the DIP.
- Normalize for preservation - creates preservation copies only. No access copies are created and no DIP will be generated.
- Normalize manually - see Manual Normalization for more information.
- Do not normalize - the AIP will contain originals only. No preservation or access copies are generated and no DIP will be generated.
- Normalize service files preservation - see see Transferring material with service (mezzanine) files for more information.
- Normalize for access - the AIP will contain originals only. No preservation copies will be generated. Access copies will be created which will be used to generate the DIP.
Note that depending on the setup of your transfer, you may not see all of the options listed above.
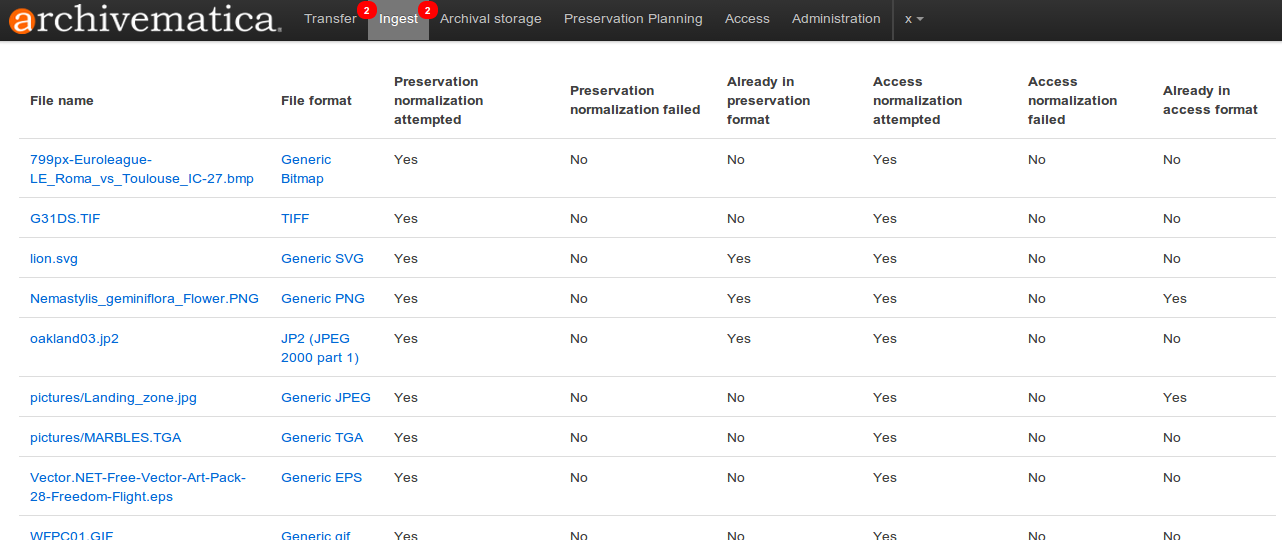
- Once normalization is completed you can review the results in the normalization report. Click on the report icon next to the Actions drop-down menu.
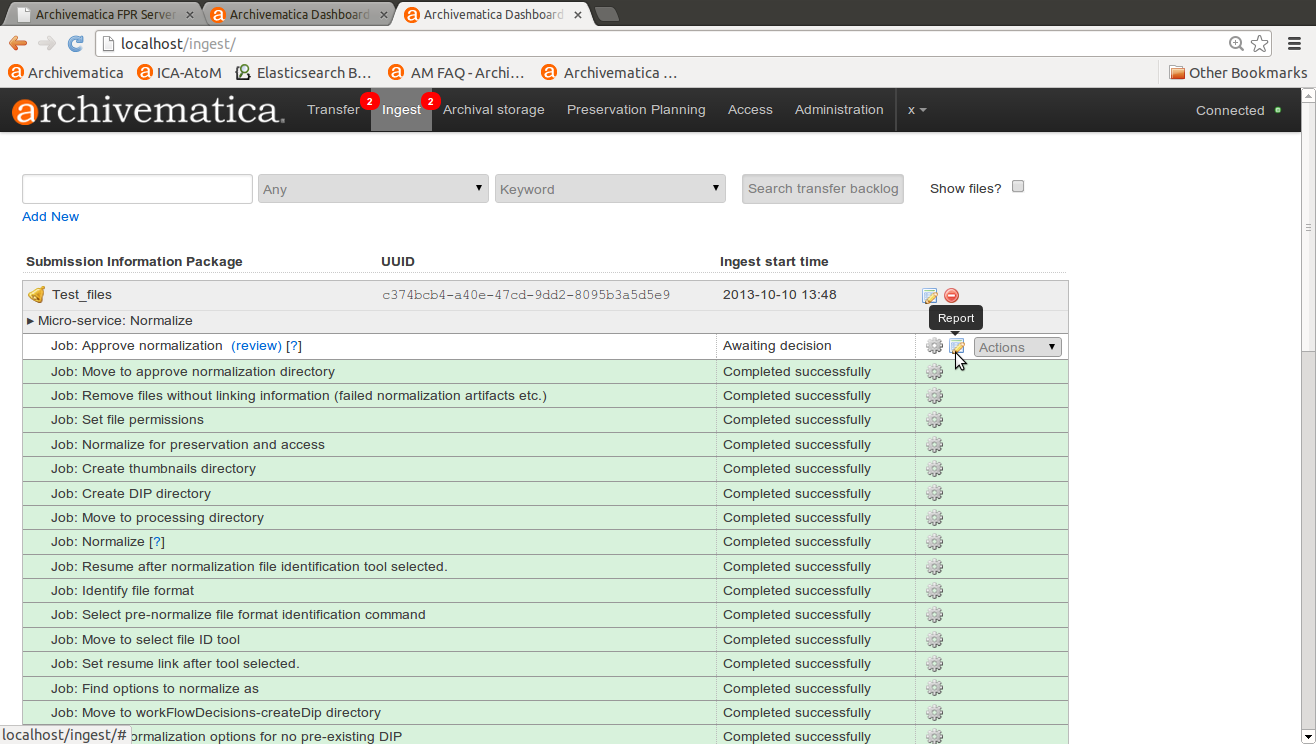
Click on the report icon to open the normalization report
The report shows what has been normalized and what is already in an acceptable preservation and access format.
- You may review the normalization results in a new tab by clicking on Review. If your browser has plug-ins to view a file, you may open it in another tab by clicking on it. If you click on a file and your browser cannot open it, it will download locally so you can view it using the appropriate software on your machine.
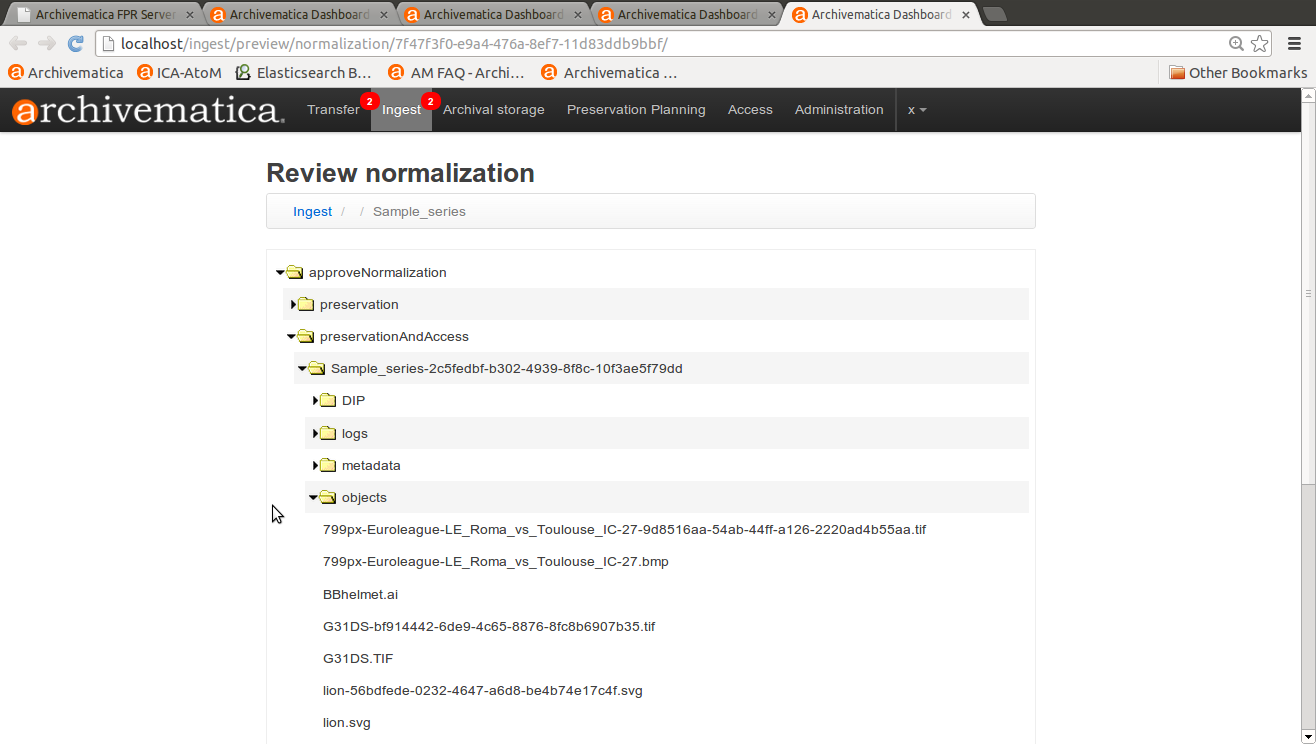
Review normalization results in new tab
- Approve normalization in the Actions drop-down menu to continue processing the SIP. You may also Reject the SIP or re-do normalization. If you see errors in normalization, follow the instructions in Error handling to learn more about the problem.
See also
Transcribe SIP contents
Archivematica gives users the option to Transcribe SIP contents using Tesseract OCR tool. If Yes is selected by the user during this microservice, an OCR file will be included in the DIP and stored in the AIP.
Note
This feature is designed to transcribe the text from single images (e.g. individual pages of a book scanned as image files). It does not support transcription of multi-page objects or word processing files, PDF files, etc.
Store AIP
- After normalization is approved, the SIP runs through a number of microservices, including processing of the submission documentation, generation of the METS file, indexing, generation of the DIP and packaging of the AIP.
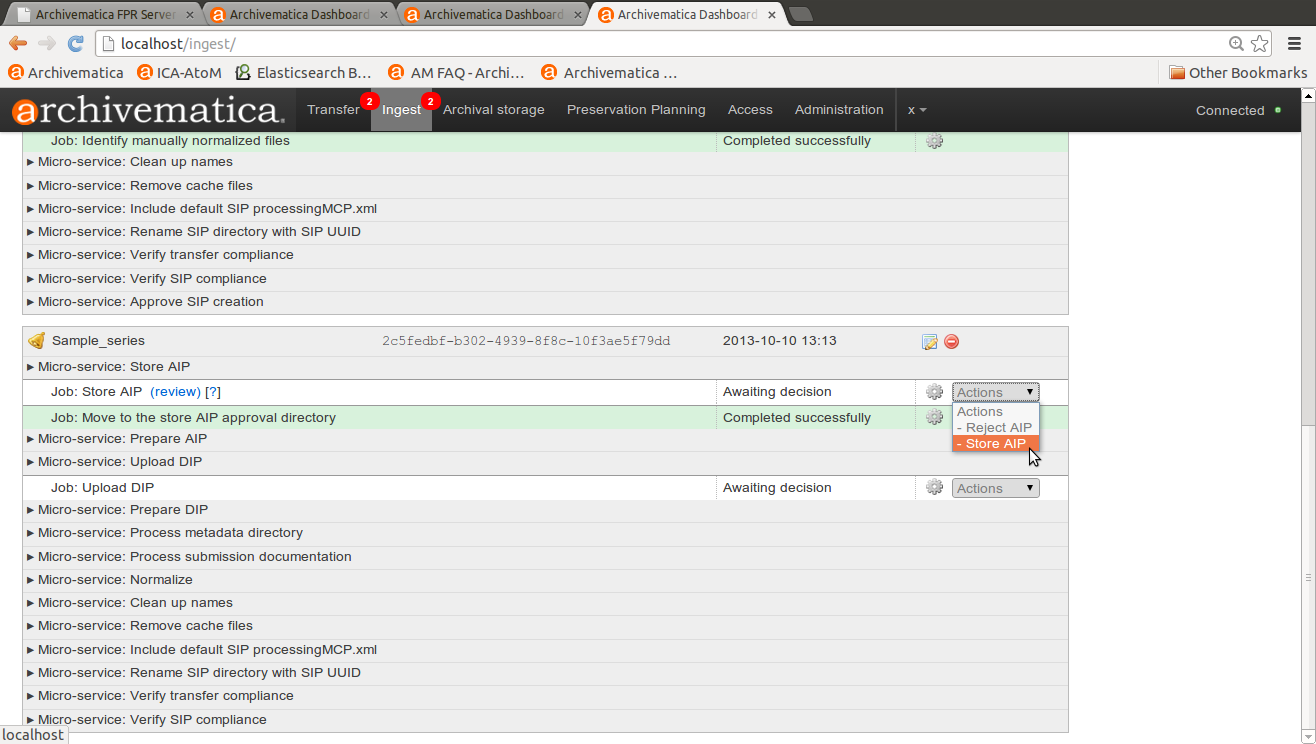
Archivematica ready to store the AIP and upload the DIP
If desired, review the contents of the AIP in another tab by clicking on Review. You can download the AIP at this stage by clicking on it. You can also view and validate the METS file by clicking on the temporary file that ends in “validatorTester.html”. Click on this file will open the METS XML in a new window and allow you to validate the document against the METS specification.
More information on Archivematica’s AIP structure and the METS/PREMIS file is available in the Archivematica documentation: see AIP structure.
From the Action dropdown menu, select “Store AIP” to move the AIP into archival storage. You can store an AIP in any number of preconfigured directories. For instructions to configure AIP storage locations, see Administrator manual - Storage Service.
From the Action dropdown menu, select the AIP storage location from the pre-configured set of options.
Note
We recommend storing the AIP before uploading the DIP. If there is a problem with the AIP at this point and the DIP has already been uploaded, you will have to delete the DIP from the upload location.
For information on viewing and managing stored AIPs go to Archival storage.
Upload DIP
Archivematica supports DIP uploads to AtoM, ArchivesSpace, CONTENTdm and Archivists’ Toolkit. For information about uploading DIPs to your access system, see Access.
Re-ingest AIP
There are three different types of AIP re-ingest:
1. Metadata only
This method is for adding or updating descriptive and/or rights metadata. Doing so will update the dmdSec of the AIP’s METS file. Note that the original metadata will still be present but if you scroll down you’ll also see another dmdSec that says STATUS=”updated”, like so:
<mets:dmdSec ID="dmdSec_792149" CREATED="2017-10-17T20:32:36"
STATUS="updated">
Choosing metadata only AIP re-ingest will take you back to the Ingest tab.
2. Partial re-ingest
This method is typically used by institutions who want to create a DIP sometime after they’ve made an AIP. They can then send their DIP to their access system or store it.
Choosing partial re-ingest will take you back to the Ingest tab.
3. Full re-ingest
This method is for institutions who want to be able to run all the major microservices (including re-normalization for preservation if desired). A possible use case for full re-ingest might be that after a time new file characterization or validation tools have been developed and integrated with a future version of Archivematica. Running the microservices with these updated tools will result in a updated and better AIP.
Full re-ingest can also be used to update the metadata, and re-normalize for access.
When performing full re-ingest, you will need to enter the name of the processing configuration you wish to use. To add new processing configurations, see Processing configuration.
Important
The following workflows are not supported in full AIP re-ingest:
- Examine contents if not performed on first ingest
- Transfer structure report if not performed on first ingest
- Extract packages in the AIP and then delete them
- Send AIP to backlog for re-arrangement during re-ingest
Choosing full re-ingest will take you back to the Transfer tab.
How to tell in the METS file if an AIP has been re-ingested
1. Look at the Header of the METS file, which will display a CREATEDATE and
a LASTMODDATE: <mets:metsHdr CREATEDATE="2017-10-17T20:29:21"
LASTMODDATE="2017-10-17T20:32:36"/>
2. You can also search for the reingest premis:event
<premis:eventType>reingestion</premis:eventType>
3. If you’ve updated the descriptive or rights metadata you will find an updated
dmdSec: <mets:dmdSec ID="dmdSec_792149" CREATED="2017-10-17T20:32:36"
STATUS="updated">
Where to start the re-ingest process
You can start the re-ingest process through the Archival Storage tab on the Dashboard, the Storage Service, or the API.
Archival Storage tab on the Dashboard
Go to the Archival Storage tab and find the AIP you wish to re-ingest by searching or browsing.
1. Click on the name of the AIP or View to open that AIP’s view page. Under Actions, click on Re-ingest.
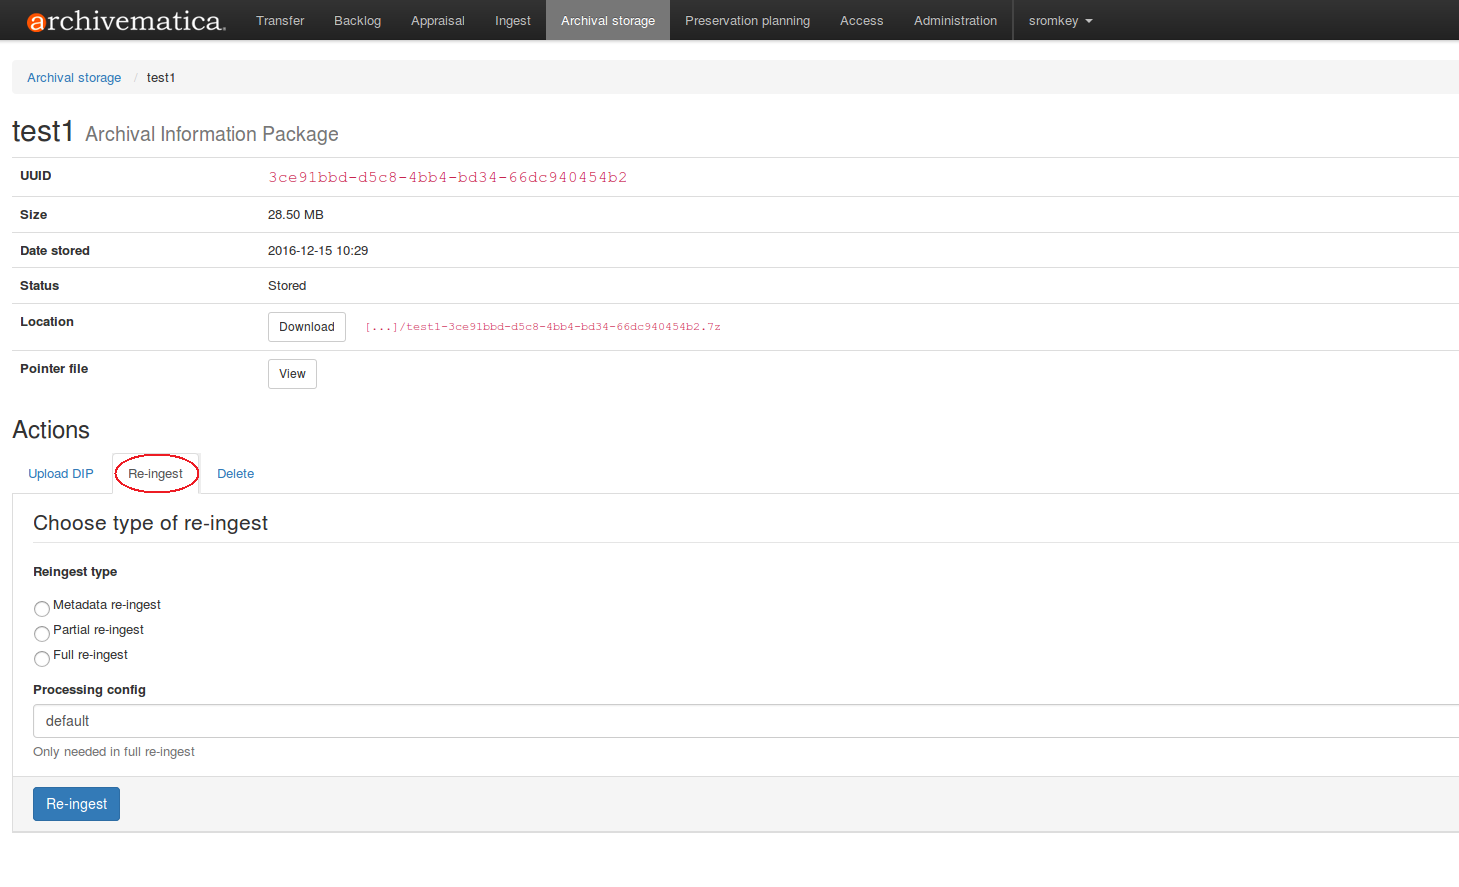
- Choose the type of re-ingest (metadata, partial or full).
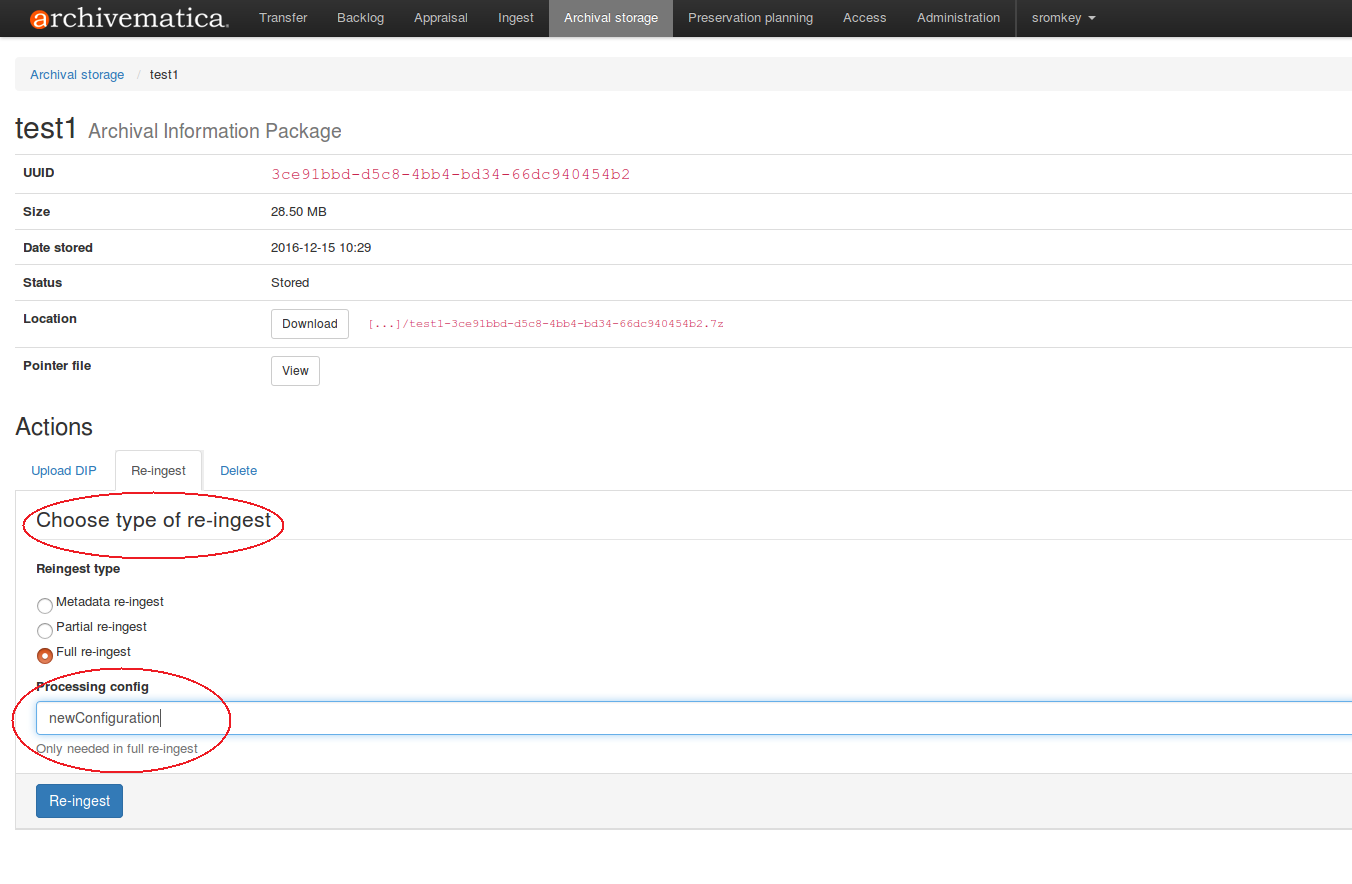
- Click on Re-ingest. Archivematica will tell you that the AIP has been sent to the pipeline for re-ingest.
Note
If you attempt to re-ingest an AIP which is already in the process of being re-ingested in the pipeline, Archivematica will alert you with an error.
Note
Archivematica will appear to allow you to extract and then delete packages. However, the resulting AIP will still actually contain the packages, and in the METS file they will not have re-ingestion events correctly associated with them. This is documented as a bug here: https://projects.artefactual.com/issues/10699
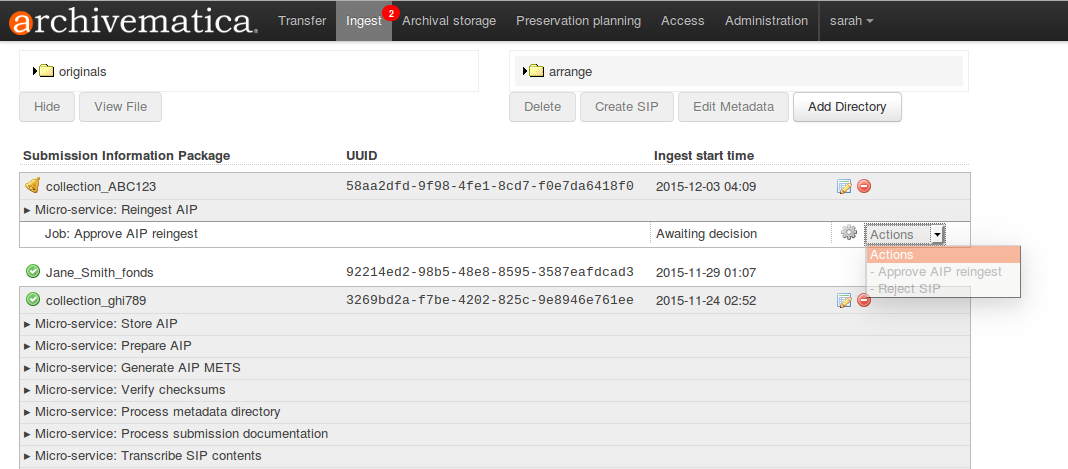
- Proceed to the Transfer or Ingest tab and approve the AIP re-ingest.
At the Normalization microservice you will make different choices depending on the type of AIP re-ingest you’ve selected.
Metadata-only re-ingest
- Add or update your metadata before you approve Normalization to ensure
the metadata is written to the database, which means it will be written to
the AIP METS file. There are two ways to add or update metadata:
- Add metadata directly into Archivematica
- Click on the paper and pencil icon on the same line as the name of the SIP to take you to the “Add metadata” page.
- Click “Add” under “Rights” if you have rights-related metadata to add.
- Click on “Add” under “Metadata” if you have descriptive metadata to add.
- Enter your metadata.
- Click on “Ingest” (top left corner) to go back to the Ingest tab when you’re done.
- Add metadata files
- Click on the metadata report icon on the same line as the name of the SIP to take you to the “Add metadata” page.
- Click on “Add metadata files” under “Metadata”
- Click on “Browse”
- Select a
metadata.csvfile. Note name of the file must be exactlymetadata.csvand the file must follow the structure outlined in Import metadata. The file must also be staged in the same Transfer Source location that you stage your objects for transfer to Archivematica.
- Add metadata directly into Archivematica
- Select “Do not normalize” when you have finished adding your metadata.
- Continue processing the SIP as normal.
- Add or update your metadata before you approve Normalization to ensure
the metadata is written to the database, which means it will be written to
the AIP METS file. There are two ways to add or update metadata:
Note
When performing a metadata-only re-ingest, there will be no objects in your AIP in the review stage- Archivematica replaces the METS file in the existing AIP upon storage.
Partial re-ingest
- Add metadata if desired. See Metadata-only re-ingest for instructions
- Select “Normalize for access”.
- Continue processing the SIP as normal.
Full re-ingest
- Add metadata if desired. See Metadata-only re-ingest for instructions.
- Select the normalization path of your choosing.
- Continue processing the SIP as normal.
Important
All normalization options will appear as for any SIP being normalized, but when performing metadata only or partial re-ingest, only the normalization paths noted above are supported.
Tip
You can add or update the metadata either before or after Normalization, but to ensure the metadata is written to the database before the AIP METS is prepared, it is recommended practice to add the metadata before Normalization, or set the metadata reminder to unchecked in Processing Configuration.
Storage Service
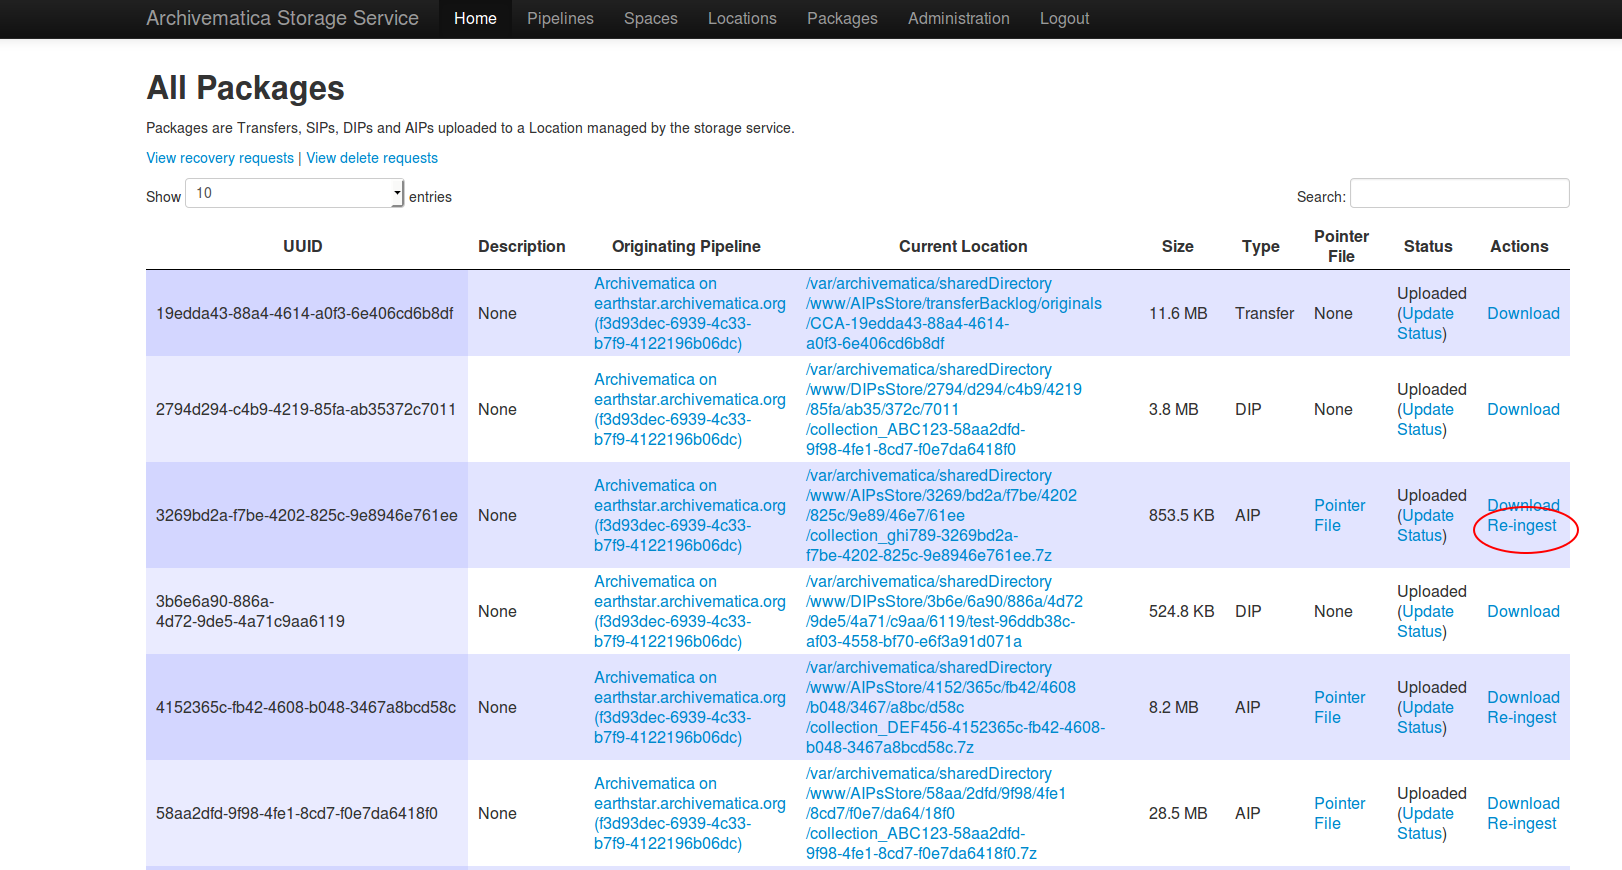
- From the Packages tab in the Storage Service, click on Re-ingest beside the AIP you wish to reingest.
- The Storage Service will ask you to choose a pipeline, the types of reingest (see above for thorough descriptions of each), and for full re-ingest, the name of the processing configuration.
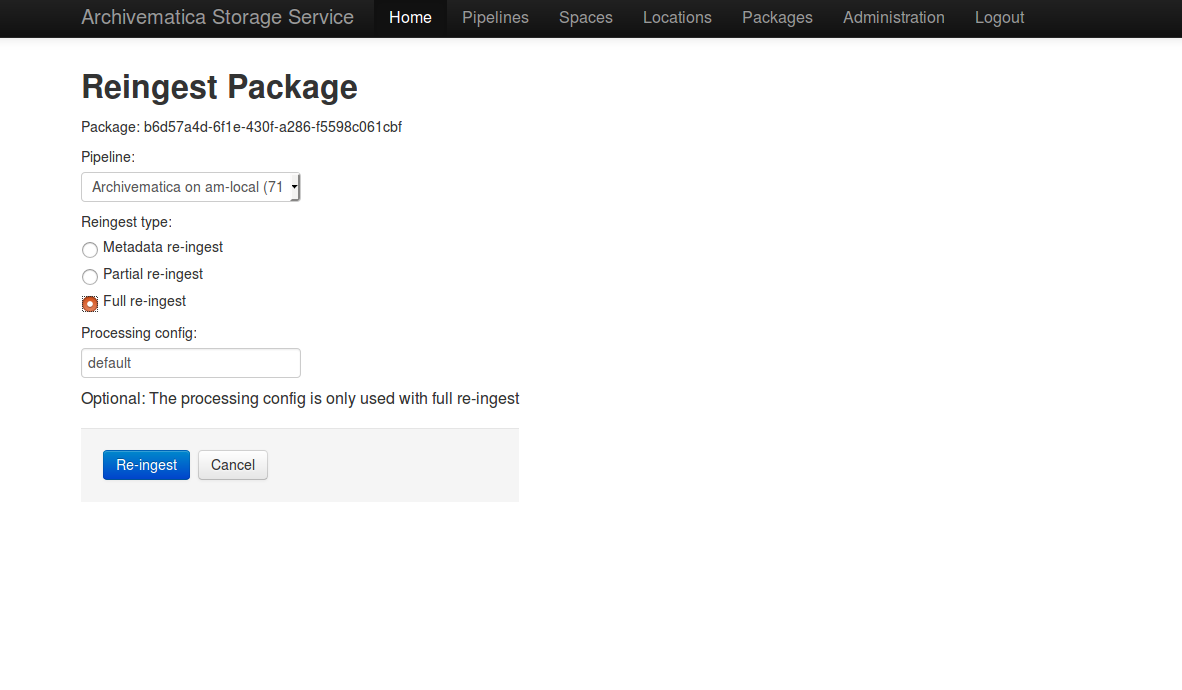
- The Storage Service will confirm that the AIP has been sent to the pipeline for reingest. Proceed to the Transfer or Ingest tab of your pipeline, and follow steps 3-6 above.
API
Documentation to come.
Clean up the ingest dashboard
The dashboard in the Ingest tab should be cleaned up from time to time. As the list of SIPs grows, it takes Archivematica longer and longer to parse this information which can create browser timeout issues.
Note
This does not delete the SIP or related entities. It merely removes them from the dashboard.
Remove a single ingest
- Ensure that the SIP you want to remove doesn’t require any user input. You must complete all user inputs and either complete the SIP (i.e. AIPs/DIPs are created and stored/uploaded) or reject the SIP before it can be removed from the dashboard.
- When you are ready to remove a SIP from the dashboard, click the red circle icon found next to the add metadata icon, to the right of the SIP name.
- Click the Confirm button to remove the SIP from the dashboard.
Remove all completed ingests
- Ensure that the SIPs you want to remove are complete (i.e. AIPs/DIPs are created and stored/uploaded). Note that this feature only works on completed SIPs; rejected SIPs will have to be removed one at a time.
- When you are ready to remove all completed SIPs, click the red circle icon in the table header of the list of SIPs.
- Click the Confirm button to remove all completed SIPs from the dashboard.
Archivematica 1.8.1
Contents
Search
Open the general index or type your search in the search box.
Available projects
Archivematica
- Version 1.18.0 (stable-current)
- Version 1.17.1 (stable-previous)
- Version 1.16.0 (legacy)
- Version 1.15.1 (legacy)
- Version 1.14.1 (legacy)
- Version 1.13.2 (legacy)
- Version 1.12.2 (legacy)
- Version 1.11.2 (legacy)
- Version 1.10.2 (legacy)
- Version 1.9.3 (legacy)
- Version 1.8.1 (legacy)
- Version 1.7.2 (legacy)
- Version 1.6.1 (legacy)
- Version 1.5 (legacy)
- Version 1.4 (legacy)
Archivematica Storage Service
- Version 0.24.0 (stable-current)
- Version 0.23.0 (stable-previous)
- Version 0.22.0 (legacy)
- Version 0.21.1 (legacy)
- Version 0.20.1 (legacy)
- Version 0.19.0 (legacy)
- Version 0.18.1 (legacy)
- Version 0.17.1 (legacy)
- Version 0.16.1 (legacy)
- Version 0.15.1 (legacy)
- Version 0.14.1 (legacy)
- Version 0.13.0 (legacy)
- Version 0.12.0 (legacy)
- Version 0.11.1 (legacy)
- Version 0.10 (legacy)
- Version 0.9 (legacy)
- Version 0.8 (legacy)
License
Archivematica documentation by Artefactual Systems Inc. is licensed under a Creative Commons Attribution-ShareAlike 4.0 International License.
