Manual normalization
Some users may have access to tools other than those provided in Archivematica that they wish to use for normalization actions.
There are two manual normalization workflow options. First, the user can do some normalization before bringing any objects into Archivematica. Second, the user can process objects through to Ingest and then choose to do manual normalization on some of the objects. Below are the workflow steps to test each of these options.
In either option, it is also possible to add PREMIS event detail metadata about the manual normalization event. See below for details.
Option 1: Manual normalization prior to transfer to Archivematica
The manual normalization feature allows the user to prepare transfers that already contain manually normalized files. The user adds a /manualNormalization folder and its subdirectories to the transfer prior to processing. Archivematica recognizes that this folder already exists and will not add one during processing. This workflow requires that there must be a one-to-one relationship between the transfer and the SIP.
- First, create your transfers with a structure that mimics the one in this sample. Name the /topDirectory whatever you want (you can still change this when you upload the transfer to the dashboard) and place the original files in it. /manualNormalization contains two directories, /access and /preservation which include in them the files you’ve already normalized for access and/or preservation prior to transfer. In the sample shown here, file1.tga has a manually normalized preservation version (file1.tif) and a manually normalized access version (file1.jpg). Note that the filenames, in this instance “file1”, MUST match in order for Archivematica to recognize the links between the original .tga file and the manually normalized preservation and access versions.
/topDirectory

    /manualNormalization

        /access

            file1.jpg

        /preservation

            file1.tif

file1.tga
file2.doc
file3.docx
- Upload the transfer to the dashboard from your source directories in the Transfer Tab.For instructions detailing how to set up source directories, see the Administrator’s manual here: Administrator manual - Transfer source location.
- Continue processing as you would a regular SIP. For instructions, see the Transfer and Ingest.
- In the Ingest tab, at the normalization microservice, choose whether to normalize for access, preservation, or both. If you choose to review normalization results prior to accepting, you will find your /manualNormalization folder and its contents in the objects directory of your transfer, with its /access and/or /preservation folders and their content intact. If you’re happy with the results here, approve normalization.
- Continue processing according to instructions in the User manual. Stop when you reach the Store AIP microservice.
- At Store AIP, you have the option to review your AIP. If you download the AIP from the review tab by simply clicking on the file with the 7z extension, you can download, unzip and view your AIP in your file browser. Your AIP will consist of a top level folder with the name you assigned plus a UUID. In that folder, you’ll find a /data folder which contains your objects for preservation, logs, thumbnails and the METS xml. That data folder will contain your originals and normalized files, and the METS will include PREMIS events with “manual normalization” noted in the eventDetail of the appropriate normalization events. A discussion of the overall AIP structure can be found here: AIP structure. Additionally, you might note that the manualNormalization folder and subfolders used during the manual normalization workflow have been deleted once normalization was approved rather than being packaged into the AIP.
- If you are satisfied with everything here, continue to store your AIP and/or upload your DIP as per usual.
Option 2: Manual normalization during Ingest
This second workflow allows users to carry out manual normalization at the normalization microservice in the Ingest tab of the dashboard instead of at the Transfer tab. The process is similar to Option 1 above but the user has to exit Archivematica, use external normalization tools, place the objects in the same directory structure as in Option 1 before returning to Archivematica and proceeding with the rest of the microservices. The user does not have to manually normalize all of the objects for preservation and/or access; any files not manually normalized will be normalized according to the regular Archivematica workflow.
- Start with any regular transfer in the Transfer tab of the dashboard. Follow the instructions in the user manual until you get to the normalization microservice in the Ingest tab.
- Select “Normalize manually” from the dropdown menu.
- In your SFTP file browser or in the command line interface, go to your
pipeline’s Processing Location, and find the approveNormalization watched
folder. The default location is at
/var/archivematica/sharedDirectory/watchedDirectories/approveNormalization/preservation/yourTransfer123abc/objects/. You may need to look at your storage service configuration to confirm the Processing Location defined for your pipeline. - Choose which files you’d like to normalize for preservation and/or access.
- Normalize locally using your preferred tools.
- Once normalization is completed, place your preservation and/or access copies in a directory structured exactly like so:
/topDirectory

    /manualNormalization

        /access

            file1.jpg

        /preservation

            file1.tif

file1.tga
file2.doc
file3.docx
Note that any objects you haven’t normalized manually will be normalized using the regular Archivematica workflow. Also, if you do not include anything in the /access folder, no DIP will be generated.
Return to the dashboard and approve normalization.
Continue processing according to instructions in the User manual. Stop when you reach the Store AIP microservice.
At the Store AIP microservice, you have the option to review your AIP. If you download the AIP from the review tab by simply clicking on the file with the 7z extension, you can download, unzip and view your AIP in your file browser. Your AIP will consist of a top level folder with the name you assigned plus a UUID. In that folder, you’ll find a /data folder which contains your objects for preservation, logs, thumbnails and the METS xml. That data folder will contain your originals and normalized files, and the METS will include PREMIS events with “manual normalization” noted in the eventDetail of the appropriate normalization events.
A discussion of the overall AIP structure can be found here: AIP structure. Additionally, you might note that the manualNormalization folder and subfolders used during the manual normalization workflow have been deleted once normalization was approved rather than being packaged into the AIP.
If you are satisfied with everything here, continue to store your AIP and/or upload your DIP as per the User manual instructions.
Adding PREMIS eventDetail for manual normalization
Note
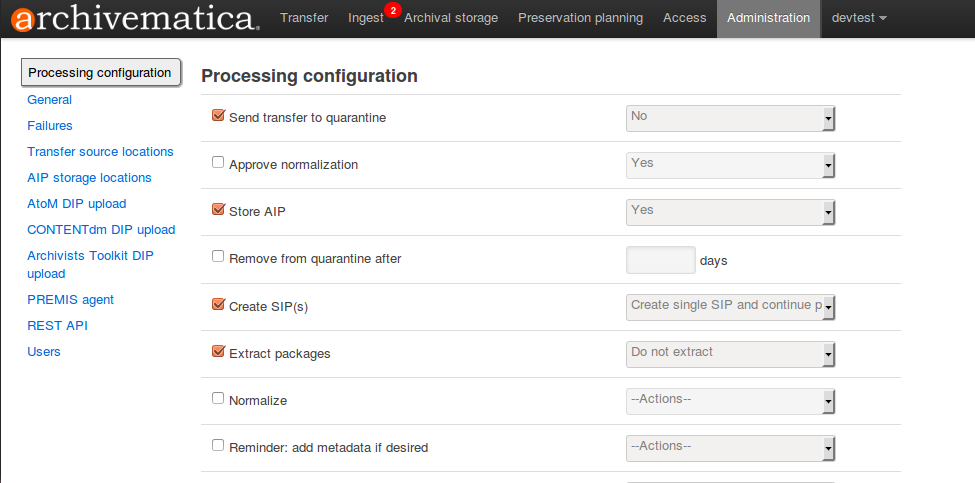
If you think you will need to use this aspect of the feature, please note that Archivematica does not offer the option to add PREMIS eventDetail by default. Instead, you must use the preconfigured choices in the processing configuration section of the Administrative tab of the dashboard to adjust your settings prior to ingest. Deselect the Reminder in the Processing Configuration settings.
If you include manually normalized files in the initial transfer (option 1) or during processing (option 2), the procedure for adding PREMIS eventDetail is the same.
- Approve normalization. For Option 2, this will be after selecting “Normalize manually” at the normalization step and adding the files to the SIP.
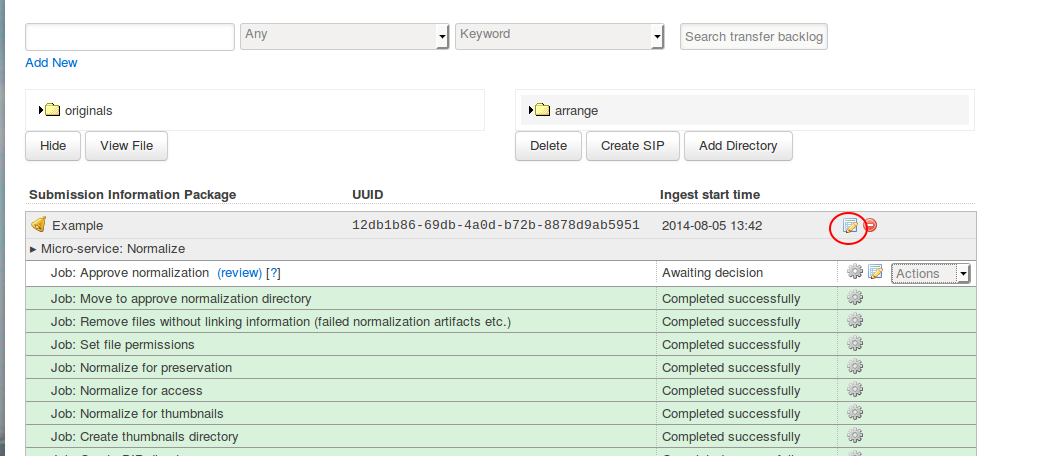
- Archivematica will stop and remind you to add the metadata.
- Click on the metadata icon.
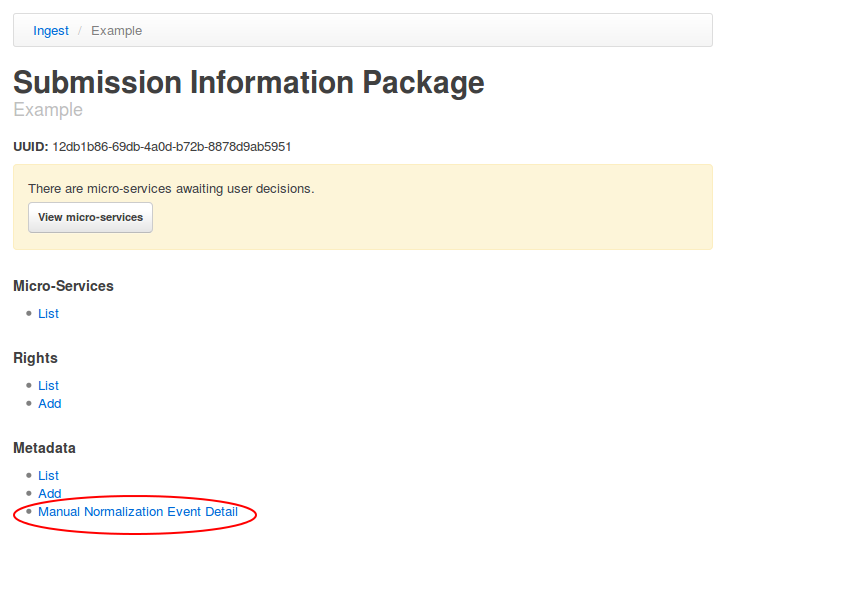
- Select “Manual normalization event detail” under metadata.
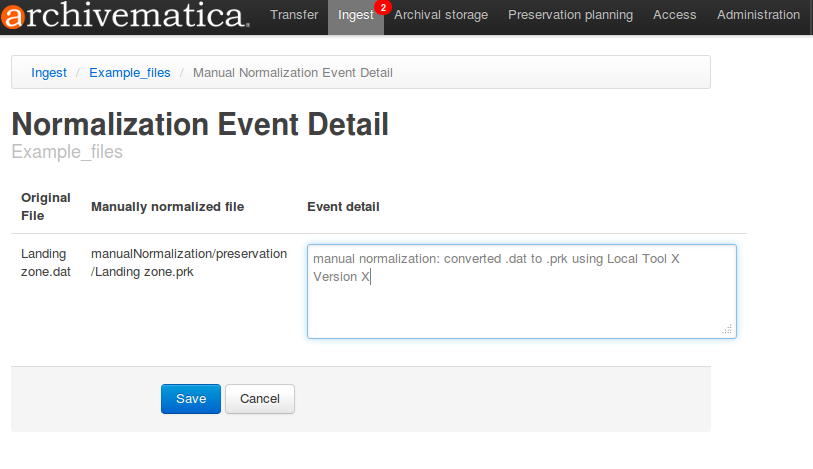
- Add event detail. This can be technical tool output, like:
program=ImageMagick; version=6.6.4.0; command=%convertPath% %fileFullName%
+compress %preservationFileDirectory%%fileTitle%.%preservationFormat%
or something more narrative like in the example below.
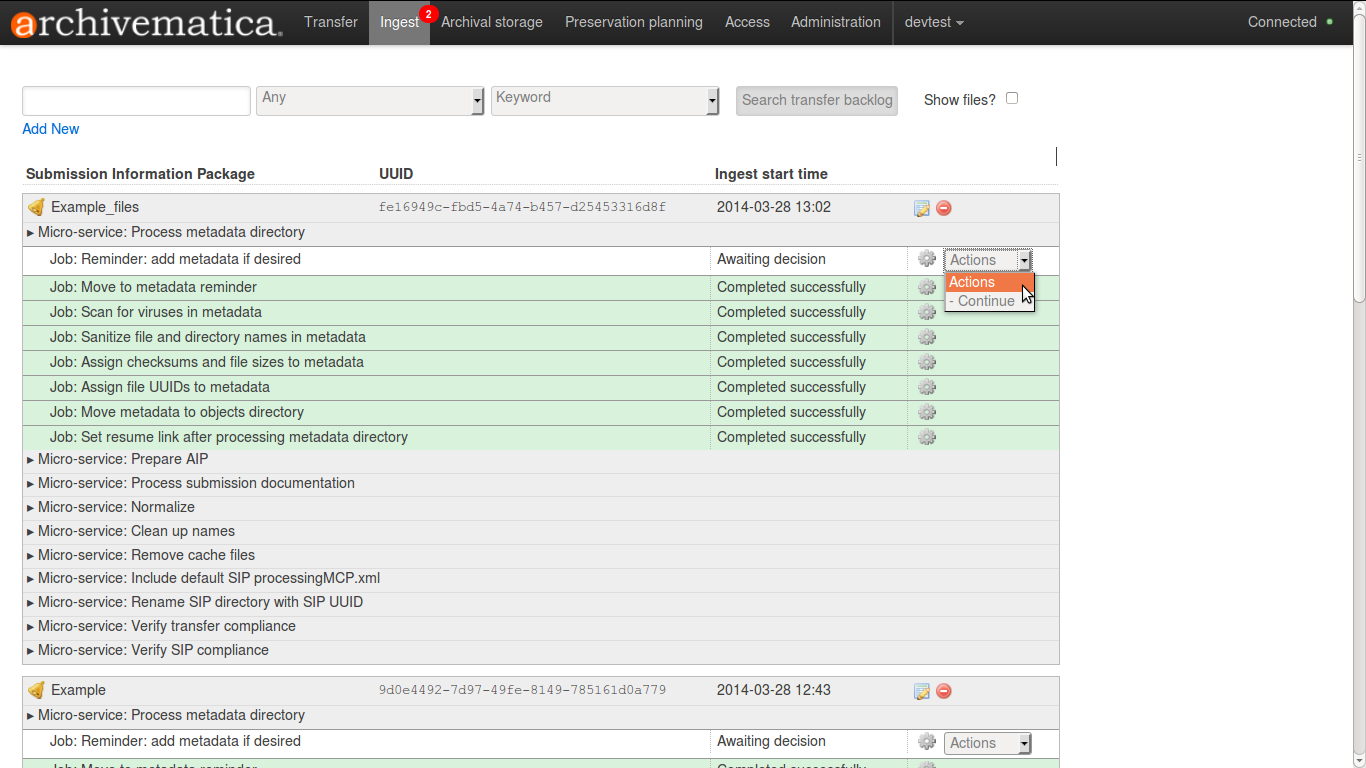
- Save the metadata and click on the ingest tab to continue processing.
- Select Continue from the metadata reminder dropdown box.
Normalizing files with the same name
The manual normalization workflow outlined above assumes that there are no conflicts between filenames. For example, if the original filenames are file1.doc and file2.xls, there is no conflict. But if you are manually normalizing both file1.doc and file1.xls, even if the extensions of the normalized files are different, you will need to provide a CSV file to document the relationships between the original and normalized files.
The structure of normalization.csv, which is saved in the manualNormalization directory, is three columns: original file, file normalized for access, file normalized for preservation. All the files with duplicate names need to be listed, even if they are not manually normalized.
Important
The normalization.csv is case-sensitive, meaning that the contents must match the file names exactly as to their capitalization.
You need to specify the path in the csv file, including any subdirectories, such as in the example below.

In the example above, there are manually normalized files for both preservation and access, however it is possible to have manually normalized files for only access or preservation by leaving the appropriate column blank.
Other scenarios are also possible:
Original file not in a subdirectory, normalized copies are:
file1.tga,manualNormalization/access/subdir1/file1.jpg,manualNormalization/preservation/subdir1/file1.tif
file1.doc,manualNormalization/access/subdir1/file1.pdf,manualNormalization/preservation/subdir1/file1.pdf
Only some normalized copies in a subdirectory:
file1.tga,manualNormalization/access/subdir1/file1.jpg,manualNormalization/preservation/subdir1/file1.tif
file1.doc,manualNormalization/access/file1.pdf,manualNormalization/preservation/subdir1/file1.pdf
Subdirectories used only to distinguish file names:
file1.tga,manualNormalization/access/subdir1/file1.jpg,manualNormalization/preservation/subdir1/file1.tif
file1.ppm,manualNormalization/access/subdir2/file1.jpg,manualNormalization/preservation/subdir2/file1.tif
If the file names contain spaces or forbidden characters, Archivematica will sanitize the file names by replacing the spaces/characters with underscores. The normalization.csv file will still work by using either the original, unsanitized file names, or by pre-sanitizing the normalized filenames and the corresponding columns in normalization.csv (see: Issue 6870).
Archivematica 1.8.1
Contents
Search
Open the general index or type your search in the search box.
Available projects
Archivematica
- Version 1.18.0 (stable-current)
- Version 1.17.1 (stable-previous)
- Version 1.16.0 (legacy)
- Version 1.15.1 (legacy)
- Version 1.14.1 (legacy)
- Version 1.13.2 (legacy)
- Version 1.12.2 (legacy)
- Version 1.11.2 (legacy)
- Version 1.10.2 (legacy)
- Version 1.9.3 (legacy)
- Version 1.8.1 (legacy)
- Version 1.7.2 (legacy)
- Version 1.6.1 (legacy)
- Version 1.5 (legacy)
- Version 1.4 (legacy)
Archivematica Storage Service
- Version 0.24.0 (stable-current)
- Version 0.23.0 (stable-previous)
- Version 0.22.0 (legacy)
- Version 0.21.1 (legacy)
- Version 0.20.1 (legacy)
- Version 0.19.0 (legacy)
- Version 0.18.1 (legacy)
- Version 0.17.1 (legacy)
- Version 0.16.1 (legacy)
- Version 0.15.1 (legacy)
- Version 0.14.1 (legacy)
- Version 0.13.0 (legacy)
- Version 0.12.0 (legacy)
- Version 0.11.1 (legacy)
- Version 0.10 (legacy)
- Version 0.9 (legacy)
- Version 0.8 (legacy)
License
Archivematica documentation by Artefactual Systems Inc. is licensed under a Creative Commons Attribution-ShareAlike 4.0 International License.
