Error handling
Archivematica anticipates that a number of different types of errors can occur during processing. Some of them will result in processing being halted and the transfer or SIP being moved to the failed directory in the file browser. For others, processing can continue: for example, a normalization failure is reported and the user is given the opportunity to continue processing the SIP.
If you don’t find an answer here or elsewhere in the user manual, please try searching the Archivematica user forum. Someone may have had the same problem before and been offered a solution. If you do not find the answer there, feel free to ask us a question. The best questions to the list include as much information as possible about the error. This means offering us information about the system(s) you’re using, the content of your transfer(s), and copying the task information (click on the cog icon on the same line as the microservice job where the error occurred) and show arguments data output. See task information and show arguments data for the same error, below.
On this page:
- Dashboard error reporting
- Failure reports in Administration tab
- Email error report
- Normalization errors
- DIP upload error
- Common error behaviours
- Rejecting a transfer or SIP
- Removing a transfer or SIP from the dashboard
- Browser compatability
Dashboard error reporting
When a microservice fails or encounters an error, the workflow will be halted and Archivematica will report a ‘Failed transfer’. The microservice drop-down can be expanded to show the specific task that failed.
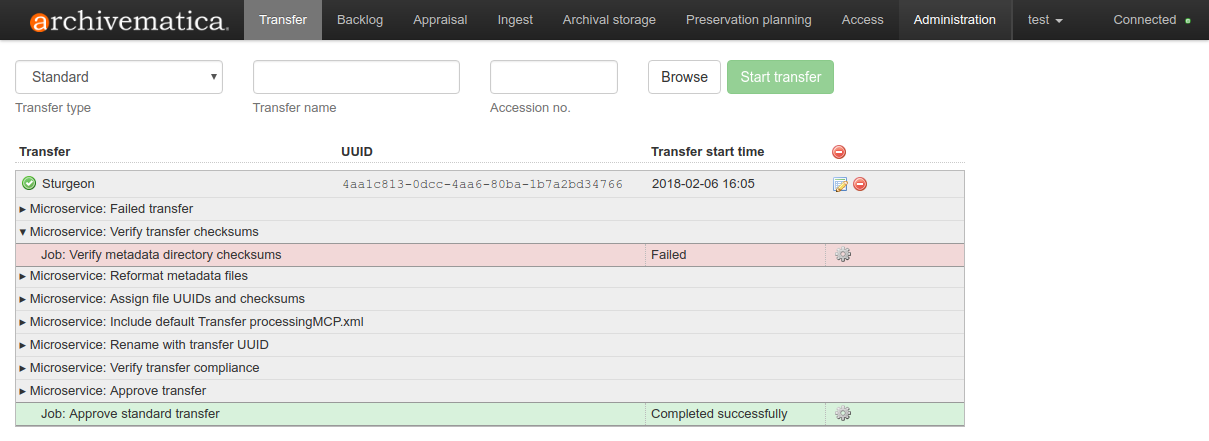
The dashboard showing a transfer has failed at the Verify transfer checksums microservice
Note that the transfer has been moved to the failed directory and processing has been halted.
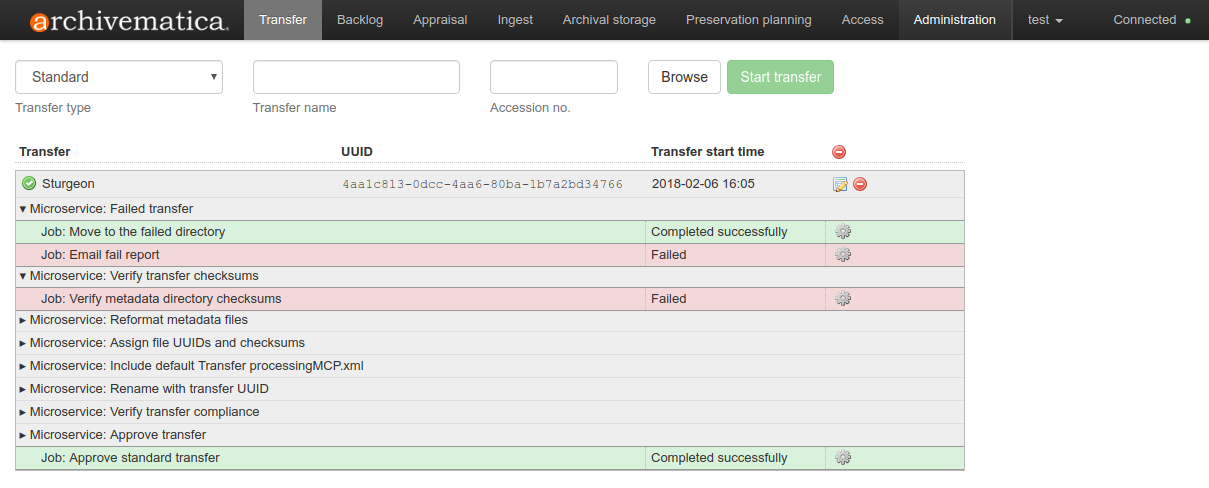
The expanded detail on ‘Failed transfer’
Click the tasks icon (the gear icon on the right-hand side) to open up an error report:
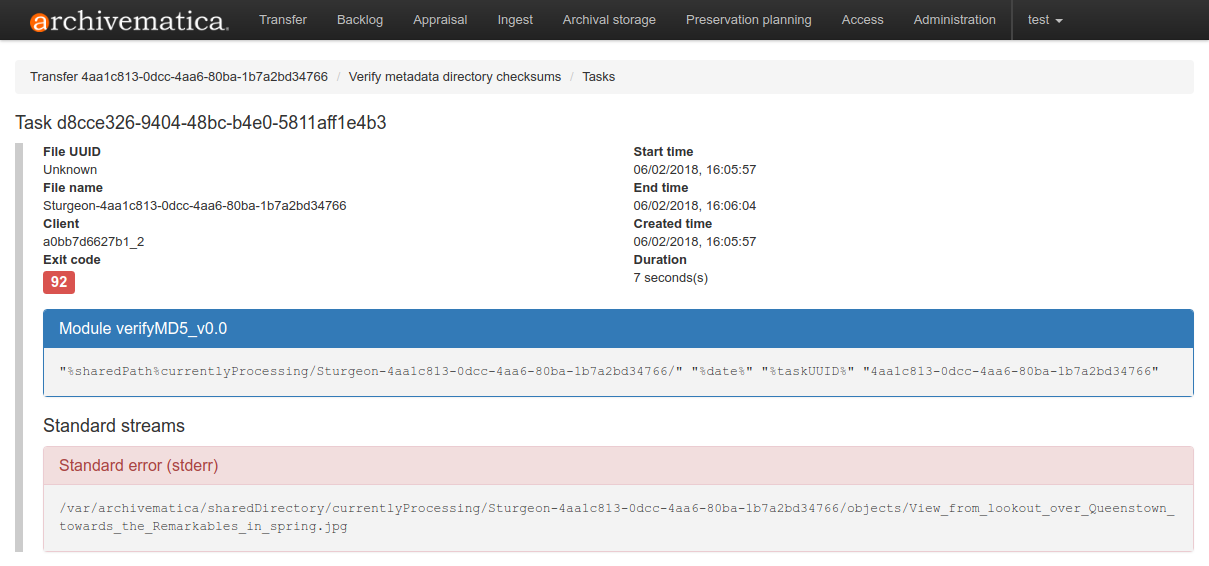
An error report showing that a file has failed checksum validation
These reports are generally standard and predictable for certain types of errors and are useful for trouble-shooting. Note that the failed file(s) will always appear at the top of the report.
Failure reports in Administration tab
You can view failure reports in the Administration tab of the dashboard. See Dashboard administration tab- Failures for more information.
Email error report
Archivematica will send email reports for two kinds of failures:
- Normalization reports are sent when the normalization process has resulted in at least one error.
- Failure reports are sent when the workflow fails unexpectedly.
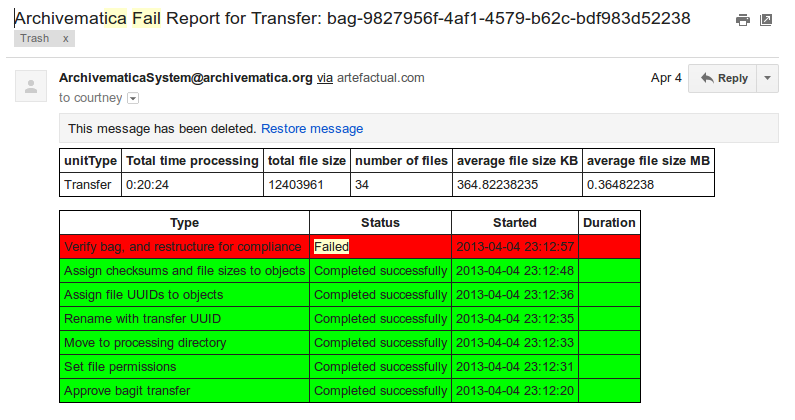
An emailed failure report showing an error at Verify bag microservice
An e-mail is generated if the transfer or ingest cannot be completed, not if an error occurs which does not halt processing. Please note that the server must have mail delivery enabled in order to receive error emails without additional configuration.
For more information about email reports, please see Email notification configuration
Normalization errors
The dashboard will report normalization errors when:
- Normalization is attempted but fails
- No normalization is attempted and the file is not in a recognized preservation or access format
When normalization fails, the SIP continues processing until it reaches the normalization approval step. At this point, the user has two options:
Option 1
Click on the report icon next to the Actions drop-down menu to see a summary report of the normalization:
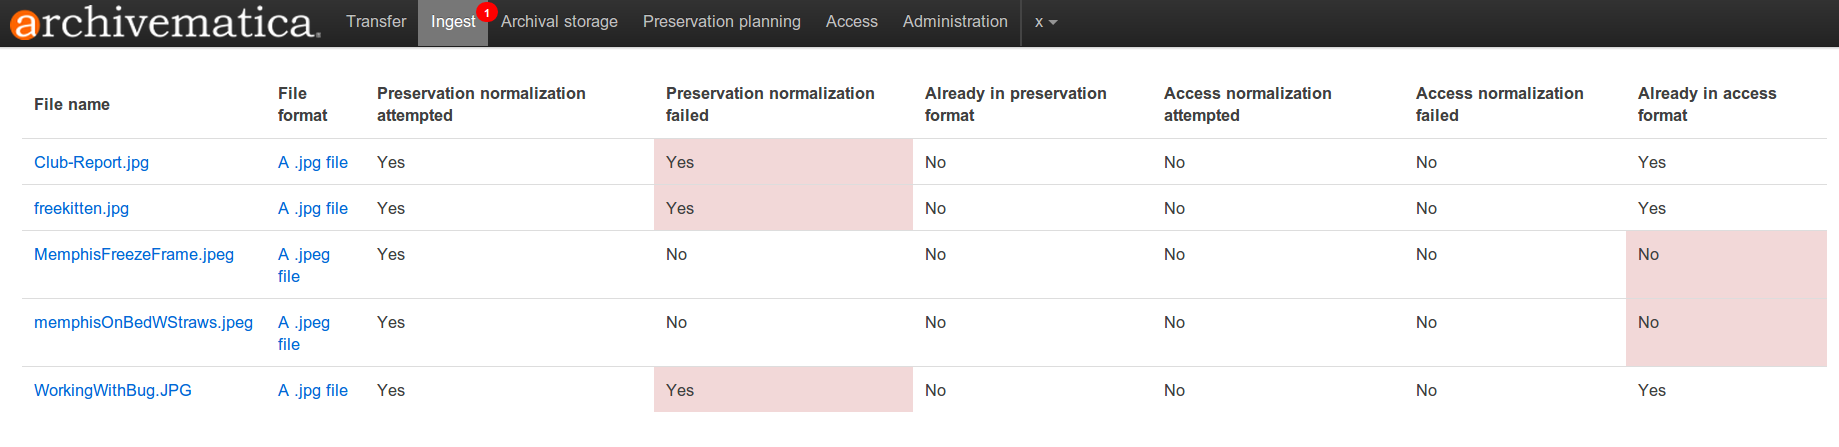
Normalization report showing failed normalization attempts
The report shows what has been normalized, what is already in an acceptable preservation and access format, and what has failed normalization or is not in a recognized preservation or access format. If normalization has failed, you can click on “yes” to see a task report of the error in a new tab:
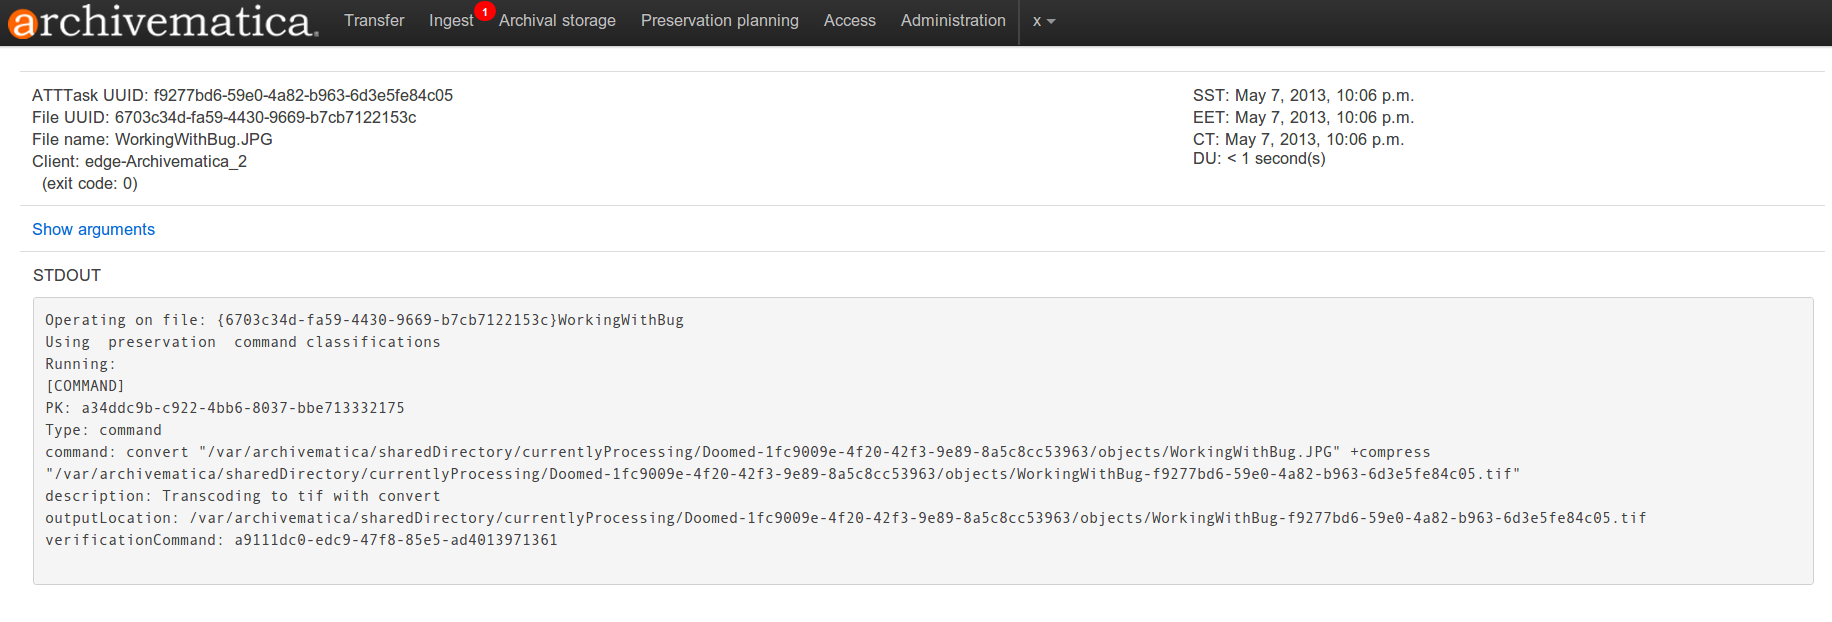
Task output for failed normalization job
Option 2
Click Review in parentheses next to the microservice to view the normalization results in a directory structure in a new browser tab:
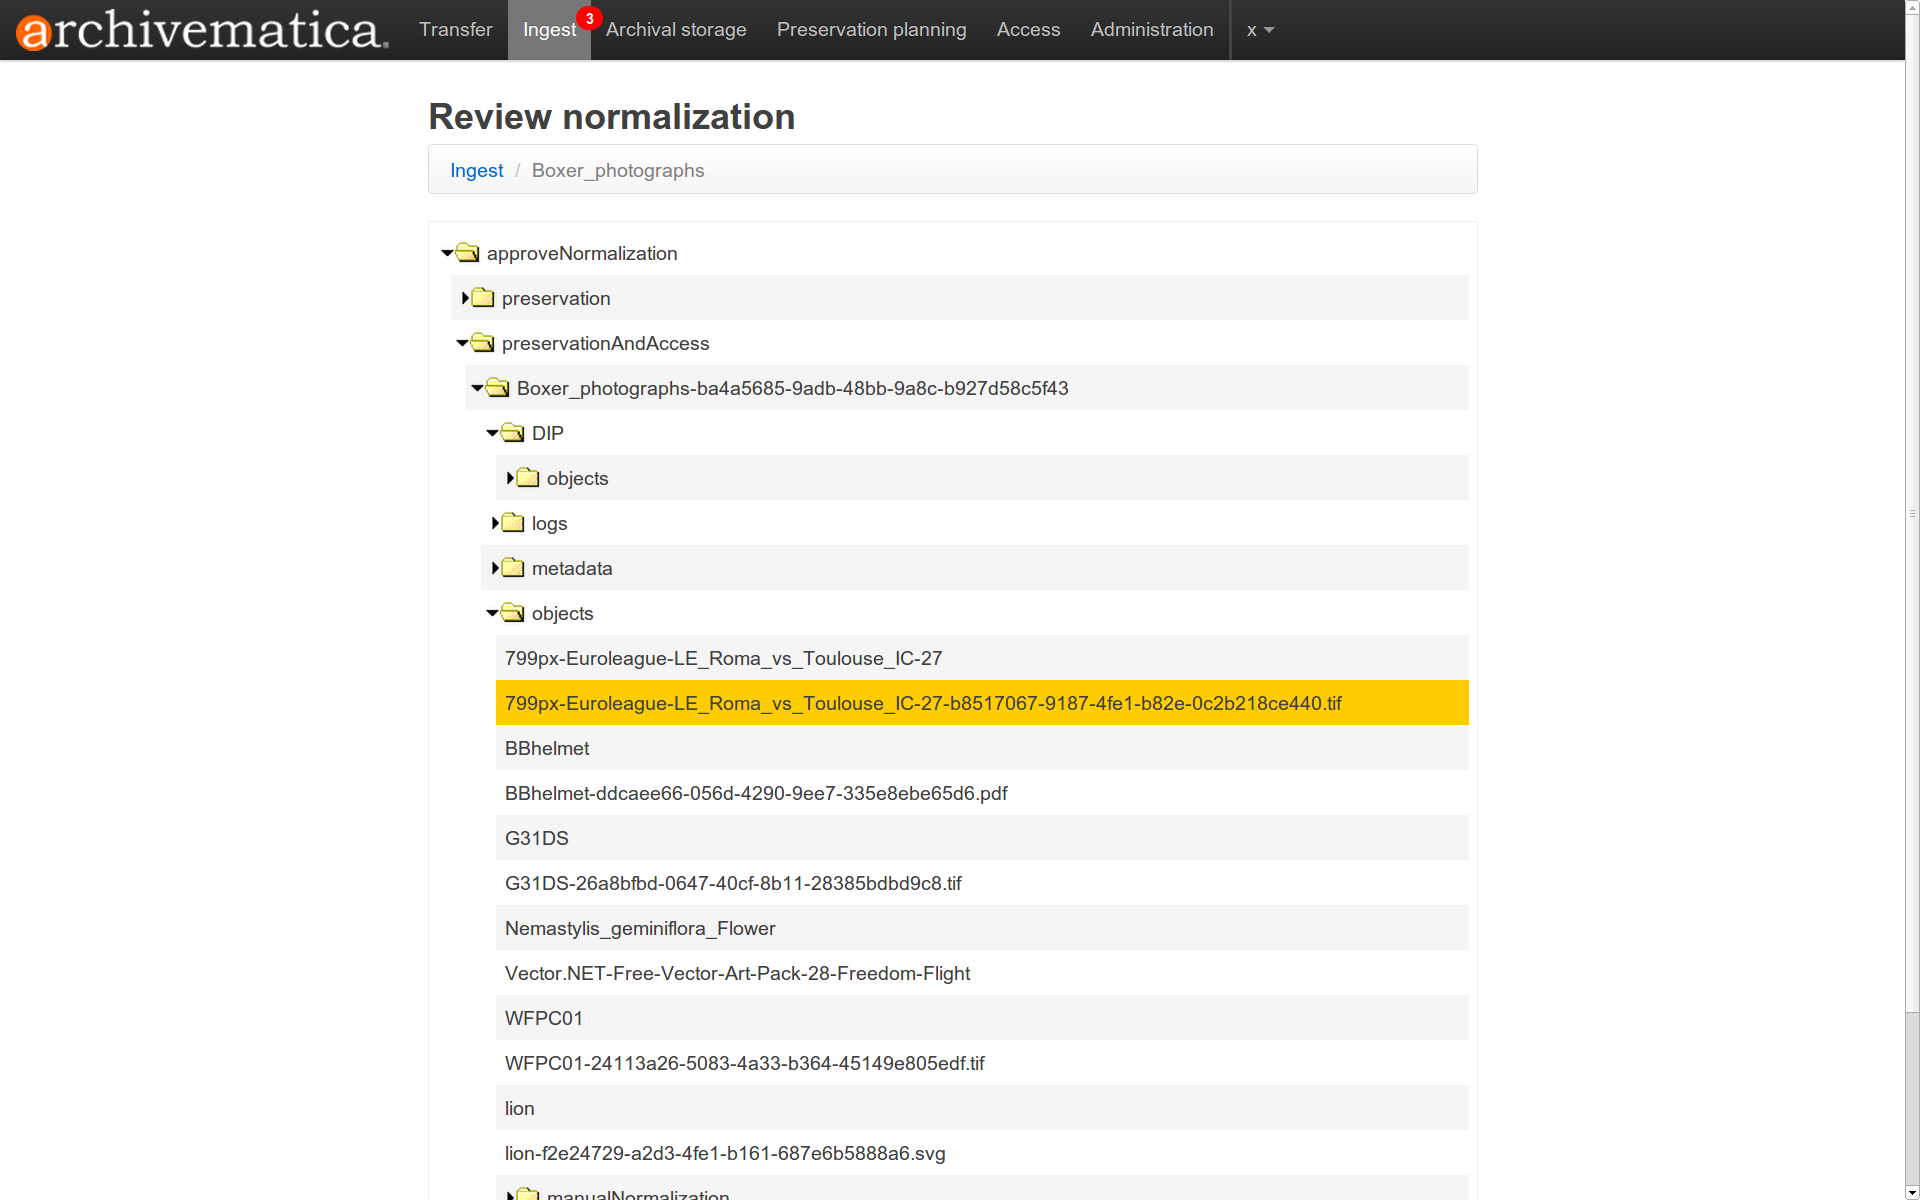
Review normalization results in a new tab
The review allows the user to either open the objects in the browser when there is an appropriate plug-in or download the objects and open them using a local application.
The user may choose to continue processing the SIP despite any normalization errors.
The user may choose to redo normalization, as well. For instance, if the user chose to normalize based on FITS-JHOVE results and experienced failures, the user may wish to redo normalization and choose to normalize based on FITS-DROID results instead.

Redo normalization option in drop-down menu of Approve normalization job
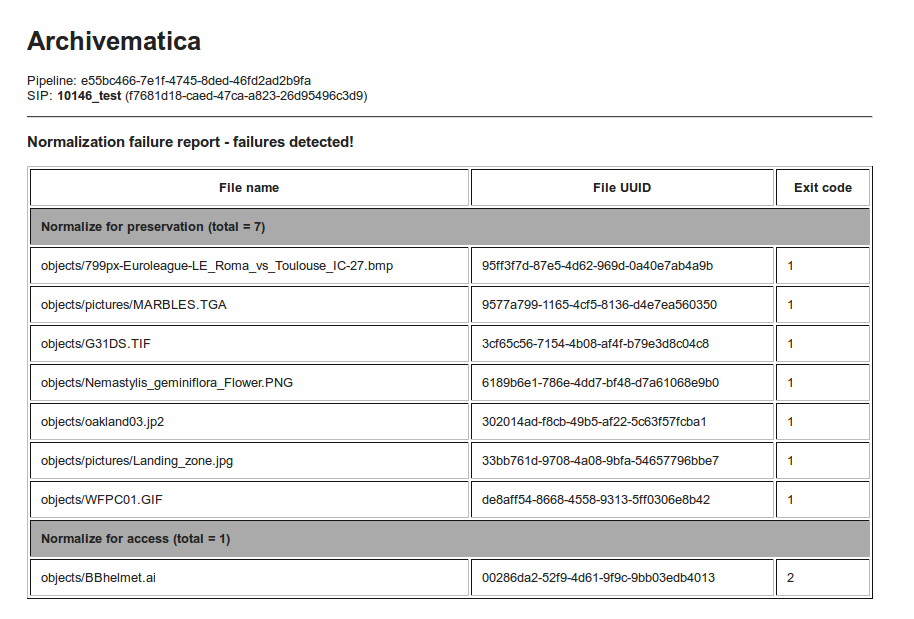
Archivematica will send an email when normalization errors occur. Information given in the email report:
- UUID of the pipeline
- Name and UUID of the SIP
- File name and file UUID, and whether Preservation or Access normalization failed
- Exit code
Exit code 1 indicates that a normalization rule and command exists but failed to execute properly (due to a problem in the command, a problem with the file, etc). Exit code 2 indicates that a normalization rule/command does not exist for that format.
Emailed normalization error report
Dip upload error
Archivematica will allow the user to continue to attempt to upload the DIP if a mistake was made entering the permalink:
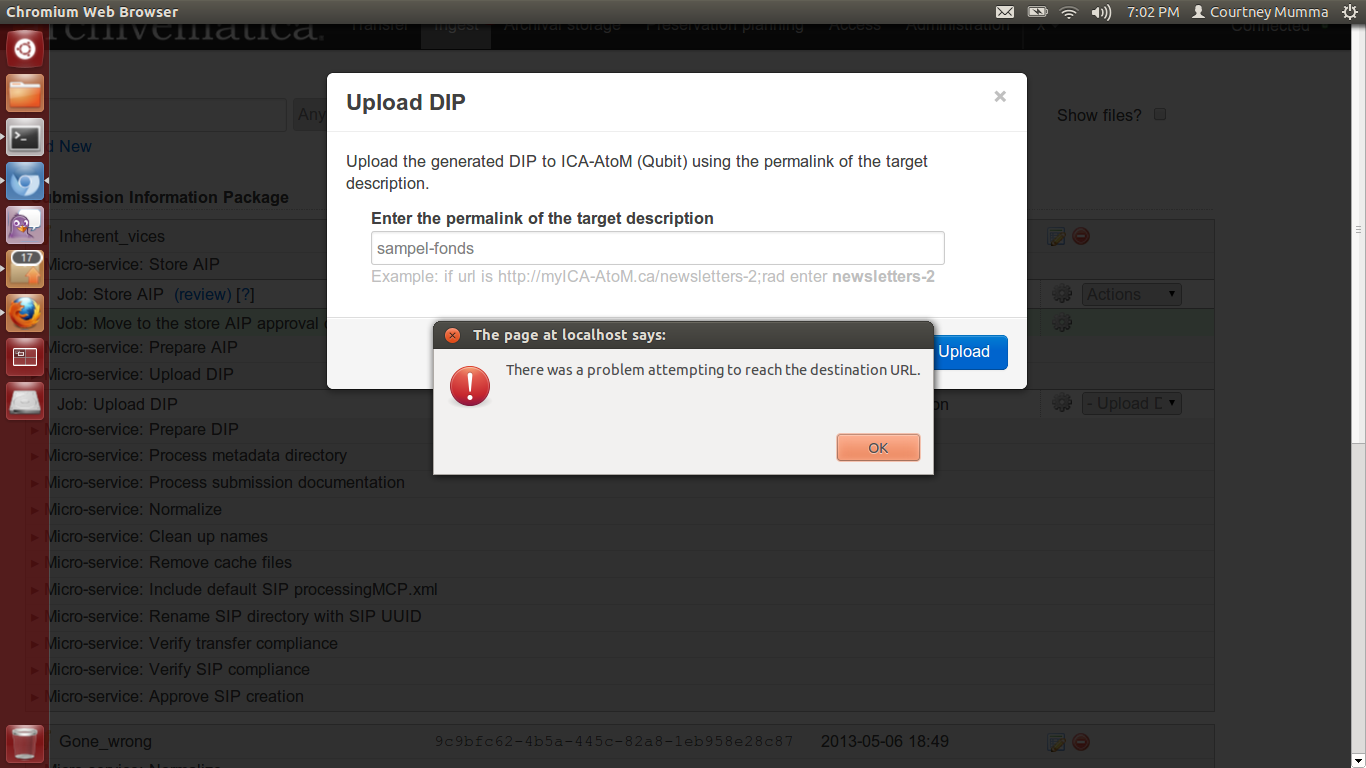
Warning that permalink was incorrect, allows user to retry upload DIP
Other common error behaviours
- Verify metadata directory checksums: if the checksums in the metadata directory cannot be verified (i.e. if a file is missing or corrupted) the microservice will fail and the transfer will be moved in the failed directory.
- Scan for viruses: if a virus is found the microservice will fail and the transfer will be moved in the failed directory.
- Characterize and extract metadata: if FITS processing fails, the micro- service will fail and the transfer will continue processing. Similarly, if a tool within FITS fails, like JHOVE, you will see the pink error bar but be able to continue processing.
- Remove thumbs.db file: if Archivematica is unable to remove a thumbs.db file, the microservice will fail and the SIP will continue processing.
- Normalize submission documentation to preservation format: if normalization fails, the microservice will fail and the SIP will continue processing.
Rejecting a transfer or SIP
At any of the workflow approval points the user can choose to reject a transfer, SIP, AIP or DIP (depending on where the information object is in the workflow). This will move the transfer or SIP to the Rejected directory (accessible from the file browser) and will stop all processing on it. The transfer or SIP will still be listed in the dashboard, however. See Removing a transfer or SIP from the dashboard, below, to remove it from the dashboard.
Removing a transfer or SIP from the dashboard
To remove a transfer or SIP from the dashboard, click on the red “Remove” icon in the dashboard:

Click on the red Remove icon to remove a transfer or SIP from the dashboard, then click Confirm.
It is recommended that you clear your dashboard of transfers and SIPs periodically to improve browser performance.
Browser compatability
Archivematica has been tested most extensively with Firefox and Chrome. There are known issues with Internet Explorer 11 which result in an inability to start transfers in the dashboard (Issue 7246). Minimal, but successful, testing has been done with Microsoft Edge.
Archivematica 1.8.1
Contents
Search
Open the general index or type your search in the search box.
Available projects
Archivematica
- Version 1.18.0 (stable-current)
- Version 1.17.1 (stable-previous)
- Version 1.16.0 (legacy)
- Version 1.15.1 (legacy)
- Version 1.14.1 (legacy)
- Version 1.13.2 (legacy)
- Version 1.12.2 (legacy)
- Version 1.11.2 (legacy)
- Version 1.10.2 (legacy)
- Version 1.9.3 (legacy)
- Version 1.8.1 (legacy)
- Version 1.7.2 (legacy)
- Version 1.6.1 (legacy)
- Version 1.5 (legacy)
- Version 1.4 (legacy)
Archivematica Storage Service
- Version 0.24.0 (stable-current)
- Version 0.23.0 (stable-previous)
- Version 0.22.0 (legacy)
- Version 0.21.1 (legacy)
- Version 0.20.1 (legacy)
- Version 0.19.0 (legacy)
- Version 0.18.1 (legacy)
- Version 0.17.1 (legacy)
- Version 0.16.1 (legacy)
- Version 0.15.1 (legacy)
- Version 0.14.1 (legacy)
- Version 0.13.0 (legacy)
- Version 0.12.0 (legacy)
- Version 0.11.1 (legacy)
- Version 0.10 (legacy)
- Version 0.9 (legacy)
- Version 0.8 (legacy)
License
Archivematica documentation by Artefactual Systems Inc. is licensed under a Creative Commons Attribution-ShareAlike 4.0 International License.
