Preservation Planning
The Format Policy Registry (FPR) is a database which allows Archivematica users to define which actions Archivematica should take on a particular file format - for example, how Archivematica should normalize a JPEG file for long-term preservation. This is called a format policy, and it defines the tools, rules, and commands that Archivematica will use to complete the desired preservation action.
Preservation actions such as normalization, package extraction, characterization, validation, identification, verification, and transcription are managed in Archivematica’s Preservation Planning tab.
When you install Archivematica, default formats, rules and commands are installed and accessed through the Preservation Planning tab. When you upgrade to a new release of Archivematica, new formats, rules and commands may be added (check the release notes for the specific release to find out). In addition, you can maintain local rules to add new formats or customize the behaviour of Archivematica. Your local changes are maintained if you upgrade your Archivematica pipeline to a new version. Archivematica’s default format policies are maintained by Artefactual. Format policies will change as community standards, practices and tools evolve. If you would like to suggest a different default format policy, consider opening an issue in the Archivematica issues repo.
On this page:
- Preservation Planning policies
- Definitions
- Altering commands and rules
- Identification
- Characterization
- Event Detail
- Extraction
- Normalization
- Transcription
- Validation
- Verification
Preservation Planning policies
It is important for institutions to establish local policies and practices that include monitoring the digital preservation environment to help inform format normalization rules over time as standards and tools evolve.
We recommend documenting your policies and practices in accordance with the TRAC standard for auditing Trusted Digital Repositories (ISO 16363:2012).
See also
Definitions
Format
A format is a standardized way that information is encoded for for storage on a digital storage medium. Archivematica recognizes hundreds of file formats by extracting format information from PRONOM, a technical registry of file formats maintained by the National Archives of the UK.
Selecting Formats at the top of the left-hand sidebar in the Preservation Planning tab will take you to the formats view page, which displays a list of all the formats that Archivematica currently knows about. Each entry in this table is a record representing one or more related format versions. Each format version is also a record. For example, the format record for Graphics Interchange Format is comprised of format version records for various versions of the GIF format: GIF 1987a, 1989a, and Generic gif.
You can add new formats to the FPR at any time by selecting Create new format on the Formats view page. Note that new formats do not need to be present in PRONOM; if you are dealing with extremely rare or one-off formats, you can create a completely local format record here.
Fields:
- Group: see Format Group, below.
- Description: the name of the format.
Once you have created a format, you can add a format version to record more precise details about the format.
Fields:
- Description: the name of the format version. This text will be used to specify the format type in the METS file. This field is required.
- Version: the version number for this specific format version. For example, for Adobe Illustrator 14 files, you could enter 14. This field is required.
- Pronom id: the specific format version’s unique identifier in PRONOM, if it exists. This field is optional.
- Access format: checking this box indicates that this format version is an acceptable access format for end users. This field is optional.
- Preservation format: checking this box indicates that this format version is an acceptable preservation format for long-term storage. This field is optional.
Format group
A format group is a convenient grouping of related file formats which share common properties. For instance, the FPR includes an “Image (raster)” group which contains format records for GIF, JPEG, and PNG. Each format can belong to one format group.
Selecting Groups near the top of the left-hand sidebar in the Preservation Planning tab will take you to the Format groups view page, which displays a list of the format groups that Archivematica uses to categorize formats. Clicking on a format name will display all of the formats belonging to that group.
The following format groups come pre-populated in the FPR:
- Audio
- Binary (Data)
- Binary (Executable)
- CAD
- Data Visualization
- Database
- Dataset
- Desktop Publishing
- Disk Image
- Flash
- Font
- GIS
- Image (Raster)
- Image (Vector)
- Package
- Portable Document Format
- Presentation
- Spreadsheet
- Statistics
- Text (Markup)
- Text (Plain)
- Text (Source Code)
- Test (Structured)
- Unknown
- Video
- Word Processing
Please note that a format group is manually assigned each time new data is imported into Archivematica from PRONOM. If you think that a format has been miscategorized, you can change it by editing the format. If you think that the change is relevant to other users, consider opening an issue in the Archivematica issues repo.
Purpose
Purpose refers to the function that a given tool, rule, or command fulfils within an Archivematica workflow. This is dependent on the context in which the tool, rule, or command is deployed. For example, a rule to normalize a JPG file to TIFF using the tool convert might have the purpose Preservation, implying that the purpose of this rule is to create the TIFF for long-term preservation.
The term Purpose is used in various places within the Preservation Planning tab. Occasionally a similar term, like Command usage, is used instead.
Tools
Archivematica acts as a wrapper for many open source tools used to carry out preservation actions. These include digital preservation specific tools like FITS, used for extracting technical metadata from files, as well as tools for handling different file formats like Inkscape, which is a design program used to handle vector images.
The full list of tools can be accessed in the left-hand sidebar by selecting Tools under the Format policy registry heading.
Tools are called by commands, and act on formats.
Commands
Format policy commands are scripts or command line statements which control how a tool runs. A command is created for a particular purpose, such as file identification. For example, during the Transfer process you might tell Archivematica to identify your files using Siegfried. This kicks off the command “Identify using Siegfried”, which runs the file identification tool Siegfried the files included in the transfer. This command will be run once on every file in the transfer.
To see the current commands for a particular purpose, find the purpose in the left-hand sidebar (i.e. Identification) and select the sub-menu-item Commands.
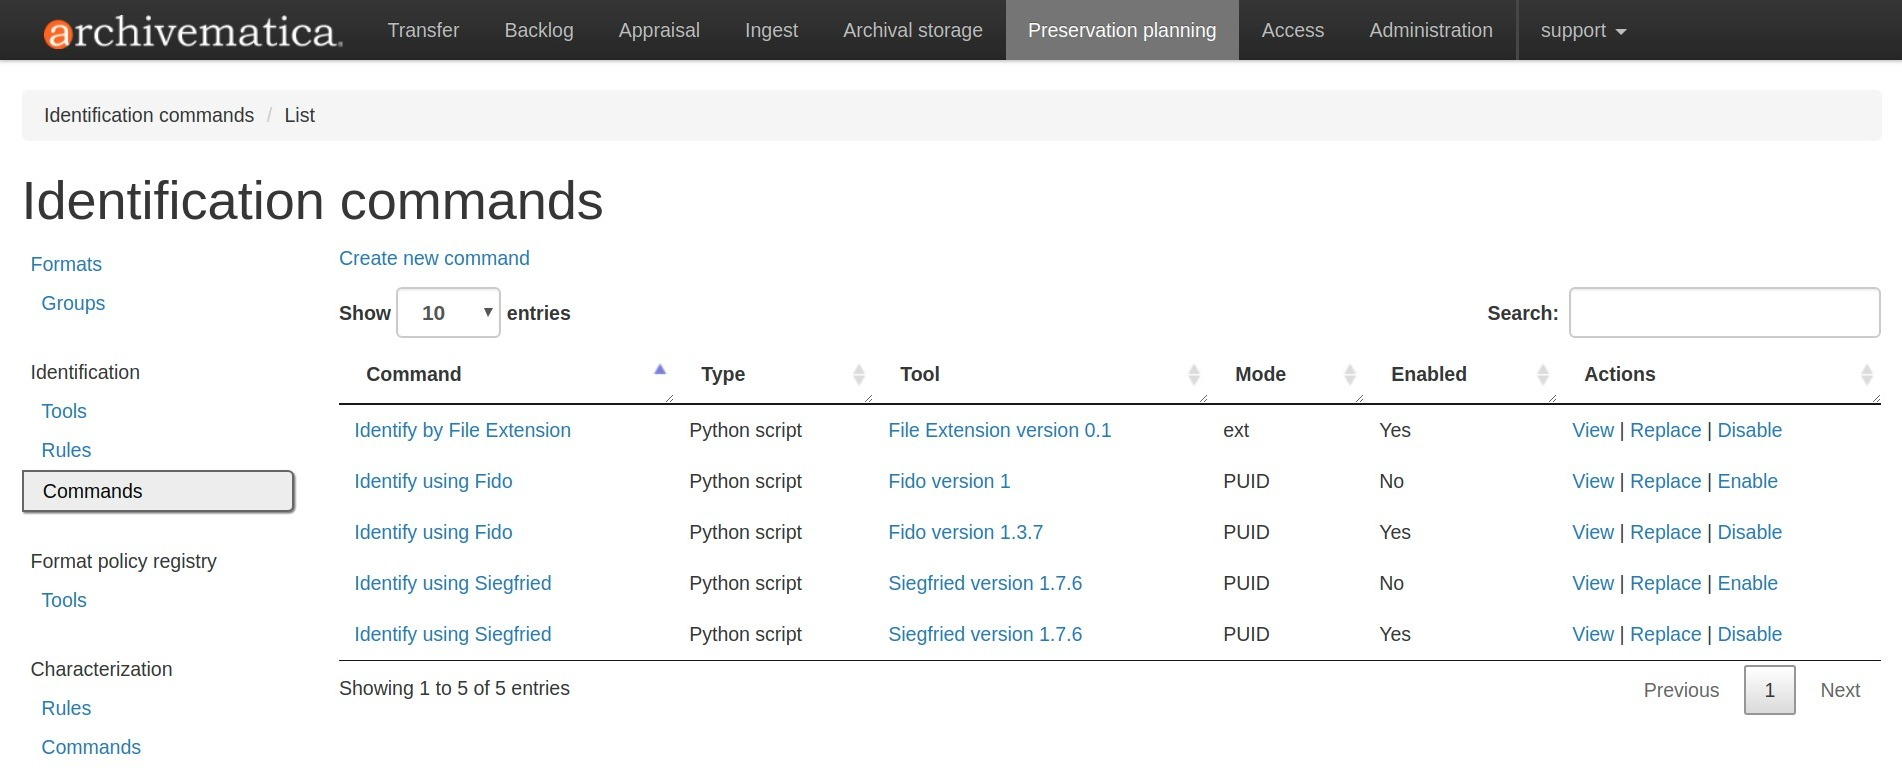
Archivematica contains default commands for many different tools. You can disable or replace these commands at any time.
Rules
Format policy rules associate commands to file formats. Like commands, rules are created for a particular purpose, such as file normalization. For example, if you are normalizing files for preservation, you can tell Archivematica to use the command Transcoding to jpg with convert for all JPG files, while SVG files are converted to PDFs using the command Transcoding to pdf with inkscape. In this way, tools, rules, and commands all work together to implement preservation policies.
To see the current rules for a particular purpose, find the purpose in the left-hand sidebar (i.e. Normalization) and select the sub-menu-item Rules.
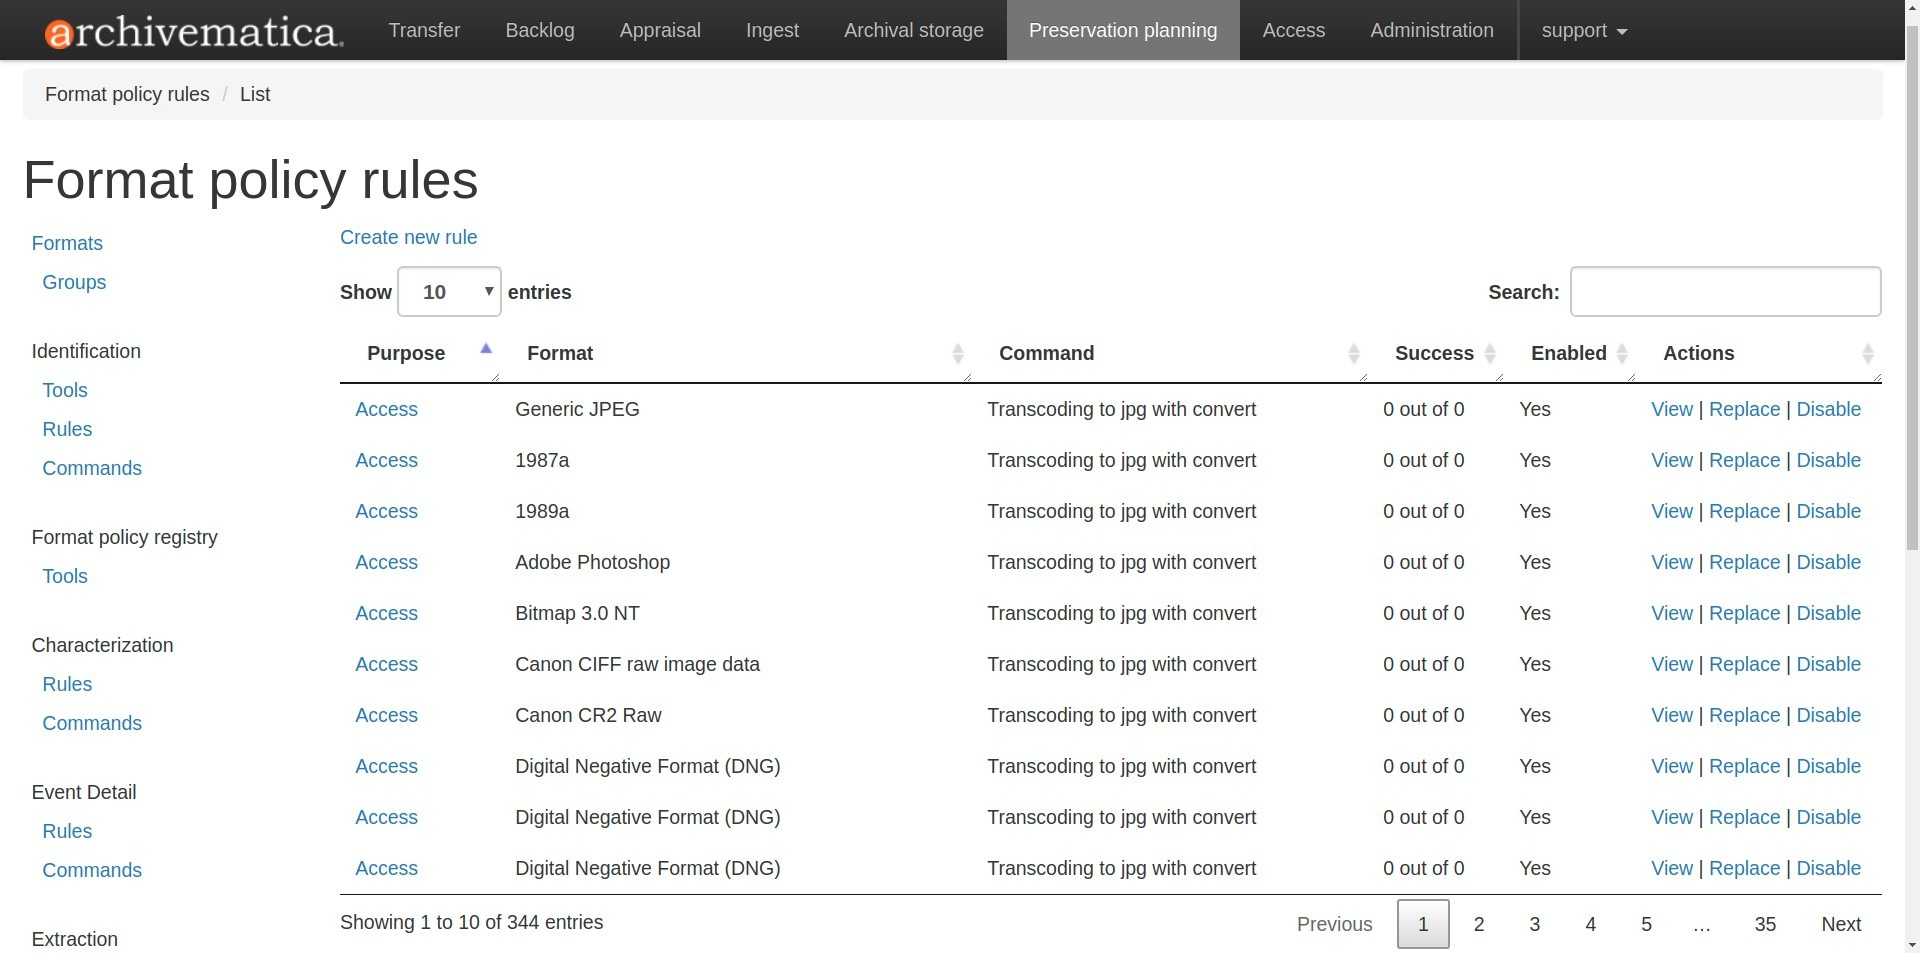
Archivematica contains default rules for many different commands. You can disable or replace these rules at any time.
Altering commands and rules
Writing commands
Writing a command for Archivematica to use can vary widely, from adding one line of bash to a few lines of Python to a full Unix script. As a result, the expertise needed will vary depending on the context. Regardless of how complex the script is, we recommend testing your script thoroughly before using it in a production environment.
Further down on this page, there is information about each section of the Preservation Planning ta, which contains specific information regarding the commands for each section.
To add a new command, decide which purpose your command will fulfill (i.e. Identification or Characterization). Then find the purpose in the left-hand sidebar (i.e. Characterization) and select the sub-menu item Commands. Once the Commands page is open, click on Create new command.
Fields:
- The related tool: the tool that this command will call.
- Description: a human-readable identifier for the command. This will be displayed to the user through the decision point drop down menu while processing material.
- Command: the script’s source or the command line statement to execute.
- Script type: options are “Bash Script”, “Python Script”, “Command Line”, and “No shebang”. The first two options will have the appropriate shebang added as the first line before being executed directly. “No shebang” allows you to write a script in any language as long as the shebang is included as the first line.
- The related output format: the format that the command outputs. For example, if you are writing a command to normalize audio to MP3 using ffmpeg, select the appropriate MP3 format version from the dropdown. This field is optional.
- Output location: The path the normalized file will be written to. This field is optional.
- Command usage: the purpose of the command. This will be used by Archivematica to decide whether a command is appropriate to run in different circumstances.
- The related verification command: the command you would like to use to ensure that the output was created. This field is optional.
- The related event detail command: a related command that provides more information about the software running this command. This will be written to the METS file as the “event detail” property. This field is optional.
Commands created for the purpose of identification have slightly different field options from other commands.
Fields:
- The related tool: the tool that this command will call.
- Description: a human-readable identifier for the command. This will be displayed to the user through the decision point drop down menu while processing material.
- Configuration (Identification commands only):
- Script type: options are “Bash Script”, “Python Script”, “Command Line”, and “No shebang needed”. The first two options will have the appropriate shebang added as the first line before being executed directly. “No shebang needed” allows you to write a script in any language as long as the shebang is included as the first line.
- Script: the script to be executed.
Changing rules
To see the current rules for a particular purpose, find the purpose in the left-hand sidebar (i.e. Normalization) and select the sub-menu-item Rules.
Archivematica contains default rules for many different formats. You can disable or replace these rules at any time. Note that the format and the command that you wish to create the rule for must exist before you can create the rule.
When creating a format policy rule, the following mandatory fields must be filled out:
- Purpose: the function of the rule within Archivematica. More information about the various purpose options can be found below.
- Format: the file format that this rule will act on.
- Command: the specific command to call when this rule is used.
You can also replace an existing rule by clicking on “Replace” beside the rule. The revision history is tracked and can be viewed by clicking “View,” and then “Revision history.”
Identification
Identification is the process of analyzing given information about a file to derive its format. Archivematica can do this either by looking at the file extension of the file or by analyzing the file’s signature, depending on which tool is selected to perform the action. Archivematica can also be configured to skip file identification, if required.
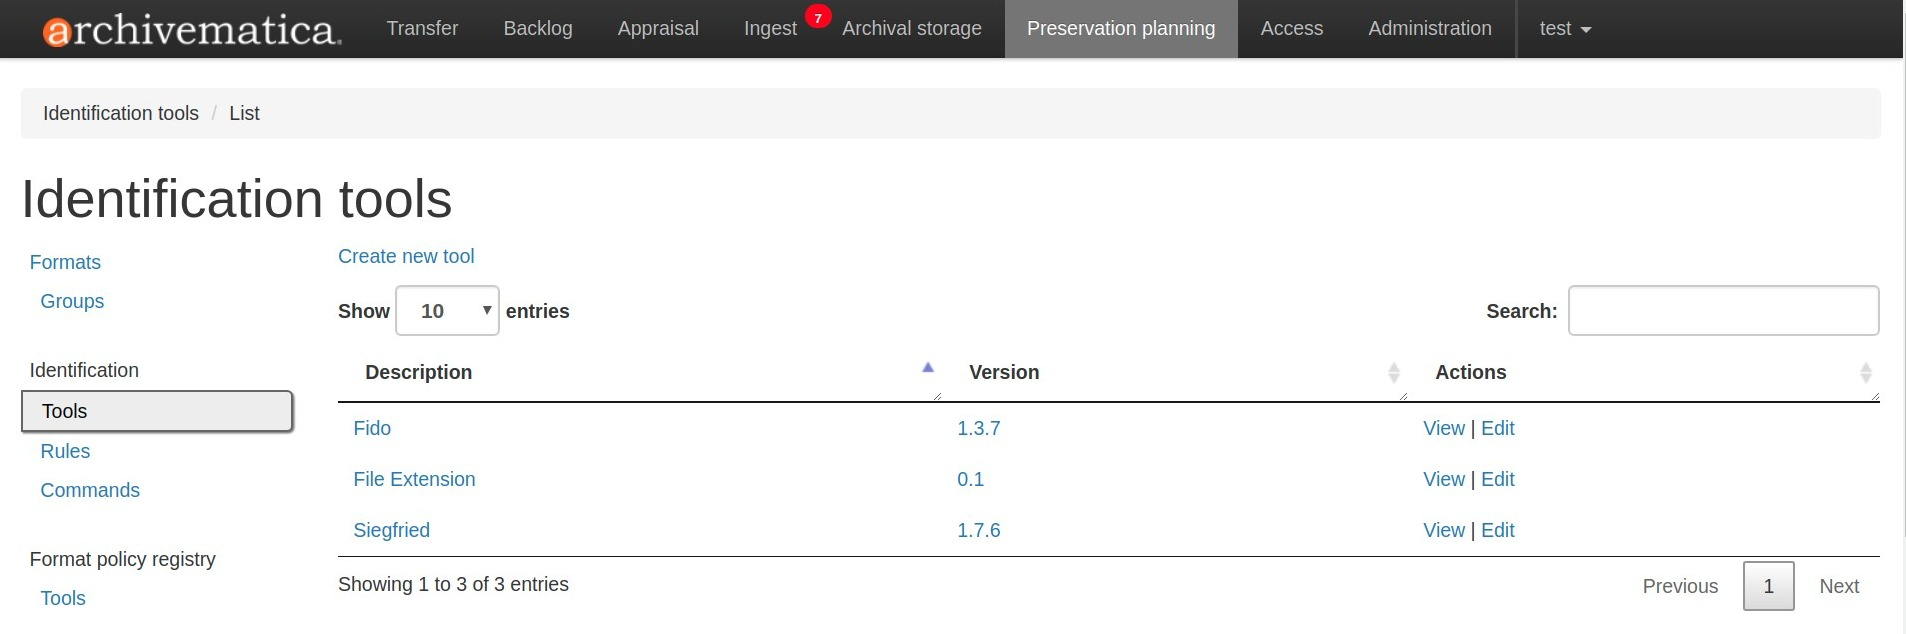
Identification tools
In Archivematica 1.8, there are three file identification tools:
- FIDO, developed and maintained by the Open Preservation Foundation, which identifies files by their signature and connects this to a PRONOM ID.
- File Extension, a simple script which identifies files by their file extension.
- Siegfried, developed and maintained by Richard Lehane, which also identifies files by their signature and connects this to a PRONOM ID.
From the Preservation Planning tab you can customize the behaviour of the existing tools or you can add new file identification tools.
Identification commands
Identification commands contain the actual code that a tool will run when identifying a file. This command will be run on every file in a transfer.
When coding a command, you should expect your script to take the path to the file to be identifed as the first command line argument. When returning an identification, the tool should print a single line containing only the identifier, and should exit 0. Any informative, diagnostic, and error message can be printed to stderr, where it will be visible to Archivematica users monitoring tool results. On failure, the tool should exit non-zero.
Identification commands require some familiarity with Unix scripting.
An identification command runs once for every file in a transfer. It will be passed a single argument (the path to the file to identify), and no switches.
On success, a command should:
- Print the identifier to stdout
- Exit 0
On failure, a command should:
- Print nothing to stdout
- Exit non-zero
Archivematica does not assign special significance to non-zero exit codes.
A command can print anything to stderr on success or error, but this is purely informational - Archivematica won’t do anything special with it. Anything printed to stderr by the command will be shown to the user in the Archivematica dashboard’s detailed tool output page. You should print any useful error output to stderr if identification fails, but you can also print any useful extra information to stderr if identification succeeds.
Here’s a Python script that identifies files by their file extension:
import os.path, sys
(_, extension) = os.path.splitext(sys.argv[1])
if len(extension) == 0:
        exit(1)
else:
        print extension.lower()
Here’s a more complex Python example, which uses ExifTool XML output to return the MIME type of a file:
#!/usr/bin/env python

from lxml import etree
import subprocess
import sys

try:
    xml = subprocess.check_output(['exiftool', '-X', sys.argv[1]])
    doc = etree.fromstring(xml)
    print doc.find('.//{http://ns.exiftool.ca/File/1.0/}MIMEType').text
except Exception as e:
    print >> sys.stderr, e
    exit(1)
Once you’ve written an identification command, you can register it in the FPR using the following steps:
- Navigate to the “Preservation Planning” tab in the Archivematica dashboard.
- Navigate to the “Identification Tools” page, and click “Create New Tool”.
- Fill out the name of the tool and the version number of the tool in use. In our example, this would be “exiftool” and “9.37”.
- Click “Create”.
Next, create a record for the command itself:
- Click “Create New Command”.
- Select your tool from the “Tool” dropdown box.
- Fill out the Identifier with text to describe to a user what this tool does. For instance, we might choose “Identify MIME-type using Exiftool”.
- Select the appropriate script type - in this case, “Python Script”.
- Enter the source code for your script in the “Command” box.
- Click “Create Command”.
Finally, you must create rules which associate the possible outputs of your tool with the FPR’s format records. This needs to be done once for every supported format; we’ll show it with MP3, as an example.
- Navigate to the “Identification Rules” page, and click “Create New Rule”.
- Choose the appropriate format from the Format dropdown - in our case, “Audio: MPEG Audio: MPEG 1/2 Audio Layer 3”.
- Choose your command from the Command dropdown.
- Enter the text your command will output when it identifies this format. For example, when our Exiftool command identifies an MP3 file, it will output “audio/mpeg”.
- Click “Create”.
Once this is complete, any new transfers you create will be able to use your new tool in the identification step.
For more information about writing a command, see Writing commands above.
Identification rules
Identification rules allow you to define the relationship between the output created by an identification tool, and one of the formats which exists in the FPR. Only create identification rules for formats being identified by extension. Both Fido and Siegfried identify files using their PUID. Because PUIDs are universal, Archivematica will always look these up for you without requiring any rules to be created, regardless of what tool is being used.
For more information about creating a rule, see Changing rules above.
Characterization
Characterization is the process of producing technical metadata for an object. Archivematica’s characterization aims both to document the object’s significant properties and to extract technical metadata contained within the object.
Characterization tools
Archivematica has four characterization tools available upon installation. Which tool will run on a given file depends on the type of file, as determined by the identification tool.
The default characterization tool is FITS; it will be used if no specific characterization rule exists for the file being scanned. It is possible to create new default characterization commands, which can either replace FITS or run alongside it on every file.
Depending on the type of the file being scanned, one or more of these tools may be called instead of FITS.
- FFprobe, a characterization tool built on top of the same core as FFmpeg, the normalization software used by Archivematica.
- MediaInfo, a characterization tool oriented towards audio and video data.
- ExifTool, a characterization tool oriented towards still image data and extraction of embedded metadata.
- fiwalk, a batch forensics analysis tool that is part of Sleuthkit.s
Characterization commands
Like an identification command, a characterization command is designed to run a
tool and produce output to standard out. Output from characterization commands
is expected to be valid XML, and will be included in the AIP’s METS document
within the file’s <objectCharacteristicsExtension> element.
When creating a characterization command, the output format should be set to
XML 1.0.
For more information about writing a command, see Writing commands above.
Characterization rules
A characterization rule must be created to connect a characterizatio command to a particular format. Note that formats that do not have a rule will be characterized by FITS by default.
For more information about creating a rule, see Changing rules above.
Event Detail
Event detail ensures that information about the software running a command is written to the METS file as the “event detail” property.
Event detail tools
Several different tools are used to write the event detail to the METS file, depending on which event is taking place. For example, if FFmpeg is being used to characterize a file, FFmpeg can write the event detail to the METS. In other situations, the command line command echo is used to perform this function.
Event detail commands
The commands describe the event detail output written to the METS file when using various FPR commands; typically, the name and version of the tool being used.
For more information about writing a command, see Writing commands above.
Event detail rules
Rules are not required for event detail, only commands.
Extraction
During the transfer phase, Archivematica can extract the contents of a package such as a ZIP file or a disk image. Archivematica comes with several predefined rules to extract packages, which are fully customizeable by Archivematica administrators.
Extraction tools
Archivematica comes with three extraction tools:
Extraction commands
An extraction command is passed two arguments: the file to extract, and the
path to which the package should be extracted. Similar to normalization
commands, these arguments will be interpolated directly into bashScript and
command scripts, and passed as positional arguments to pythonScript and
asIs scripts.
| Name (bashScript and command) | Commandline position (pythonScript and asIs) | Description | Sample value |
|---|---|---|---|
| %outputDirectory% | First | The full path to the directory in which the package’s contents should be extracted | /path/to/filename-uuid/ |
| %inputFile% | Second | The full path to the package file | /path/to/filename |
Here’s a simple example of how to call an existing tool (7-zip) without any extra logic:
7z x -bd -o"%outputDirectory%" "%inputFile%"
For more information about writing a command, see Writing commands above.
Extraction rules
An extraction rule must be created to associate an extraction command with a package format.
For more information about creating a rule, see Changing rules above.
Normalization
Normalization is the process of taking a file of a given format and transforming it into another format for a stated purpose, such as access or preservation - for example, Archivematica could contain rules to convert a PNG file to a JPG for access and a TIFF for preservation.
Normalization is Archivematica’s primary format preservation strategy. The preservation copies are added to the AIP and the access copies are used to generate a DIP for upload to the access system. Note that the original files are always kept, to allow for different preservation actions in the future, such as normalization to different archival formats or emulation.
Normalization tools
Several different tools are used to complete normalization tasks within Archivematica, depending on the format of the file. For image files, ImageMagick convert and Inkscape are commonly used; ffmpeg acts on audio-visual files; Ghostscript and ps2pdf are used to transform materials to PDF. One notable tool is an Archivematica-specific script that can transcode a maildir to mbox format, used for emails.
Normalization commands
Normalization commands are slightly more complicated than other kinds of commands in the Preservation Planning tab because they take extra parameters. The goal of a normalization command is to take an input file and make a copy of the file in a new format. For instance, Archivematica provides commands to transform video content into FFV1 for preservation, and into H.264 for access.
Archivematica provides several parameters specifying input and output filenames and other useful information. Several of the most common are shown in the examples below.
When writing a bash script or a command line command, you can reference the variables directly in your code, like this:
inkscape -z "%fileFullName%" --export-pdf="%outputDirectory%%prefix%%fileName%%postfix%.pdf"
When writing a script in Python or other languages, the values will be passed to your script as command line options, which you will need to parse. The following script provides an example using the argparse module that comes with Python:
import argparse
import subprocess

parser = argparse.ArgumentParser()

parser.add_argument('--file-full-name', dest='filename')
parser.add_argument('--output-file-name', dest='output')
parsed, _ = parser.parse_known_args()
args = [
    'ffmpeg', '-vsync', 'passthrough',
    '-i', parsed.filename,
    '-map', '0:v', '-map', '0:a',
    '-vcodec', 'ffv1', '-g', '1',
    '-acodec', 'pcm_s16le',
    parsed.output+'.mkv'
]

subprocess.call(args)
Once you’ve created a command, the process of registering it is similar to creating a new identification tool. The following examples will use the Python normalization script above.
First, create a new tool record:
- Navigate to the “Preservation Planning” tab in the Archivematica dashboard.
- Navigate to the “Identification Tools” page, and click “Create New Tool”.
- Fill out the name of the tool and the version number of the tool in use. In our example, this would be “exiftool” and “9.37”.
- Click “Create”.
Next, create a record for your new command:
- Click “Create New Tool Command”.
- Fill out the Description with text to describe to a user what this tool does. For instance, we might choose “Normalize to mkv using ffmpeg”.
- Enter the source for your command in the Command textbox.
- Select the appropriate script type - in this case, “Python Script”.
- Select the appropriate output format from the dropdown. This indicates to Archivematica what kind of file this command will produce. In this case, choose “Video: Matroska: Generic MKV”.
- Enter the location the video will be saved to, using the script variables.
You can usually use the
%outputFileName%variable, and add the file extension - in this case%outputFileName%.mkv - Select a verification command. Archivematica will try to use this tool to ensure that the file your command created works. Archivematica ships with two simple tools, which test whether the file exists and whether it’s larger than 0 bytes, but you can create new commands that perform more complicated verifications.
- Finally, choose a command to produce the “Event detail” text that will be written in the section of the METS file covering the normalization event. Archivematica already includes a suitable command for ffmpeg, but you can also create a custom command.
- Click “Create command”.
Finally, you must create rules which will associate your command with the formats it should run on.
For more information about writing a command, see Writing commands above.
Normalization command variables and arguments
The following variables and arguments control the behaviour of format policy command scripts.
| Name (bashScript and command) | Command line option (pythonScript and asIs) | Description | Sample value |
|---|---|---|---|
| %SIPUUID% | –sipuuid= | The UUID of the SIP or transfer being processed. | 4941c1e7-722b-41dc-900a-a17f7cfd32a9 |
| %sipName% | –sip-name= | The name of the SIP or transfer being processed, parsed from its path. | this-is-a-sip |
| %SIPDirectory% | –sip-directory= | The full path of the SIP or transfer. | /dir/this-is-a-sip-4941c1e7-722b-41dc-900a-a17f7cfd32a9 |
| %SIPDirectoryBasename% | –sip-directory-basename= | The basename of the SIP or transfer. | this-is-a-sip-4941c1e7-722b-41dc-900a-a17f7cfd32a9 |
| %SIPLogsDirectory% | –sip-logs-directory= | The full path of the SIP or transfer’s logs directory. | /dir/sip-4941c1e7-722b-41dc-900a-a17f7cfd32a9/logs |
| %SIPObjectsDirectory% | –sip-objects-directory= | The full path of the SIP or transfer’s objects directory. | /dir/sip-4941c1e7-722b-41dc-900a-a17f7cfd32a9/objects |
| %fileUUID% | –file-uuid= | The UUID of the file being processed. | baa67175-f04d-4df6-8615-d05d0651eae2 |
| %originalLocation% | –original-location= | The original path of the file, as first recorded by Archivematica. Note that the filename component of this path is unsanitized, so it is possible for this string to contain data in arbitrary text encodings, including mixed encodings. | /dir/sip-4941c1e7-722b-41dc-900a-a17f7cfd32a9/objects/ …/file name unsanitized.jpeg |
| %fileName% | –input-file= | The filename of the file to process. This variable holds the file’s basename, not the whole path. | video.mov |
| %fileDirectory% | –file-directory= | The directory containing the input file. | /path/to |
| %inputFile% | –file-name= | The fully-qualified path to the file to process. | /path/to/video.mov |
| %fileExtension% | –file-extension= | The file extension of the input file. | mov |
| %fileExtensionWithDot% | –file-extension-with-dot= | As above, without stripping the period. | .mov |
| %outputFileUUID% | –output-file-uuid= | The unique identifier assigned by Archivematica to the output file. | 1abedf3e-3a4b-46d7-97da-bd9ae13859f5 |
| %outputDirectory% | –output-directory= | The fully-qualified path to the directory where the new file should be written. | /var/archivematica/sharedDirectory/www/AIPsStore/uuid |
| %outputFileName% | –output-file-name= | The fully-qualified path to the output file, minus the file extension. | /path/to/access/copies/video-uuid |
| %fileGrpUse% | –file-grp-use= | The file grouping for this file. Possible values are: * original * submissionDocumentation * preservation * access * service * license * text/ocr * metadata | original |
Normalization rules
A normalization rule must be created to associate a normalization command with a particular format. Normalization rules have three purposes: Access, for use in the DIP, Preservation, for use in the AIP, and Thumbnail, for use in both the AIP and DIP. You may only have one normalization rule per format per purpose - for example, if you have a rule that states that PNGs are normalized to TIFF for the purpose of preservation, you cannot have a second rule that states that PNGs are normalized to GIF for the purpose of preservation.
You can decide whether or not normalization for thumbnails occurs for the entire pipeline, rather than on a format-by-format basis, by altering the processing configuration.
The success rate of each normalization rule is show in the “Success” column on the normalization rules page.
For more information about creating a rule, see Changing rules above.
Transcription
Transcription runs Tesseract or other transcription tools on image files to analyze whether or not they contain text. If they do contain text, the text can be read and output to a text file.
Transcription tools
By default, Archivematica supports one transcription tool: Tesseract, an open source OCR tool.
Transcription commands
By default, Archivematica supports one transcription command, which uses the OCR tool Tesseract.
Transcription commands are expected to write their data to disk inside the SIP.
For commands which perform OCR, metadata can be placed inside the
metadata/OCRfiles directory inside the SIP; other kinds of transcription
should produce files within the metadata directory.
For example, the following bash script is used by Archivematica to transcribe images using Tesseract:
ocrfiles="%SIPObjectsDirectory%metadata/OCRfiles"
test -d "$ocrfiles" || mkdir -p "$ocrfiles"

tesseract %fileFullName% "$ocrfiles/%fileName%"
For more information about writing a command, see Writing commands above.
Transcription rules
A transcription rule must be created to associate a transcription command with a particular format.
For more information about creating a rule, see Changing rules above.
Validation
Format validation ensures that files are well-formed and compliant with any relevant format specifications. In Archivematica, validation can also be done against a custom policy that is applied to the format.
Validation tools
Archivematica includes two validation tools: JHOVE and MediaConch.
>>>>>>> 6140e75… Remove SWORD API sync warning (#285)
MediaConch
MediaConch was introduced in Archivematica 1.7 as a validation tool specifically for files utilizing the Matroska (MKV) container format, the FFV1 video codec format, and the LPCM audio codec format. This is the file format used and recommended by Archivematica when performing normalization on audiovisual files. For more information about normalization rules, see the Normalization section below.
In addition to validating files against their format specification, MediaConch can also be used to validate file formats against an internal policy created by any institution.
Users can use MediaConchOnline or a local installation of MediaConch to create a policy to check against files being ingested in Archivematica. Policies can include rules such as aspect ratios, bit rate, track information, etc. Policy checking is not restricted to mkv files. A policy can be created for any format which can be characterized by MediaInfo.
To create a policy within Archivematica:
1. Ensure that the Archivematica processing configuration is set to perform policy checks on originals. You can also use these policies to check preservation and access derivatives created by Archivematica or through manual normalization against a local policy.
2. In the Preservation Planning tab, click on Commands under Validation. You should see a sample policy called Check against policy PLACEHOLDER_FOR_POLICY_FILE_NAME using MediaConch. Either replace this command or create a new one using it as a template.
Here is a blank command:
import sys
from ammcpc import MediaConchPolicyCheckerCommand

# Valuate this constant with the text (XML) of the policy.
POLICY = """
<!-- Add your MediaConch policy here! -->
""".strip()

# Valuate this constant with the name of the policy.
POLICY_NAME = 'Add your policy name here'

if __name__ == '__main__':
    target = sys.argv[1]
    policy_checker = MediaConchPolicyCheckerCommand(
        policy=POLICY,
        policy_file_name=POLICY_NAME)
    sys.exit(policy_checker.check(target))
2a. To use your own command, add the MediaConch-created xml between POLICY = “”” and “””.strip() in the Command section. As an example, here’s a very simple policy to check that a file is an mp4:
<policy type="and" name="Is Mp4?" license="CC-BY-SA-4.0+">
  <description>New Is Mp4</description>
  <rule name="Is Mp4?" value="Format" tracktype="General" occurrence="*" operator="=">mp4</rule>
</policy>
2b. In the command above, update the POLICY_NAME field with the name of your policy. This can be anything you like, but it cannot be left blank.
2c. After the policy and policy name fields have been updated, you can save your new FPR policy command.
3. Create or replace a rule (in the Rules section under Validation) with the purpose “Validation against a Policy” for the format you want to check, using the command you just created/edited.
4. Now, when processing a new transfer, there should be a microservice called “Policy checks on originals.” Clicking on the gear icon associated with that microservice will give you details related to your MediaConch policy. Like with other microservices in Archivematica, its background will be green when all policies pass, and turn pink if one or more policies fail. Likewise, if performing policy checks on preservation or access derivatives, this new microservice will appear under the Normalization service during Ingest.
For more information about how to create a policy for policy validation, please see the “Create a Policy” section of the MediaConch documentation.
Validation commands
There are three default validation commands in Archivematica 1.8:
- Validate using JHOVE
- Validate using MediaConch
- Check against policy PLACEHOLDER_FOR_POLICY_FILE_NAME using MediaConch
For more information about writing a command, see Writing commands above.
Validation rules
The default validation rule for most formats in Archivematica is to use JHOVE. The exception is Matroska files, which use MediaConch by default as of Archivematica 1.7.
If you would like to implement a MediaConch policy command, you must also create a rule to invoke the policy checking command for the desired format. For example, if you have created a MediaConch policy command to check against JPG files, you must also create a rule that connects the format with the command.
Validation rules are called during several microservices:
- During the Validate microservice on the Transfer tab, which includes validating formats as well as checking original files against a policy.
- During the Normalize microservice on the Ingest tab, where access and preservation derivatives generated during normalization are validated.
- During the Policy checks for derivatives microservice on the Ingest tab, where access derivatives and preservation derivatives can be checked against a policy.
For more information about creating a rule, see Changing rules above.
Verification
Verification is automatically run after a normalization command. Archivematica will run two commands: one checks if a file exists, and the other checks if the file exists and is greater than 0 bytes in size.
Verification is run on the output of normalization, not on the original file.
You do not need to create rules for verification.
Archivematica 1.8.1
Contents
Search
Open the general index or type your search in the search box.
Available projects
Archivematica
- Version 1.18.0 (stable-current)
- Version 1.17.1 (stable-previous)
- Version 1.16.0 (legacy)
- Version 1.15.1 (legacy)
- Version 1.14.1 (legacy)
- Version 1.13.2 (legacy)
- Version 1.12.2 (legacy)
- Version 1.11.2 (legacy)
- Version 1.10.2 (legacy)
- Version 1.9.3 (legacy)
- Version 1.8.1 (legacy)
- Version 1.7.2 (legacy)
- Version 1.6.1 (legacy)
- Version 1.5 (legacy)
- Version 1.4 (legacy)
Archivematica Storage Service
- Version 0.24.0 (stable-current)
- Version 0.23.0 (stable-previous)
- Version 0.22.0 (legacy)
- Version 0.21.1 (legacy)
- Version 0.20.1 (legacy)
- Version 0.19.0 (legacy)
- Version 0.18.1 (legacy)
- Version 0.17.1 (legacy)
- Version 0.16.1 (legacy)
- Version 0.15.1 (legacy)
- Version 0.14.1 (legacy)
- Version 0.13.0 (legacy)
- Version 0.12.0 (legacy)
- Version 0.11.1 (legacy)
- Version 0.10 (legacy)
- Version 0.9 (legacy)
- Version 0.8 (legacy)
License
Archivematica documentation by Artefactual Systems Inc. is licensed under a Creative Commons Attribution-ShareAlike 4.0 International License.
