CONTENTdm
Archivematica can prepare DIPS for upload to CONTENTdm. As of Archivematica version 1.4, no configuration with your CONTENTdm installation is necessary. Rather, Archivematica will prepare the DIP and allow you to download via the Dashboard or by SFTP to the server Archivematica is installed on.
In Archivematica version 1.4, direct upload to CONTENTdm is no longer available. The process described below assumes the user will use CONTENTdm Project Client to upload DIPs to CONTENTdm.
Should you run into an error during this process, please see Error handling.
On this page
Preparing a transfer for CONTENTdm
Note that it is possible to follow these instructions for either a single simple or compound object, or multiple simple or compound objects.
Preparing the transfer
For a transfer of simple objects:
- Inside the directory you wish to use as a transfer, create two
subdirectories:
metadata, andobjects. - Inside
objects, place the digital objects you wish to transfer. - Inside
metadata, place a file calledmetadata.csv. See preparation instructions below.
Example:
/transferName
    /objects
        file1.tif
        file2.tif
        etc
    /metadata
        metadata.csv
For a transfer of compound objects:
- Inside the directory you wish to use as a transfer, create two
subdirectories:
metadata, andobjects. - Inside
objects, create or place directories, one corrsponding to each compound object. Place the digital objects inside those directories. - Inside metadata, place a file called
metadata.csv. See preparation instructions below.
Example:
/transferName
    /objects
        /directoryOne
             file1.tif
             file2.tif
             etc
        /directoryTwo
             file3.tif
             file4.tif
             etc
    /metadata
        metadata.csv
Preparing the metadata.csv
The first column in the metadata.csv must be called filename. The contents will be the path to the object and/or the directory. For a simple transfer:
objects/filename.tif
For a compound transfer:
objects/directoryName
Or, for a compound transfer with object-level metadata
objects/directoryName/filename.tif
If there are both Dublin Core and non-Dublin Core fields in metadata.csv,
Archivematica will look for “custom” (non-Dublin Core) field names in the
metadata.csv file file and create a tab delimited file based on those fields.
This allows the operator to use the field names as they appear exactly as they
do in the CONTENTdm collection, which eases the field matching in Project
Client. It is also recommended that you enter the non-Dublin Core fields in
the same order as in your CONTENTdm collection. However, if metadata.csv
contains only Dublin Core namespaced fields, Archivematica will create the tab
delimited file using those fieldnames, stripping out the dc namespace. For
example,``dc.title`` will become title.
For more information regarding the creation and transfer of a metadata.csv file, see Import metadata.
Controlling the file order
Currently, the only method of controlling the order of files and directories as listed in the tab delimited file is to ensure they are in alphabetical order. The sort method is based on ASCII characters (e.g. numbers, capital letters, underscores, small case letters).
Other methods of controlling file order could be implemented in future releases. Please see Issue 8448.
Create DIP for CONTENTdm
Important
Ensure that your CONTENTdm target collection has a field called “AIP UUID and a field called “File UUID”. The tab file produced by Archivematica will populate these two fields.
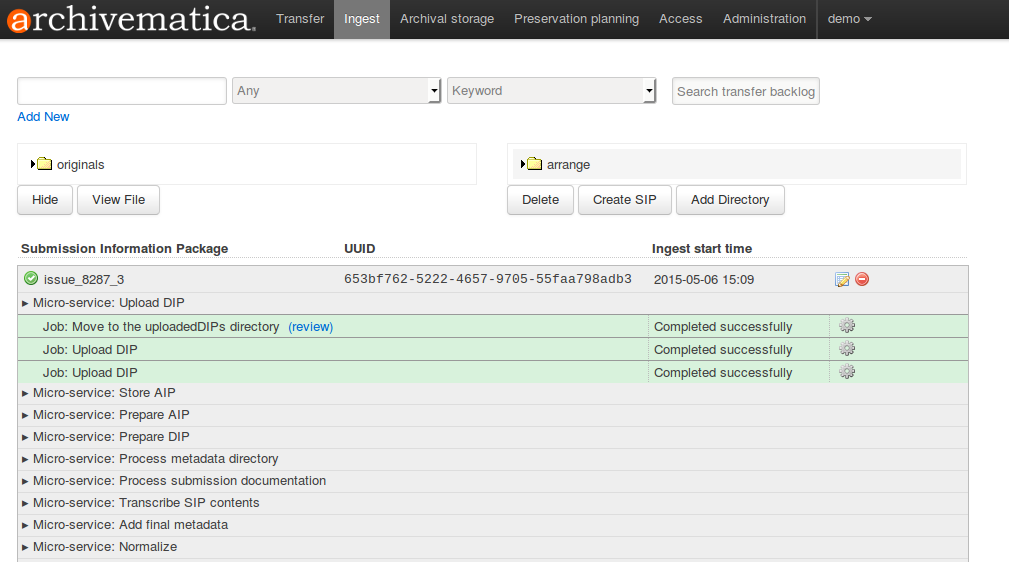
- In the Archivematica dashboard at “Upload DIP”, choose the action “Upload DIP to CONTENTdm” from the drop-down menu.
- Archivematica will create a DIP consisting of normalized or manually normalized access objects and a tab delimited file for use in Project Client.
To review the DIP in the dashboard and download individual DIP objects and/or the tab file, click “review”:
The next screen will display the uploadedDIPs directory, which operators can navigate to locate the required DIP objects. The CONTENTdm tab file will be in the same directory as the DIP objects.
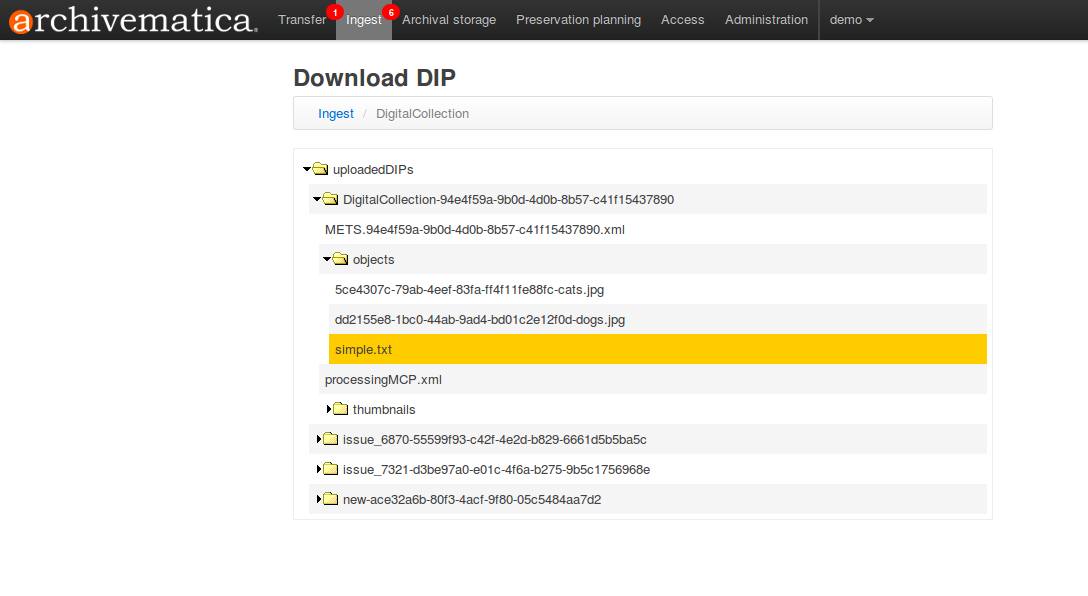
By default, the DIP will be stored in
/var/archivematica/sharedDirectory/watchedDirectories/uploadedDIPs/. It can
be retrieved from this location via SFTP client, or individual objects
downloaded through the web browser.
Tip
Once your work in CONTENTdm Project Client is complete, and your digital objects are uploaded, you may wish to “clean up” your uploadedDIPs directory to save space on your service and keep the Download DIP page manageable. This can be done through the Administration tab, Processing storage usage.
Archivematica 1.8.1
Contents
Search
Open the general index or type your search in the search box.
Available projects
Archivematica
- Version 1.18.0 (stable-current)
- Version 1.17.1 (stable-previous)
- Version 1.16.0 (legacy)
- Version 1.15.1 (legacy)
- Version 1.14.1 (legacy)
- Version 1.13.2 (legacy)
- Version 1.12.2 (legacy)
- Version 1.11.2 (legacy)
- Version 1.10.2 (legacy)
- Version 1.9.3 (legacy)
- Version 1.8.1 (legacy)
- Version 1.7.2 (legacy)
- Version 1.6.1 (legacy)
- Version 1.5 (legacy)
- Version 1.4 (legacy)
Archivematica Storage Service
- Version 0.24.0 (stable-current)
- Version 0.23.0 (stable-previous)
- Version 0.22.0 (legacy)
- Version 0.21.1 (legacy)
- Version 0.20.1 (legacy)
- Version 0.19.0 (legacy)
- Version 0.18.1 (legacy)
- Version 0.17.1 (legacy)
- Version 0.16.1 (legacy)
- Version 0.15.1 (legacy)
- Version 0.14.1 (legacy)
- Version 0.13.0 (legacy)
- Version 0.12.0 (legacy)
- Version 0.11.1 (legacy)
- Version 0.10 (legacy)
- Version 0.9 (legacy)
- Version 0.8 (legacy)
License
Archivematica documentation by Artefactual Systems Inc. is licensed under a Creative Commons Attribution-ShareAlike 4.0 International License.
