Dashboard administration tab
This page describes dashboard user administration in Archivematica via the dashboard. For higher level, technical administrative documentation, please see Administrator manual.
The Archivematica administration pages, under the Administration tab of the dashboard, allows you to configure application components and manage users.
On this page:
- Processing configuration
- General
- Failures
- Transfer source locations
- AIP storage locations
- Processing storage usage
- AtoM DIP upload
- Archivists Toolkit DIP upload
- PREMIS agent
- REST API
- Users
Processing configuration
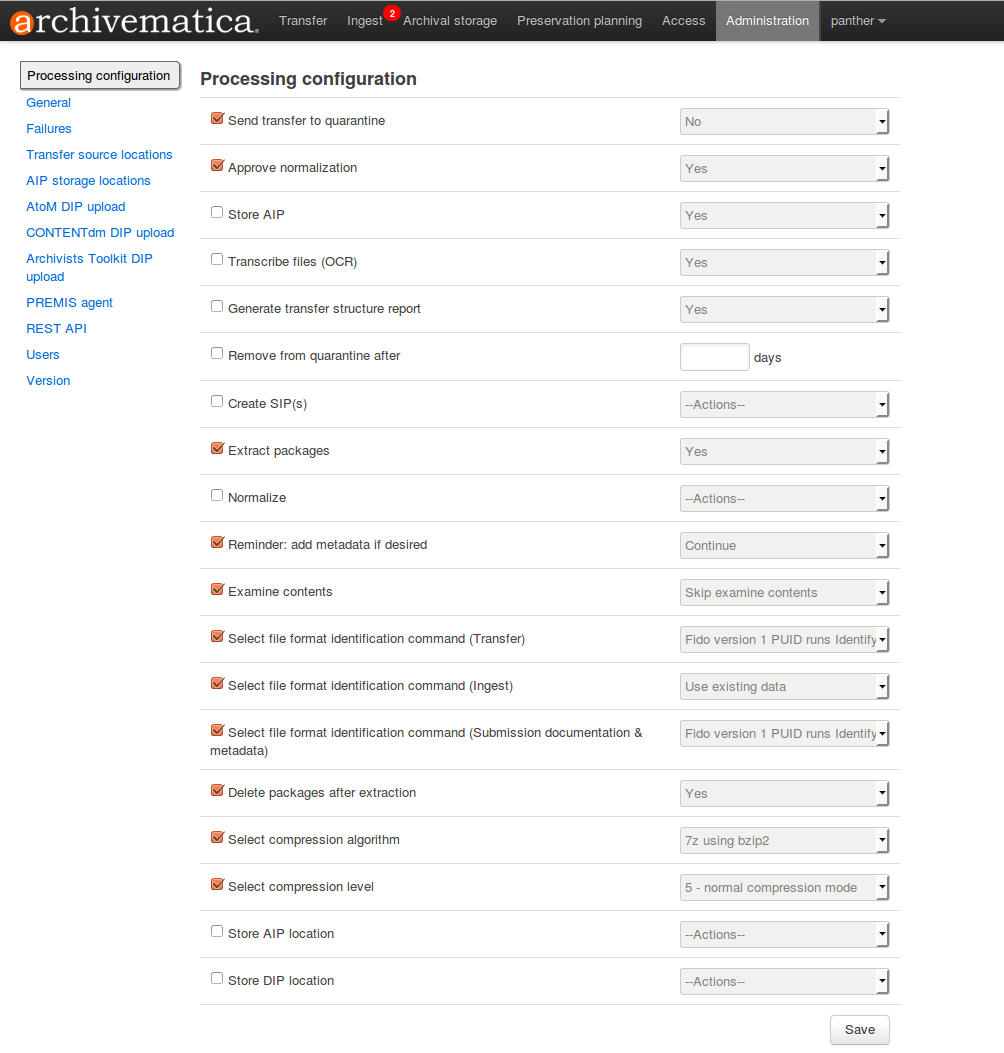
The processing configuration administration page of the dashboard provides you with an easy form to configure the default ‘processingMCP.xml’ that’s added to a SIP or transfer if it doesn’t already contain one. When you change the options using the web interface the necessary XML will be written behind the scenes.
- For the approval (yes/no) steps, the user ticks the box on the left-hand side to make a choice. If the box is not ticked, the approval step will appear in the dashboard.
- For the other steps, if no actions are selected the choices appear in the dashboard
Specific processing configurations available on this page are:
Select whether or not to send transfers to quarantine (yes/no) and decide how long you’d like them to stay there (below).
Approve normalization, sending the AIP to storage, and uploading the DIP without interrupting the workflow in the dashboard.
Store the AIP without interripting the workflow in the dashboard.
Select whether or not Archivematica should transcribe files.
Select whether or not Archivematica should generate a transfer structure report (see Process the transfer)
Select if Archivematica should create one SIP from the transfer and continue processing or send the transfer to backlog.
Select whether to extract packages as well as whether to keep and/or delete the extracted objects and/or the package itself.
Select Normalization options (see Normalize).
Select whether or not Archivematica should remind you to add metadata at the appropriate point during ingest.
Select whether or not to Examine contents.
Select which format identification tool and command to run in both/either transfer and/or ingest to base your normalization upon.
Select which format identification tool and command to run for Submission documentation and metadata.
Select whether packages should be deleted after extraction.
Select between 7z using lzma and 7zip using bzip or parallel bzip2 algorithms for AIP compression.
Select compression levels:
- 1 - fastest mode
- 3 - fast compression mode
- 5 - normal compression mode
- 7 - maximum compression
- 9 - ultra compression
Select one archival storage location where you will consistently send your AIPs and DIPs (if you are storing DIPs rather than sending them immediately to an access system.)
General
In the general configuration section, you can select interface options and set Storage Service options for your Archivematica client.
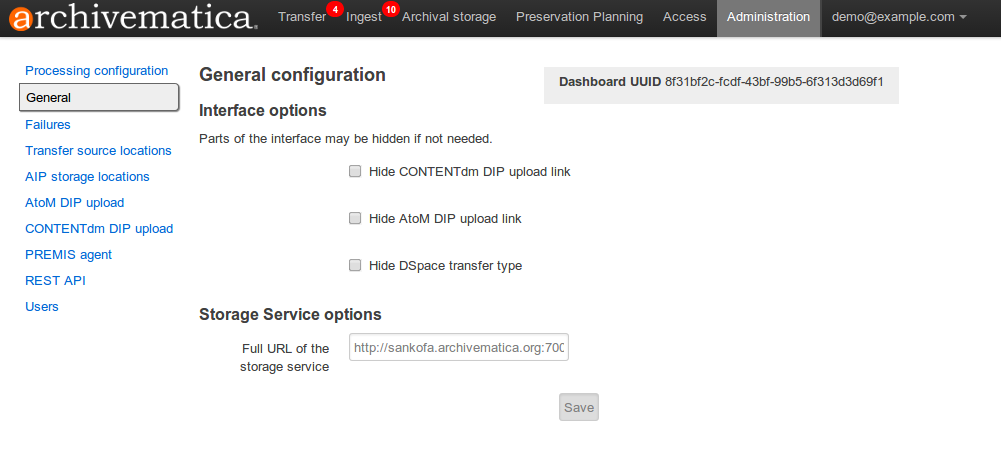
General configuration options in Administration tab of the dashboard
Interface options
Here, you can hide parts of the interface that you don’t need to use. In particular, you can hide CONTENTdm DIP upload link, AtoM DIP upload link and DSpace transfer type.
Storage Service options
This is where you’ll find the complete URL for the Storage Service. See Storage Service for more information about this feature.
Failures
This page displays packages that failed during processing.
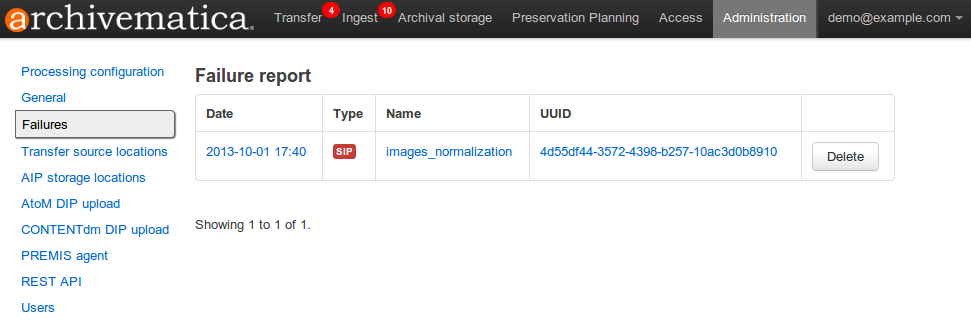
Failures report in the dashboard
Clicking the date, name or UUID will display a report of the failure:
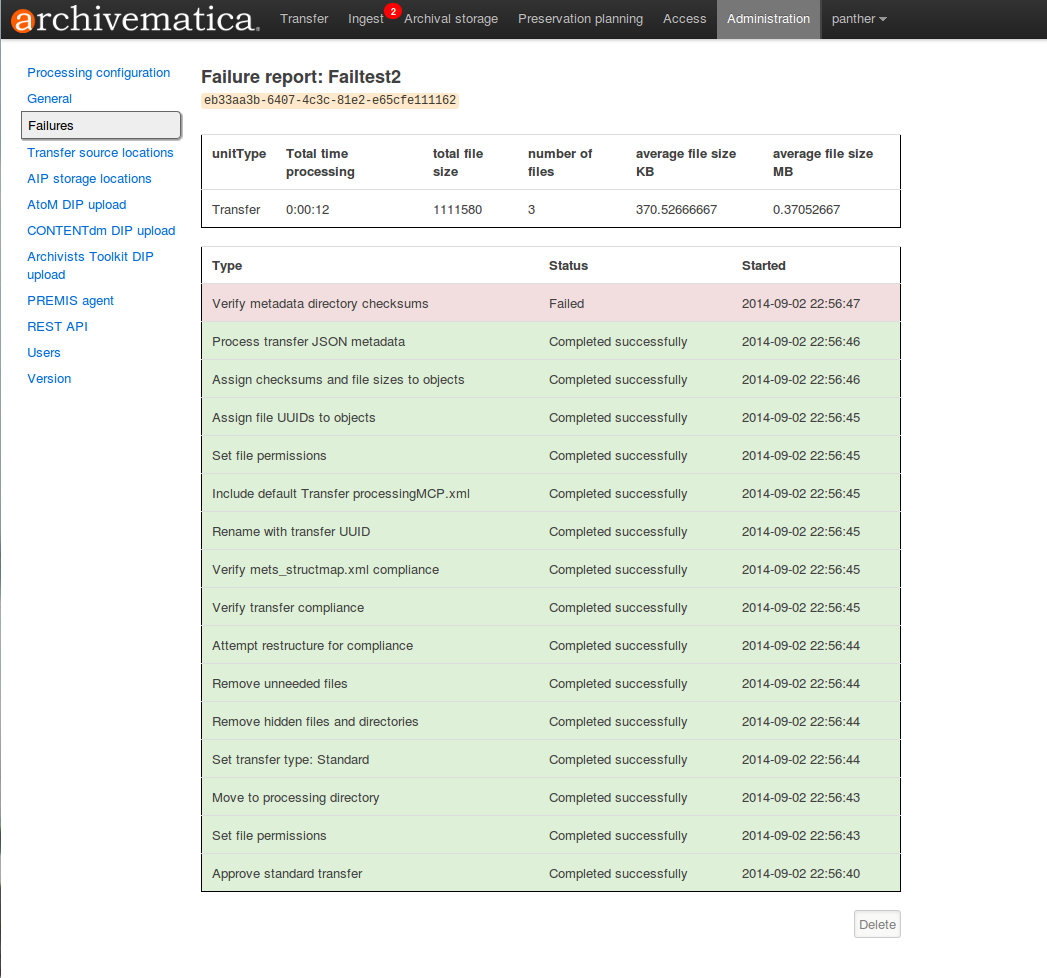
The Failure report can be removed from the Dashboard by clicking Delete.
Transfer source location
Archivematica allows you to start transfers using the operating system’s file browser or via a web interface. Source files for transfers, however, cannot be uploaded using the web interface; they must exist on volumes accessible to the Archivematica MCP server and configured via the Storage Service.
When starting a transfer you are required to select one or more directories of files to add to the transfer.
AIP storage locations
AIP storage directories are directories in which completed AIPs are stored. Storage directories can be specified in a manner similar to transfer source directories using the Storage Service.
You can view your transfer source directories in the Administrative tab of the dashboard under “AIP storage locations”.
Processing storage usage
This section of the Administration page displays various processing locations with their current usage of available space.
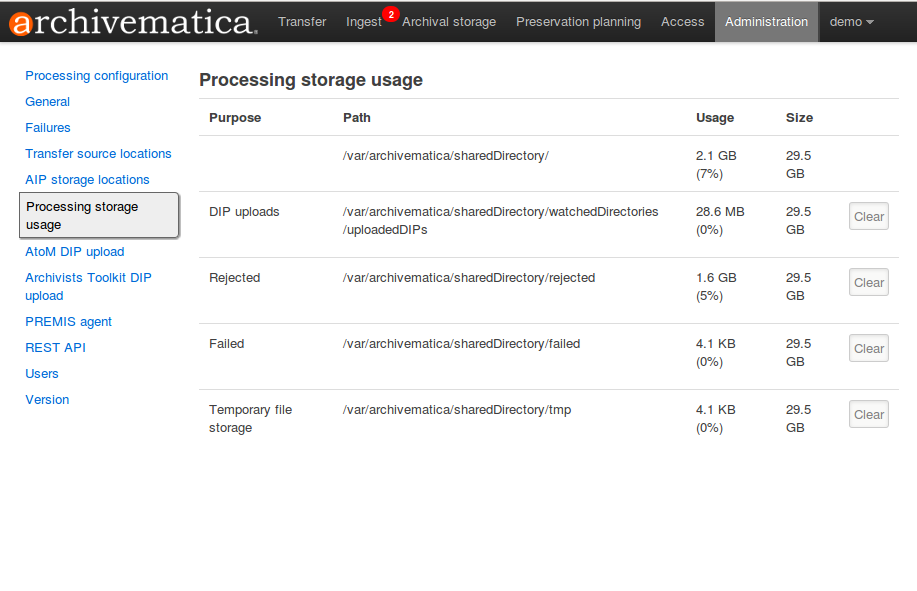
Administrators can use the “clear” buttons to delete the contents of these processing locations to make more room on their server.
AtoM DIP upload
Archivematica can upload DIPs directly to an AtoM website so the contents can be accessed online. The AtoM DIP upload configuration page is where you specify the details of the AtoM installation you’d like the DIPs uploaded to (and, if using Rsync to transfer the DIP files, Rsync transfer details).
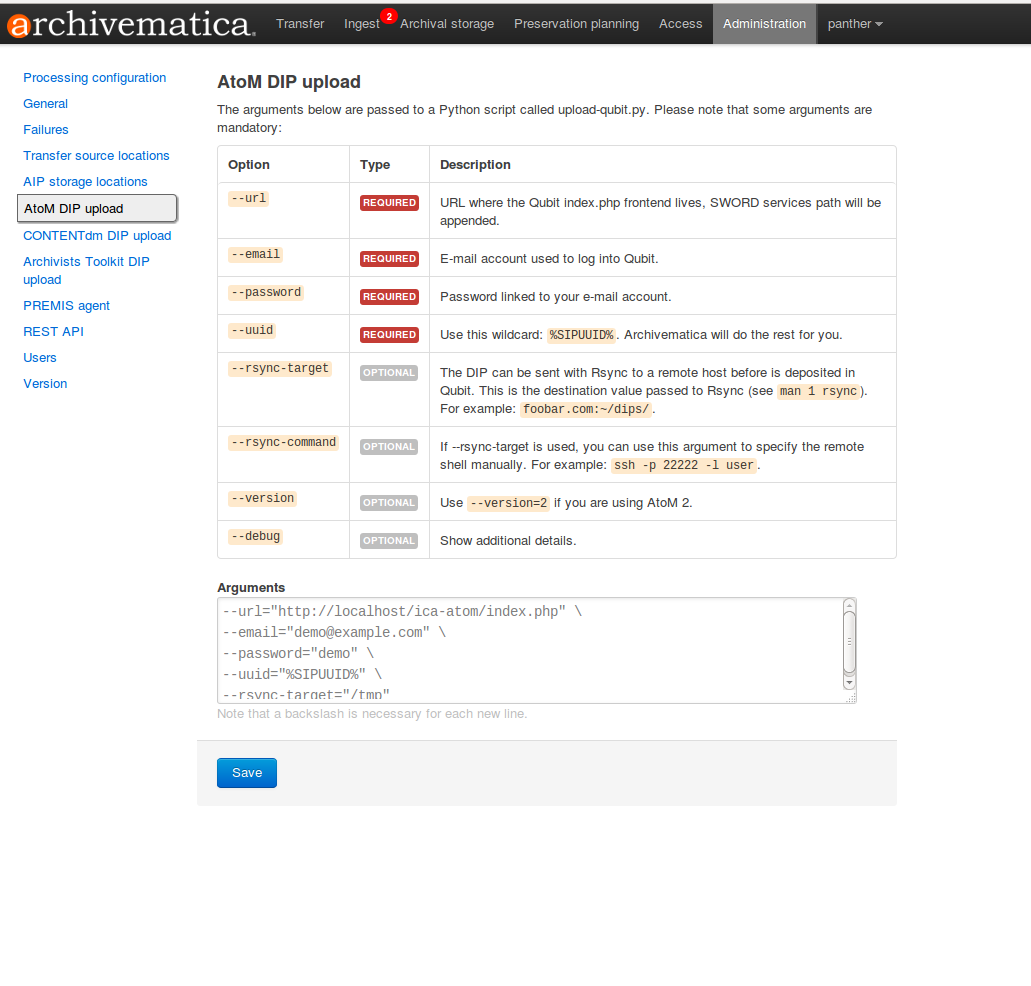
AtoM DIP upload configuration in Dashboard.
The required parameters are:
url: the destination AtoM website’s URL
password: the password used to log in to AtoM.
uuid: Use this wildcard: %SIPUUID%. Archivematica will do the rest for you.
If using rsync to send the DIP to AtoM, enter
--rsync-target="address.of.atom.machine:/tmp" \
If you are using AtoM 2.0 or higher, enter
--version=2
Do not enter the specific version of AtoM, e.g. 2.0.1, only 2.
For additional details in failure reports, also enable debug mode:
--debug
To set any parameters for AtoM DIP upload change the values, preserving the existing format they’re specified in, in the “Arguments” field then click “Save”.
In the AtoM user interface
In the AtoM user interface, ensure that:
The sword plugin (Admin –> Plugins –> qtSwordPlugin) is be enabled in order for AtoM to receive uploaded DIPs.
Enabling Job scheduling (Admin –> Settings –> Job scheduling) is also recommended.
See also
AtoM configuration instructions in the Administrator manual
Archivists Toolkit DIP upload
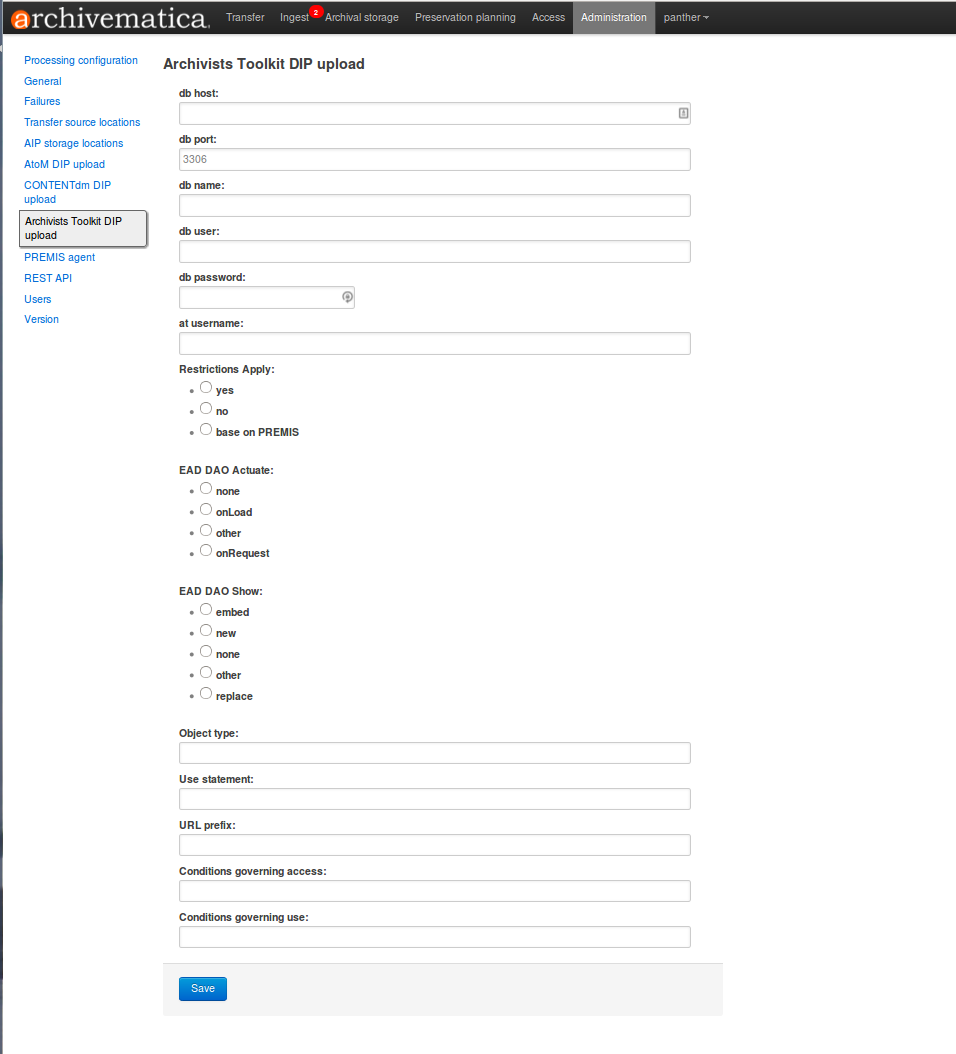
Before ingesting digital objects destined for Archivists’ Toolkit, ensure that the Achivists’ Toolkit DIP upload settings in the administration tab of the dashboard have been set.
- These settings should be created and saved before digital objects destined for upload to Archivists Toolkit are processed. Note that these can be set once and used for processing any number of transfers (i.e. they do not need to be re-set for each transfer). The screenshots below show the template in the dashboard.
- Include the IP address of the host database (db host), the database port (db port), the database name (db name), the database user (db user), and the Archivists’ Toolkit user name (at username).
- Should you wish to enable the PREMIS-based restrictions functionality, choose “base on PREMIS” under “Restrictions Apply”. To add PREMIS rights, please see Add PREMIS rights and restrictions.
PREMIS agent
The PREMIS agent name and code can be set via the administration interface.
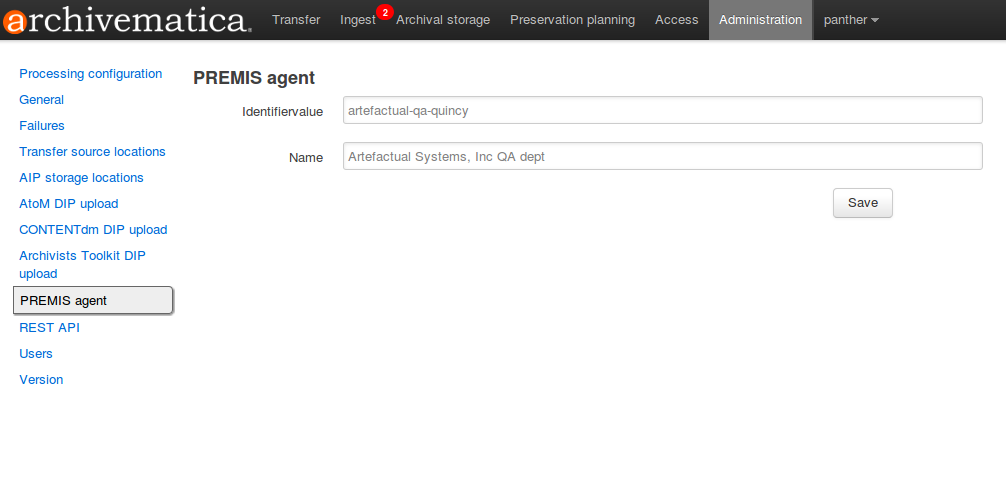
The PREMIS agent information is used in the METS files created by Archivematica to identify the agency performing the digital preservation events.
See also
REST API
Archivematica includes a REST API for automating transfer approval. Artefactual recommends that a technical administrator configure the options for this feature.
To configure Archivematica to use the REST API for automation, see Administrator manual - REST API.
Users
The dashboard provides a simple cookie-based user authentication system using the Django authentication framework. Access to the dashboard is limited only to logged-in users and a login page will be shown when the user is not recognized. If the application can’t find any user in the database, the user creation page will be shown instead, allowing the creation of an administrator account.
Users can be also created, modified and deleted from the Administration tab. Only users who are administrators can create and edit user accounts.
You can add a new user to the system by clicking the “Add new” button on the user administration page. By adding a user you provide a way to access Archivematica using a username/password combination. Should you need to change a user’s username or password, you can do so by clicking the “Edit” button, corresponding to the user, on the administration page. Should you need to revoke a user’s access, you can click the corresponding “Delete” button.
Archivematica 1.4
Contents
Search
Open the general index or type your search in the search box.
Available projects
Archivematica
- Version 1.18.0 (stable-current)
- Version 1.17.1 (stable-previous)
- Version 1.16.0 (legacy)
- Version 1.15.1 (legacy)
- Version 1.14.1 (legacy)
- Version 1.13.2 (legacy)
- Version 1.12.2 (legacy)
- Version 1.11.2 (legacy)
- Version 1.10.2 (legacy)
- Version 1.9.3 (legacy)
- Version 1.8.1 (legacy)
- Version 1.7.2 (legacy)
- Version 1.6.1 (legacy)
- Version 1.5 (legacy)
- Version 1.4 (legacy)
Archivematica Storage Service
- Version 0.24.0 (stable-current)
- Version 0.23.0 (stable-previous)
- Version 0.22.0 (legacy)
- Version 0.21.1 (legacy)
- Version 0.20.1 (legacy)
- Version 0.19.0 (legacy)
- Version 0.18.1 (legacy)
- Version 0.17.1 (legacy)
- Version 0.16.1 (legacy)
- Version 0.15.1 (legacy)
- Version 0.14.1 (legacy)
- Version 0.13.0 (legacy)
- Version 0.12.0 (legacy)
- Version 0.11.1 (legacy)
- Version 0.10 (legacy)
- Version 0.9 (legacy)
- Version 0.8 (legacy)
License
Archivematica documentation by Artefactual Systems Inc. is licensed under a Creative Commons Attribution-ShareAlike 4.0 International License.
