Dashboard administration tab
The Archivematica administration pages, under the Administration tab of the dashboard, allow you to configure application components and manage users.
On this page:
- Processing configuration
- General
- Failures
- Transfer source locations
- AIP storage locations
- AtoM DIP upload
- Archivists Toolkit DIP upload
- PREMIS agent
- REST API
- Users
Processing configuration
When processing a SIP or transfer, you may want to automate some of the
workflow choices. Choices can be preconfigured by putting a
processingMCP.xml file into the root directory of a SIP/transfer.
If a SIP or transfer is submitted with a processingMCP.xml file,
processing decisions will be made with the included file.
The XML file format is:
<processingMCP>
 <preconfiguredChoices>
     <!-- Send to quarantine? -->
     <preconfiguredChoice>
         <appliesTo>755b4177-c587-41a7-8c52-015277568302</appliesTo>
         <goToChain>d4404ab1-dc7f-4e9e-b1f8-aa861e766b8e</goToChain>
     </preconfiguredChoice>
     <!-- Display metadata reminder -->
     <preconfiguredChoice>
         <appliesTo>eeb23509-57e2-4529-8857-9d62525db048</appliesTo>
         <goToChain>5727faac-88af-40e8-8c10-268644b0142d</goToChain>
     </preconfiguredChoice>
     <!-- Remove from quarantine -->
     <preconfiguredChoice>
         <appliesTo>19adb668-b19a-4fcb-8938-f49d7485eaf3</appliesTo>
         <goToChain>333643b7-122a-4019-8bef-996443f3ecc5</goToChain>
         <delay unitCtime="yes">2419200.0</delay>
     </preconfiguredChoice>
     <!-- Extract packages -->
     <preconfiguredChoice>
         <appliesTo>dec97e3c-5598-4b99-b26e-f87a435a6b7f</appliesTo>
         <goToChain>01d80b27-4ad1-4bd1-8f8d-f819f18bf685</goToChain>
     </preconfiguredChoice>
     <!-- Delete extracted packages -->
     <preconfiguredChoice>
         <appliesTo>f19926dd-8fb5-4c79-8ade-c83f61f55b40</appliesTo>
         <goToChain>85b1e45d-8f98-4cae-8336-72f40e12cbef</goToChain>
     </preconfiguredChoice>
     <!-- Select pre-normalize file format identification command -->
     <preconfiguredChoice>
         <appliesTo>7a024896-c4f7-4808-a240-44c87c762bc5</appliesTo>
         <goToChain>3c1faec7-7e1e-4cdd-b3bd-e2f05f4baa9b</goToChain>
     </preconfiguredChoice>
     <!-- Select compression algorithm -->
     <preconfiguredChoice>
         <appliesTo>01d64f58-8295-4b7b-9cab-8f1b153a504f</appliesTo>
         <goToChain>9475447c-9889-430c-9477-6287a9574c5b</goToChain>
     </preconfiguredChoice>
     <!-- Select compression level -->
     <preconfiguredChoice>
         <appliesTo>01c651cb-c174-4ba4-b985-1d87a44d6754</appliesTo>
         <goToChain>414da421-b83f-4648-895f-a34840e3c3f5</goToChain>
     </preconfiguredChoice>
   </preconfiguredChoices>
  </processingMCP>
Where appliesTo is the UUID associated with the micro-service job presented in
the dashboard, and goToChain is the UUID of the desired selection. The default
processingMCP.xml file is located at /var/archivematica/sharedDirectory/share
dMicroServiceTasksConfigs/processingMCPConfigs/defaultProcessingMCP.xml.
The processing configuration administration page of the dashboard provides you
with an easy form to configure the default processingMCP.xml that’s added to
a SIP or transfer if it doesn’t already contain one. When you change the
options using the web interface the necessary XML will be written behind the
scenes.
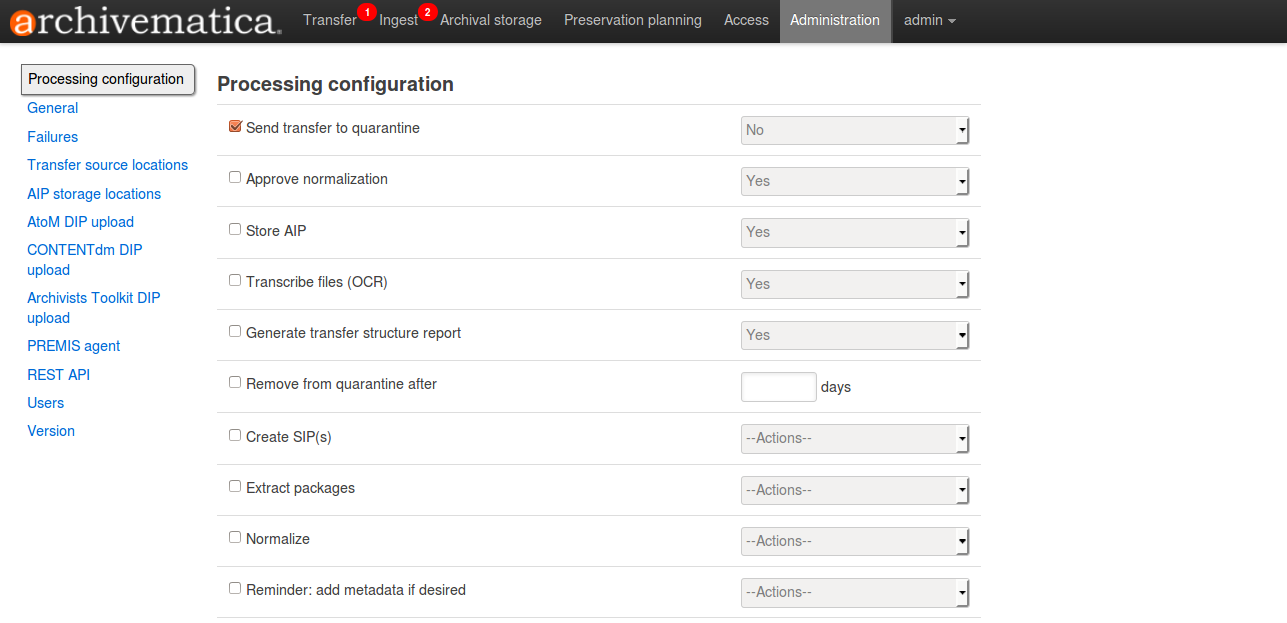
- For the approval (yes/no) steps, the user ticks the box on the left-hand side to make a choice. If the box is not ticked, the approval step will appear in the dashboard.
- For the other steps, if no actions are selected the choices appear in the dashboard
Specific processing configurations available on this page are:
Select whether or not to send transfers to quarantine (yes/no) and decide how long you’d like them to stay there (below).
Approve normalization, sending the AIP to storage, and uploading the DIP without interrupting the workflow in the dashboard.
Store the AIP without interripting the workflow in the dashboard.
Select whether or not Archivematica should transcribe files.
Select whether or not Archivematica should generate a transfer structure report (see Process the transfer)
Select if Archivematica should create one SIP from the transfer and continue processing or send the transfer to backlog.
Select whether to extract packages as well as whether to keep and/or delete the extracted objects and/or the package itself.
Select Normalization options (see Normalize).
Select whether or not Archivematica should remind you to add metadata at the appropriate point during ingest.
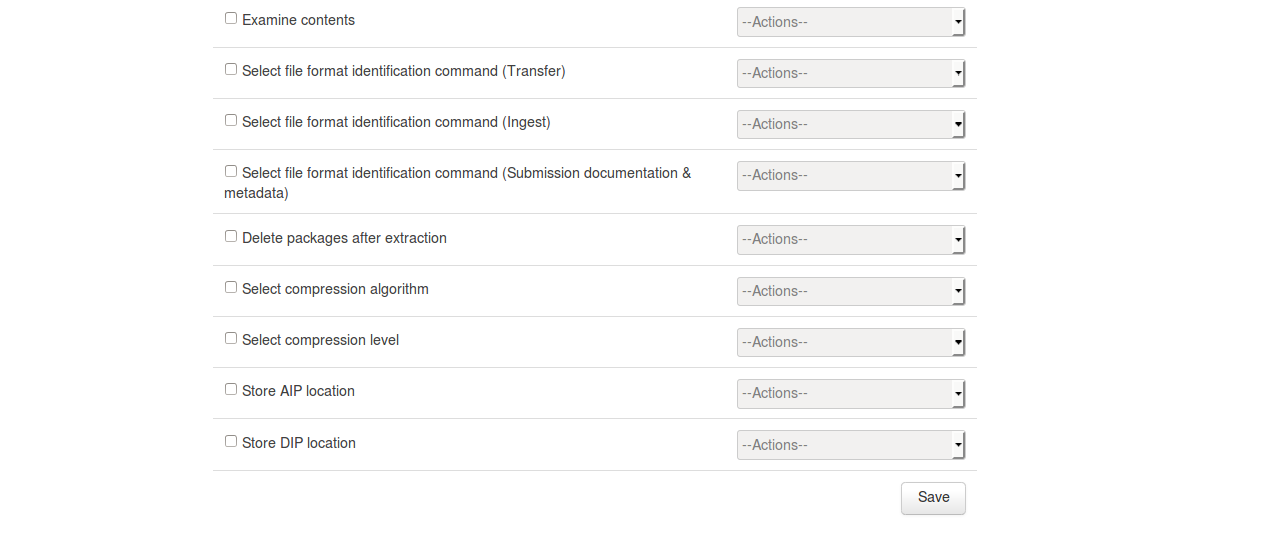
Select whether or not to Examine contents.
Select which format identification tool and command to run in both/either transfer and/or ingest to base your normalization upon.
Select which format identification tool and command to run for Submission documentation and metadata.
Select whether packages should be deleted after extraction.
Select between 7z using lzma and 7zip using bzip or parallel bzip2 algorithms for AIP compression.
Select compression levels:
- 1 - fastest mode
- 3 - fast compression mode
- 5 - normal compression mode
- 7 - maximum compression
- 9 - ultra compression
Select one archival storage location where you will consistently send your AIPs and DIPs (if you are storing DIPs rather than sending them immediately to an access system.)
General
In the general configuration section, you can select interface options and set Storage Service options for your Archivematica client.
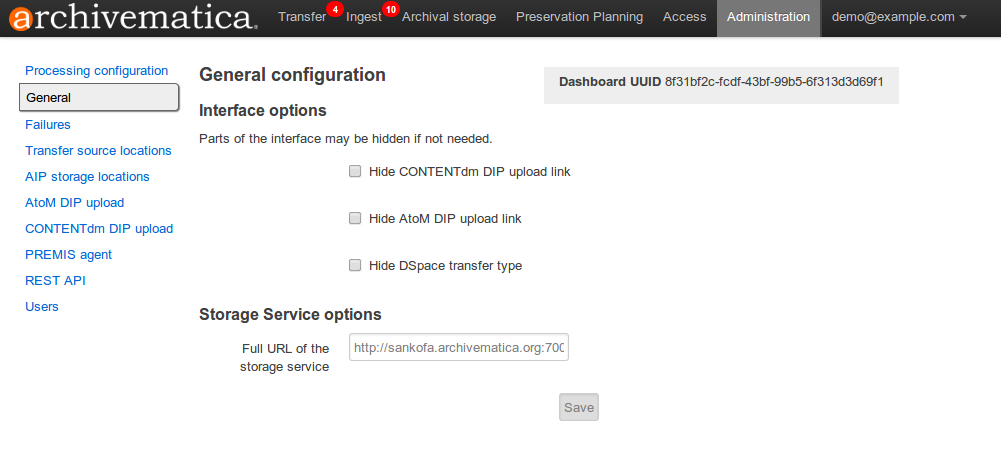
General configuration options in Administration tab of the dashboard
Interface options
Here, you can hide parts of the interface that you don’t need to use. In particular, you can hide CONTENTdm DIP upload link, AtoM DIP upload link and DSpace transfer type.
Storage Service options
This is where you’ll find the complete URL for the Storage Service. See Storage Service for more information about this feature.
Failures
This page displays packages that failed during processing.
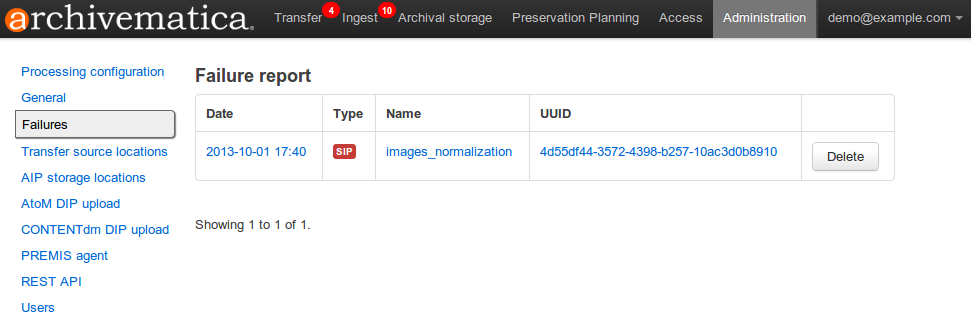
Failures report in the dashboard
Clicking the date, name or UUID will display a report of the failure:
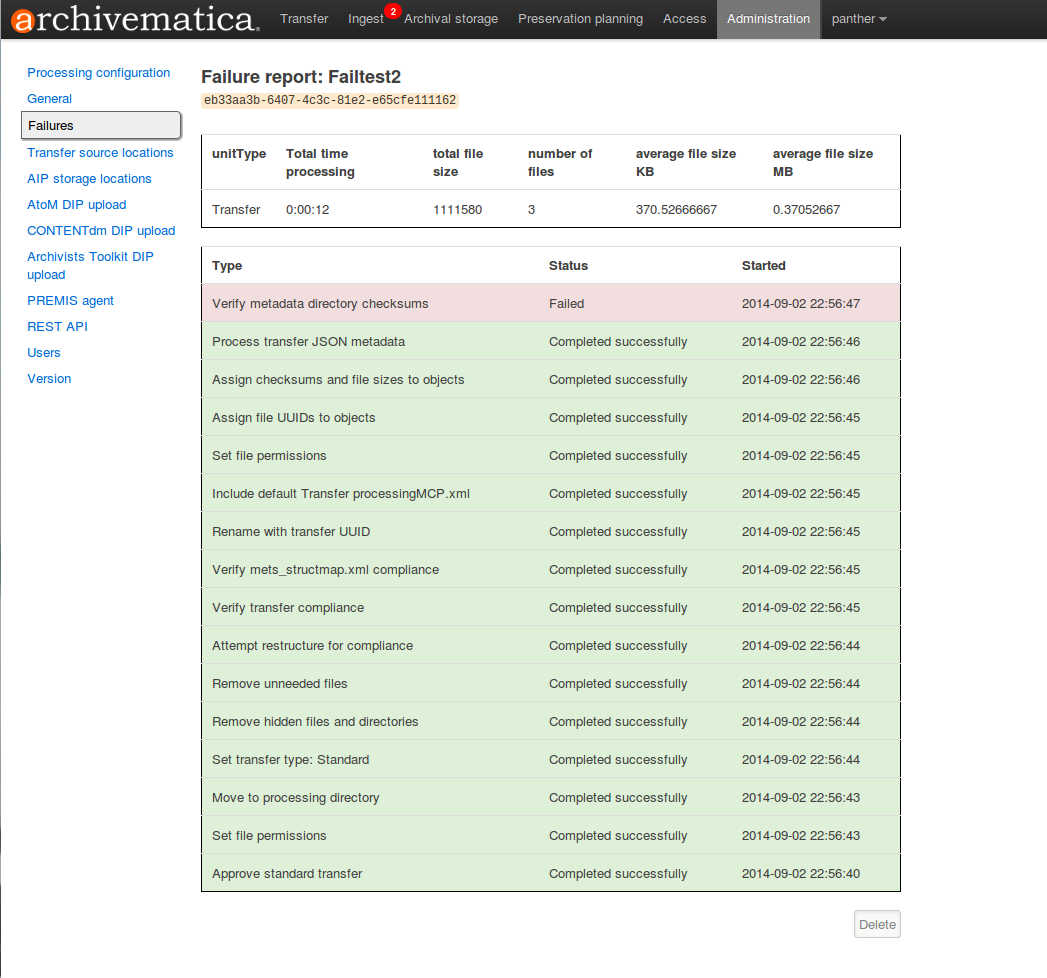
The Failure report can be removed from the Dashboard by clicking Delete.
Transfer source location
Archivematica allows you to start transfers using the operating system’s file browser or via a web interface. Source files for transfers, however, cannot be uploaded using the web interface; they must exist on volumes accessible to the Archivematica MCP server and configured via the Storage Service.
When starting a transfer you are required to select one or more directories of files to add to the transfer.
AIP storage locations
AIP storage directories are directories in which completed AIPs are stored. Storage directories can be specified in a manner similar to transfer source directories using the Storage Service.
You can view your transfer source directories in the Administrative tab of the dashboard under “AIP storage locations”.
AtoM DIP upload
Archivematica can upload DIPs directly to an AtoM website so the contents can be accessed online. The AtoM DIP upload configuration page is where you specify the details of the AtoM installation you’d like the DIPs uploaded to (and, if using Rsync to transfer the DIP files, Rsync transfer details).
The parameters that you’ll most likely want to set are url, email, and password. These parameters, respectively, specify the destination AtoM website’s URL, the email address used to log in to the website, and the password used to log in to the website.
AtoM DIP upload can also use Rsync as a transfer mechanism. Rsync is an open
source utility for efficiently transferring files. The rsync-target parameter
is used to specify an Rsync-style target host/directory pairing,
foobar.com:~/dips/ for example. The rsync-command parameter is used to
specify rsync connection options, ssh -p 22222 -l user for example. If you
are using the rsync option, please see AtoM server configuration below.
To set any parameters for AtoM DIP upload change the values, preserving the
existing format they’re specified in, in the Command arguments field then
click “Save”.
Note that in AtoM, the sword plugin (Admin –> Plugins –> qtSwordPlugin) must be enabled in order for AtoM to receive uploaded DIPs. Enabling Job scheduling (Admin –> Settings –> Job scheduling) is also recommended. From the AtoM documentation, see Settings and Plugins.
AtoM server configuration
This server configuration step is necessary to allow Archivematica to log in to the AtoM server without passwords, and only when the user is deploying the rsync option described above in the AtoM DIP upload section.
To enable sending DIPs from Archivematica to the AtoM server:
Generate SSH keys for the Archivematica user. Leave the passphrase field blank.
$ sudo -u archivematica ssh-keygen
Copy the contents of /var/lib/archivematica/.ssh/id_rsa.pub somewhere
handy, you will need it later.
Now, it’s time to configure the AtoM server so Archivematica can send the DIPs
using SSH/rsync. For that purpose, you will create a user called archivematica
and we are going to assign that user a restricted shell with access only to
rsync:
$ sudo apt-get install rssh
$ sudo useradd -d /home/archivematica -m -s /usr/bin/rssh archivematica
$ sudo passwd -l archivematica
$ sudo vim /etc/rssh.conf // Make sure that allowrsync is uncommented!
Add the SSH key that we generated before:
$ sudo mkdir /home/archivematica/.ssh
$ chmod 700 /home/archivematica/.ssh/
$ sudo vim /home/archivematica/.ssh/authorized_keys // Paste here the contents of id_dsa.pub
$ chown -R archivematica:archivematica /home/archivematica
In Archivematica, make sure that you update the --rsync-target accordingly.
These are the parameters that we are passing to the upload-qubit microservice.
Go to the Administration > Upload DIP page in the dashboard.
Generic parameters:
--url="http://atom-hostname/index.php" \
--email="demo@example.com" \
--password="demo" \
--uuid="%SIPUUID%" \
--rsync-target="archivematica@atom-hostname:/tmp" \
--debug
Archivists Toolkit DIP upload
Before ingesting digital objects destined for Archivists’ Toolkit, ensure that the Achivists’ Toolkit DIP upload settings in the administration tab of the dashboard have been set.
- These settings should be created and saved before digital objects destined for upload to Archivists Toolkit are processed. Note that these can be set once and used for processing any number of transfers (i.e. they do not need to be re-set for each transfer). The screenshots below show the template in the dashboard.
- Include the IP address of the host database (db host), the database port (db port), the database name (db name), the database user (db user), and the Archivists’ Toolkit user name (at username).
- Should you wish to enable the PREMIS-based restrictions functionality, choose “base on PREMIS” under “Restrictions Apply”. To add PREMIS rights, please see Add PREMIS rights and restrictions.
PREMIS agent
The PREMIS agent name and code can be set here via the administration interface.
Rest API
In addition to automation using the processingMCP.xml file, Archivematica
includes a REST API for automating transfer approval. Using this API, you can
create a custom script that copies a transfer to the appropriate directory
then uses the curl command, or some other means, to let Archivematica know
that the copy is complete.
API keys
Use of the REST API requires the use of API keys. An API key is associated with a specific user. To generate an API key for a user:
- Browse to /administration/accounts/list/
- Click the “Edit” button for the user you’d like to generate an API key for
- Click the “Regenerate API key” checkbox
- Click “Save”
After generating an API key, you can click the “Edit” button for the user and you should see the API key.
IP whitelist
In addition to creating API keys, you’ll need to add the IP of any computer
making REST requests to the REST API whitelist. The IP whitelist can be
edited in the administration interface at /administration/api/.
Approving a transfer
The REST API can be used to approve a transfer. The transfer must first be
copied into the appropriate watch directory. To determine the location of the
appropriate watch directory, first figure out where the shared directory is
from the watchDirectoryPath value of
/etc/archivematica/MCPServer/serverConfig.conf. Within that directory is a
subdirectory activeTransfers. In this subdirectory are watch directories for
the various transfer types.
When using the REST API to approve a transfer, if a transfer type isn’t specified, the transfer will be deemed a standard transfer.
HTTP Method: POST
URL: /api/transfer/approve
Parameters:
directory: directory name of the transfer
type (optional): transfer type [standard|dspace|unzipped bag|zipped bag]
api_key: an API key
username: the username associated with the API key
Example curl command:
curl --data "username=rick&api_key=f12d6b323872b3cef0b71be64eddd52f87b851a6&type=standard&directory=MyTransfer" http://127.0.0.1/api/transfer/approve
Example result:
{"message": "Approval successful."}
Listing unapproved transfers
The REST API can be used to get a list of unapproved transfers. Each transfer’s directory name and type is returned.
Method: GET
URL: /api/transfer/unapproved
Parameters:
api_key: an API key
username: the username associated with the API key
Example curl command:
curl "http://127.0.0.1/api/transfer/unapproved?username=rick&api_key=f12d6b323872b3cef0b71be64eddd52f87b851a6"
Example result:
{
    "message": "Fetched unapproved transfers successfully.",
    "results": [{
            "directory": "MyTransfer",
           "type": "standard"
        }
    ]
}
Users
The dashboard provides a simple cookie-based user authentication system using the Django authentication framework. Access to the dashboard is limited only to logged-in users and a login page will be shown when the user is not recognized. If the application can’t find any user in the database, the user creation page will be shown instead, allowing the creation of an administrator account.
Users can be also created, modified and deleted from the Administration tab. Only users who are administrators can create and edit user accounts.
You can add a new user to the system by clicking the “Add new” button on the user administration page. By adding a user you provide a way to access Archivematica using a username/password combination. Should you need to change a user’s username or password, you can do so by clicking the “Edit” button, corresponding to the user, on the administration page. Should you need to revoke a user’s access, you can click the corresponding “Delete” button.
CLI creation of administrative users
If you need an additional administrator user one can be created via the command-line, issue the following commands:
cd /usr/share/archivematica/dashboard
export PATH=$PATH:/usr/share/archivematica/dashboard
export DJANGO_SETTINGS_MODULE=settings.common
python manage.py createsuperuser
CLI password resetting
If you’ve forgotten the password for your administrator user, or any other user, you can change it via the command-line:
cd /usr/share/archivematica/dashboard
export PATH=$PATH:/usr/share/archivematica/dashboard
export DJANGO_SETTINGS_MODULE=settings.common
python manage.py changepassword <username>
Security
Archivematica uses PBKDF2 as the default algorithm to store passwords. This should be sufficient for most users: it’s quite secure, requiring massive amounts of computing time to break. However, other algorithms could be used as the following document explains: How Django stores passwords .
Our plan is to extend this functionality in the future adding groups and granular permissions support.
Archivematica 1.4
Contents
Search
Open the general index or type your search in the search box.
Available projects
Archivematica
- Version 1.18.0 (stable-current)
- Version 1.17.1 (stable-previous)
- Version 1.16.0 (legacy)
- Version 1.15.1 (legacy)
- Version 1.14.1 (legacy)
- Version 1.13.2 (legacy)
- Version 1.12.2 (legacy)
- Version 1.11.2 (legacy)
- Version 1.10.2 (legacy)
- Version 1.9.3 (legacy)
- Version 1.8.1 (legacy)
- Version 1.7.2 (legacy)
- Version 1.6.1 (legacy)
- Version 1.5 (legacy)
- Version 1.4 (legacy)
Archivematica Storage Service
- Version 0.24.0 (stable-current)
- Version 0.23.0 (stable-previous)
- Version 0.22.0 (legacy)
- Version 0.21.1 (legacy)
- Version 0.20.1 (legacy)
- Version 0.19.0 (legacy)
- Version 0.18.1 (legacy)
- Version 0.17.1 (legacy)
- Version 0.16.1 (legacy)
- Version 0.15.1 (legacy)
- Version 0.14.1 (legacy)
- Version 0.13.0 (legacy)
- Version 0.12.0 (legacy)
- Version 0.11.1 (legacy)
- Version 0.10 (legacy)
- Version 0.9 (legacy)
- Version 0.8 (legacy)
License
Archivematica documentation by Artefactual Systems Inc. is licensed under a Creative Commons Attribution-ShareAlike 4.0 International License.
