Dashboard Administration tab
The Archivematica administration pages, under the Administration tab of the dashboard, allow you to configure application components and manage users.
On this page:
- Processing configuration
- General
- Failures
- Transfer source locations
- AIP storage locations
- Processing storage usage
- DIP upload
- PREMIS agent
- REST API
- Users
- Handle Server config
- Language
- Version
Processing configuration
The processing configuration administration page of the dashboard allows users to configure the job decision points presented by Archivematica during transfer and ingest. When you install Archivematica, there are two default processing configurations:
Default, which is used for any transfer started manually from the Transfer tab, automatically via the automation tools, or in any other context where no other processing configuration is specified.Automated, which is used for transfers automatically started from Jisc RDSS environments (if you are not a Jisc user, feel free to delete this configuration).
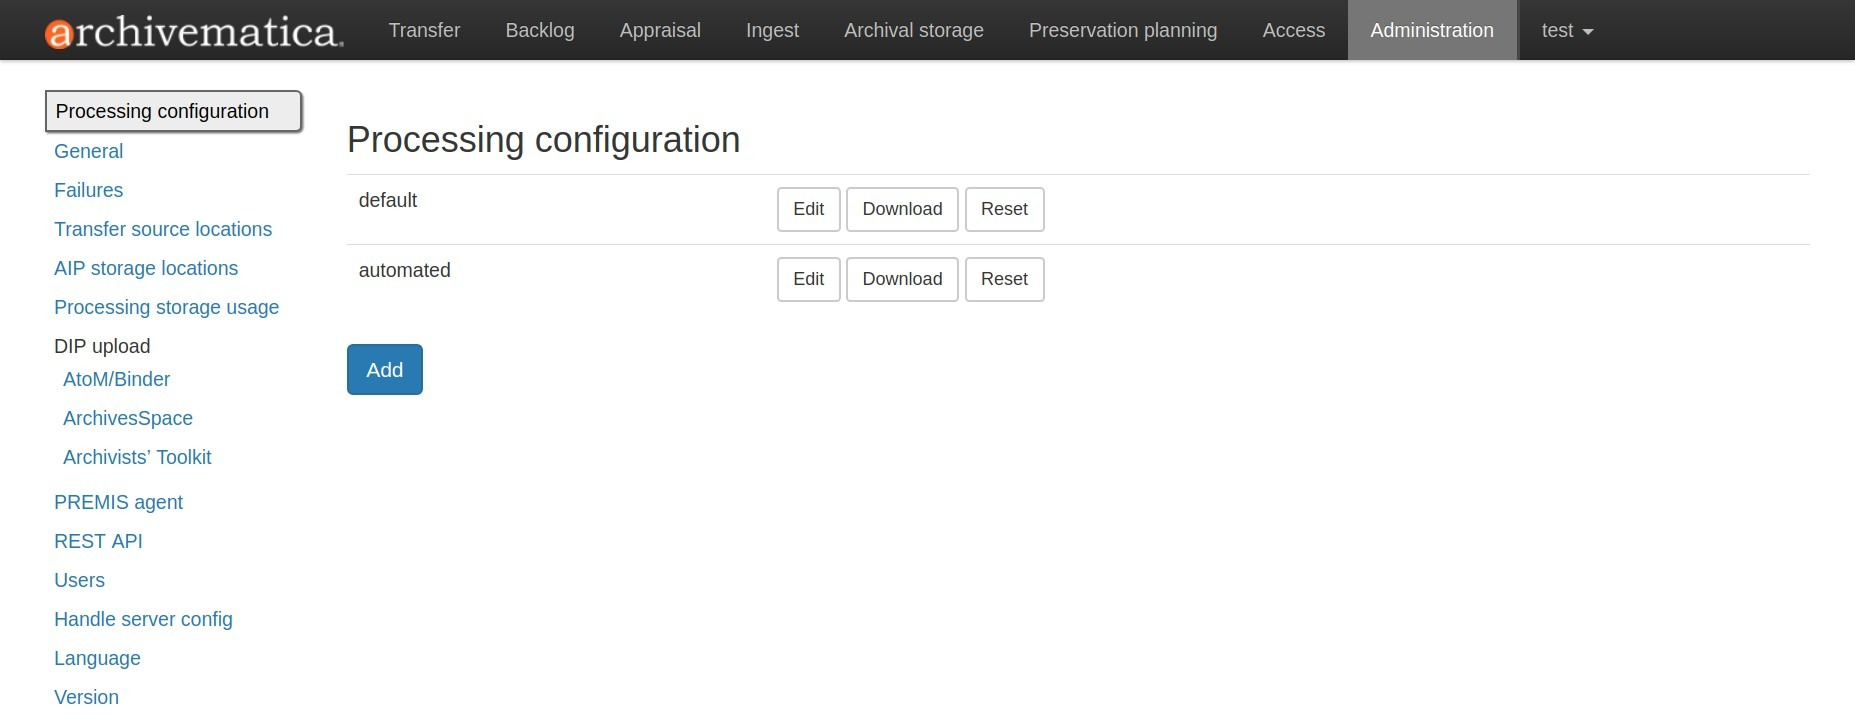
By clicking Edit, you will be taken to a form where you can configure the default processingMCP.xml that governs these decisions. Clicking on Add will allow you to create a new processing configuration. When you change the options using the web interface the necessary XML will be written behind the scenes.
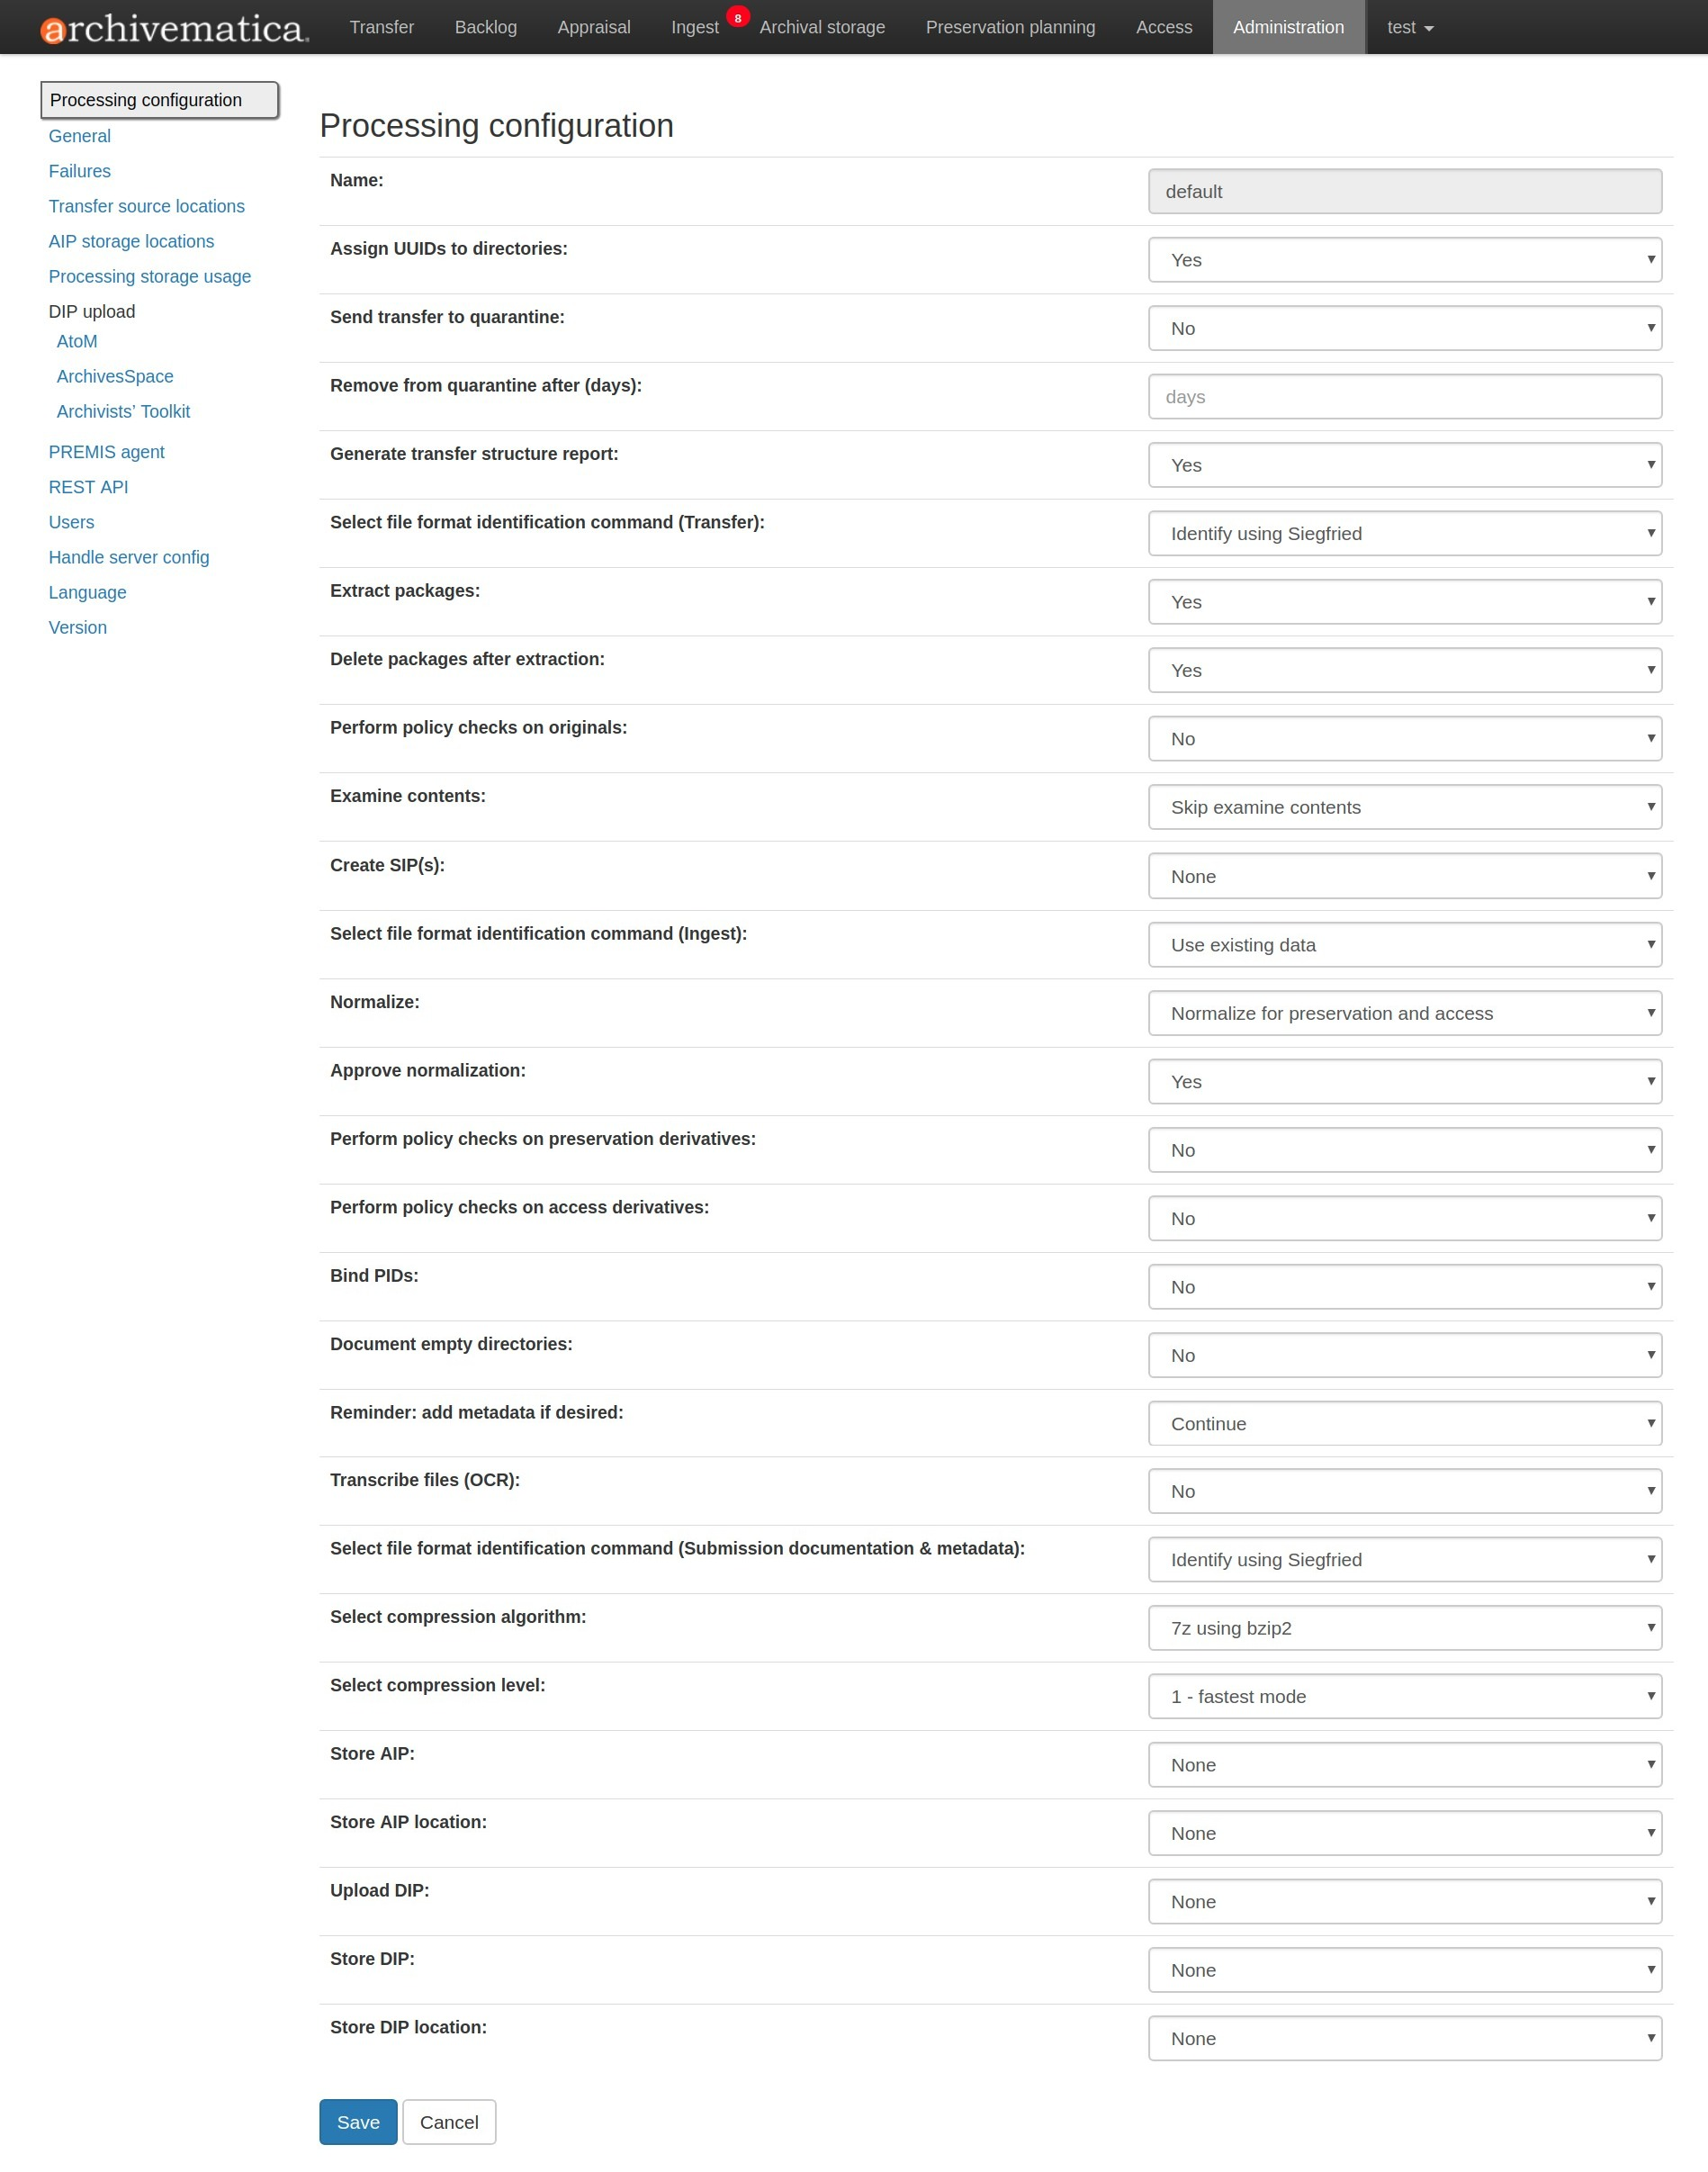
For more information about configuring processing decisions in the Archivematica dashboard, see Processing configuration page in the User Manual. The Processing configuration page contains a list of all of the decision points and their options.
You can also revert the default and automated processing configurations to their pre-sets by clicking on Reset. Please note that the pre-sets for the default processing configuration are noted on the Processing configuration in the User Manual.
Changes to this form are written to a file called processingMCP.xml. When
you start a transfer in the Archivematica dashboard, it automatically uses the
default processingMCP.xml.
Using a custom processing configuration file
For more advanced workflows, you may wants to create multiple processing configurations - for example, along with the default config, users might want to have a configuration specific to video files. You can add a new processing configuration through the user interface by clicking on the Add button.
Once you have created a custom processing configuration, you can download the
XML file by clicking on Download. Rename this file processingMCP.xml.
Then place this file in the root directory of the transfer. Archivematica will
now use the included file to make processing decisions, rather than the default
configuration.
The processingMCP.xml follows a specific XML format:
<processingMCP>
 <preconfiguredChoices>
     <!-- Send to quarantine? -->
     <preconfiguredChoice>
         <appliesTo>755b4177-c587-41a7-8c52-015277568302</appliesTo>
         <goToChain>d4404ab1-dc7f-4e9e-b1f8-aa861e766b8e</goToChain>
     </preconfiguredChoice>
     <!-- Display metadata reminder -->
     <preconfiguredChoice>
         <appliesTo>eeb23509-57e2-4529-8857-9d62525db048</appliesTo>
         <goToChain>5727faac-88af-40e8-8c10-268644b0142d</goToChain>
     </preconfiguredChoice>
     <!-- Remove from quarantine -->
     <preconfiguredChoice>
         <appliesTo>19adb668-b19a-4fcb-8938-f49d7485eaf3</appliesTo>
         <goToChain>333643b7-122a-4019-8bef-996443f3ecc5</goToChain>
         <delay unitCtime="yes">2419200.0</delay>
     </preconfiguredChoice>
     <!-- Extract packages -->
     <preconfiguredChoice>
         <appliesTo>dec97e3c-5598-4b99-b26e-f87a435a6b7f</appliesTo>
         <goToChain>01d80b27-4ad1-4bd1-8f8d-f819f18bf685</goToChain>
     </preconfiguredChoice>
     <!-- Delete extracted packages -->
     <preconfiguredChoice>
         <appliesTo>f19926dd-8fb5-4c79-8ade-c83f61f55b40</appliesTo>
         <goToChain>85b1e45d-8f98-4cae-8336-72f40e12cbef</goToChain>
     </preconfiguredChoice>
     <!-- Select pre-normalize file format identification command -->
     <preconfiguredChoice>
         <appliesTo>7a024896-c4f7-4808-a240-44c87c762bc5</appliesTo>
         <goToChain>3c1faec7-7e1e-4cdd-b3bd-e2f05f4baa9b</goToChain>
     </preconfiguredChoice>
     <!-- Select compression algorithm -->
     <preconfiguredChoice>
         <appliesTo>01d64f58-8295-4b7b-9cab-8f1b153a504f</appliesTo>
         <goToChain>9475447c-9889-430c-9477-6287a9574c5b</goToChain>
     </preconfiguredChoice>
     <!-- Select compression level -->
     <preconfiguredChoice>
         <appliesTo>01c651cb-c174-4ba4-b985-1d87a44d6754</appliesTo>
         <goToChain>414da421-b83f-4648-895f-a34840e3c3f5</goToChain>
     </preconfiguredChoice>
   </preconfiguredChoices>
  </processingMCP>
Note that appliesTo is the UUID associated with the microservice job
presented in the dashboard and goToChain is the UUID of the desired
selection.
General
The General configuration page allows you to connect your Archivematica instance to the Storage Service and set the default checksum algorithm used in processing.
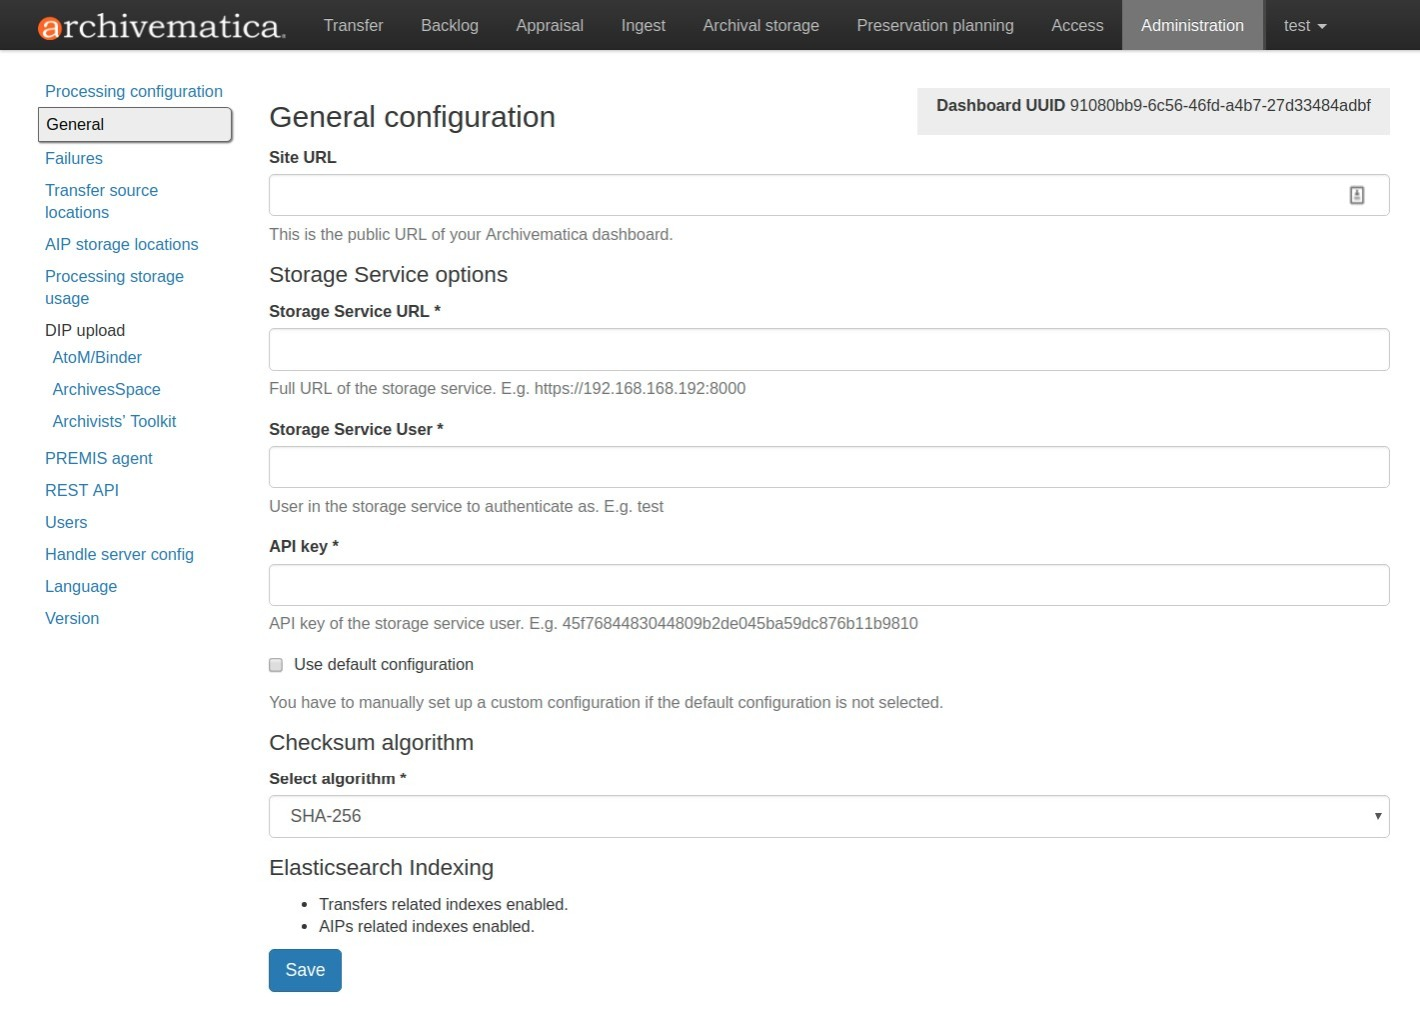
General configuration options in Administration tab of the dashboard
General configuration
Fields:
- Site URL: This is the public URL of your Archivematica dashboard. This field is optional.
Note
Archivematica will try to register itself with the Storage Service. If you have installed Archivematica with a static URL or IP address, you may not need to set the Site URL here. However, if you expect the URL or IP address to change you should use a URL that will not change over time.
Storage Service options
Archivematica’s storage spaces and locations are controlled by a back-end application called the Storage Service. For more information about the Storage Service, see the Storage Service documentation.
Fields:
- Storage Service URL: Full URL of the storage service. E.g. https://192.168.168.192:8000
- Storage Service User: User in the Storage Service to authenticate as. Obtain Storage Service credentials from the Administration tab of the Storage Service.
- API key: API key of the storage service user. Obtain Storage Service credentials from the Administration tab of the Storage Service.
- Use default configuration: Check this box if you have deployed the Storage Service using the default space and location configurations. If you have set up custom configurations, uncheck it.
Checksum algorithm
You can select which checksum algorithm Archivematica will use during the Assign UUIDs and checksums microservice in Transfer. Choose between MD5, SHA-1, SHA-256 and SHA-512.
Elasticsearch indexing
As of Archivematica 1.7, Elasticsearch is optional. Installing Archivematica without Elasticsearch means reduced consumption of compute resources and lower operational complexity. Disabling Elasticsearch means that the Backlog, Appraisal, and Archival Storage tabs do not appear and their functionality is not available.
This section in the General configuration shows if Elasticsearch is enabled or disabled.
Failures
This page displays packages that failed during processing.
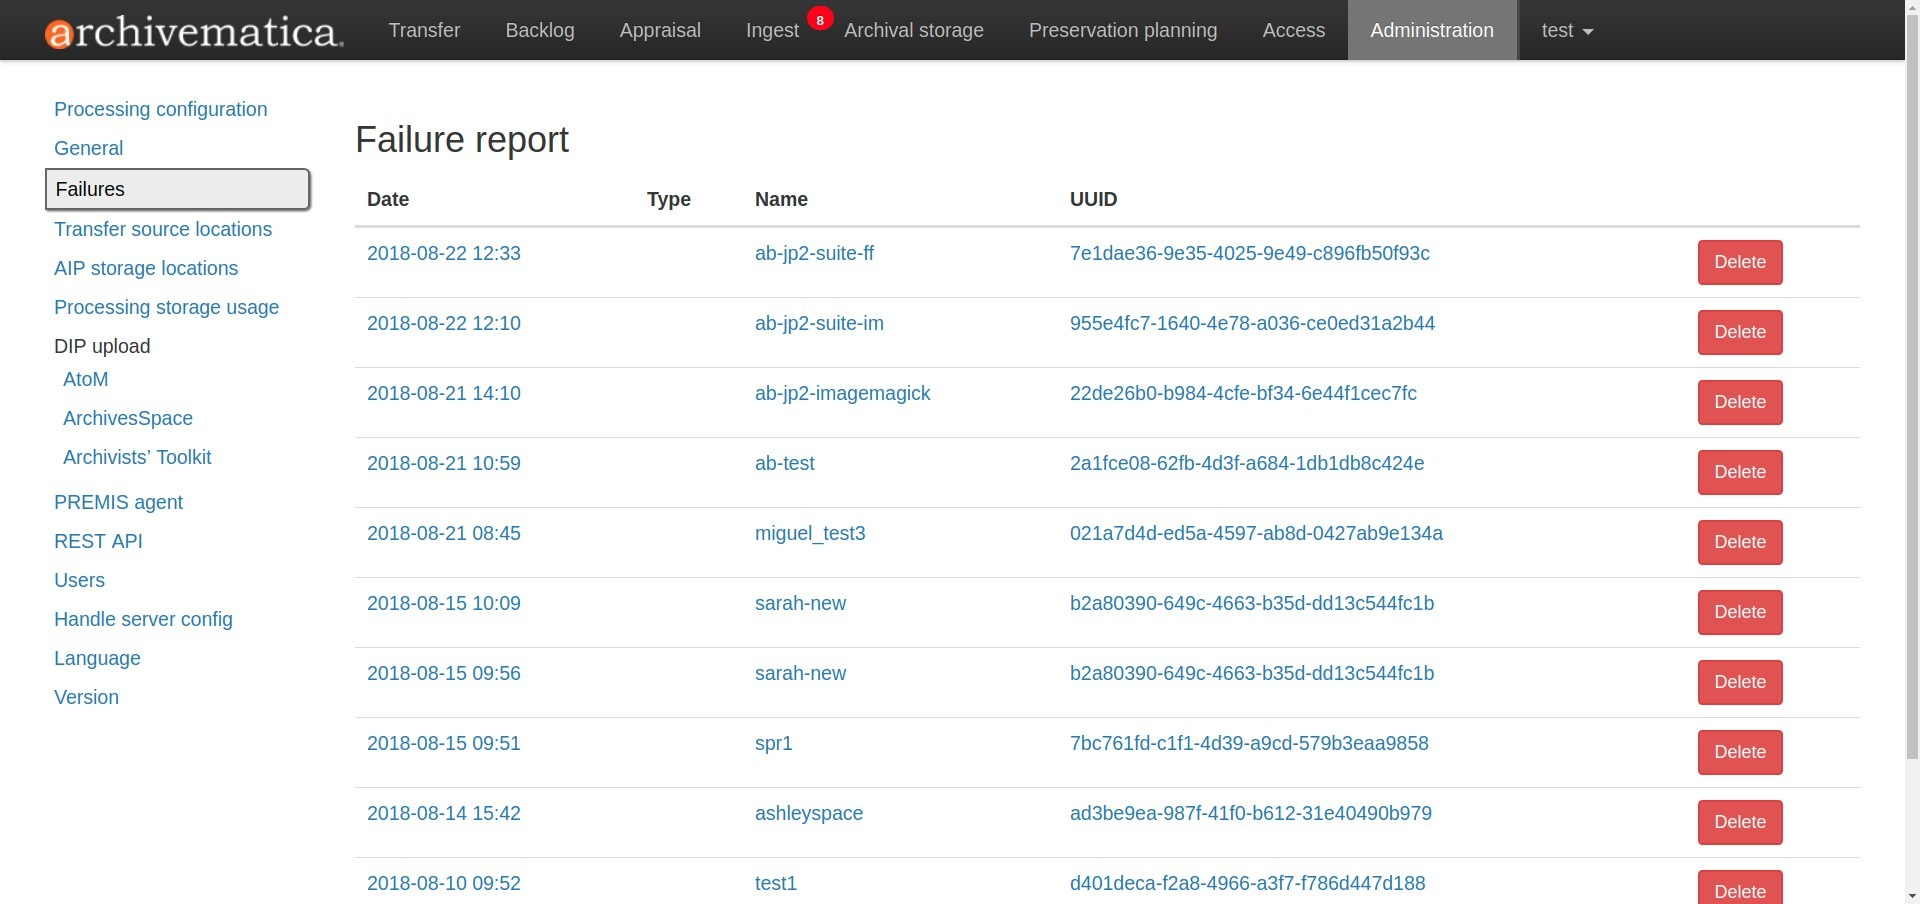
Failures report in the dashboard
Clicking the date, name or UUID will display a report of the failure:
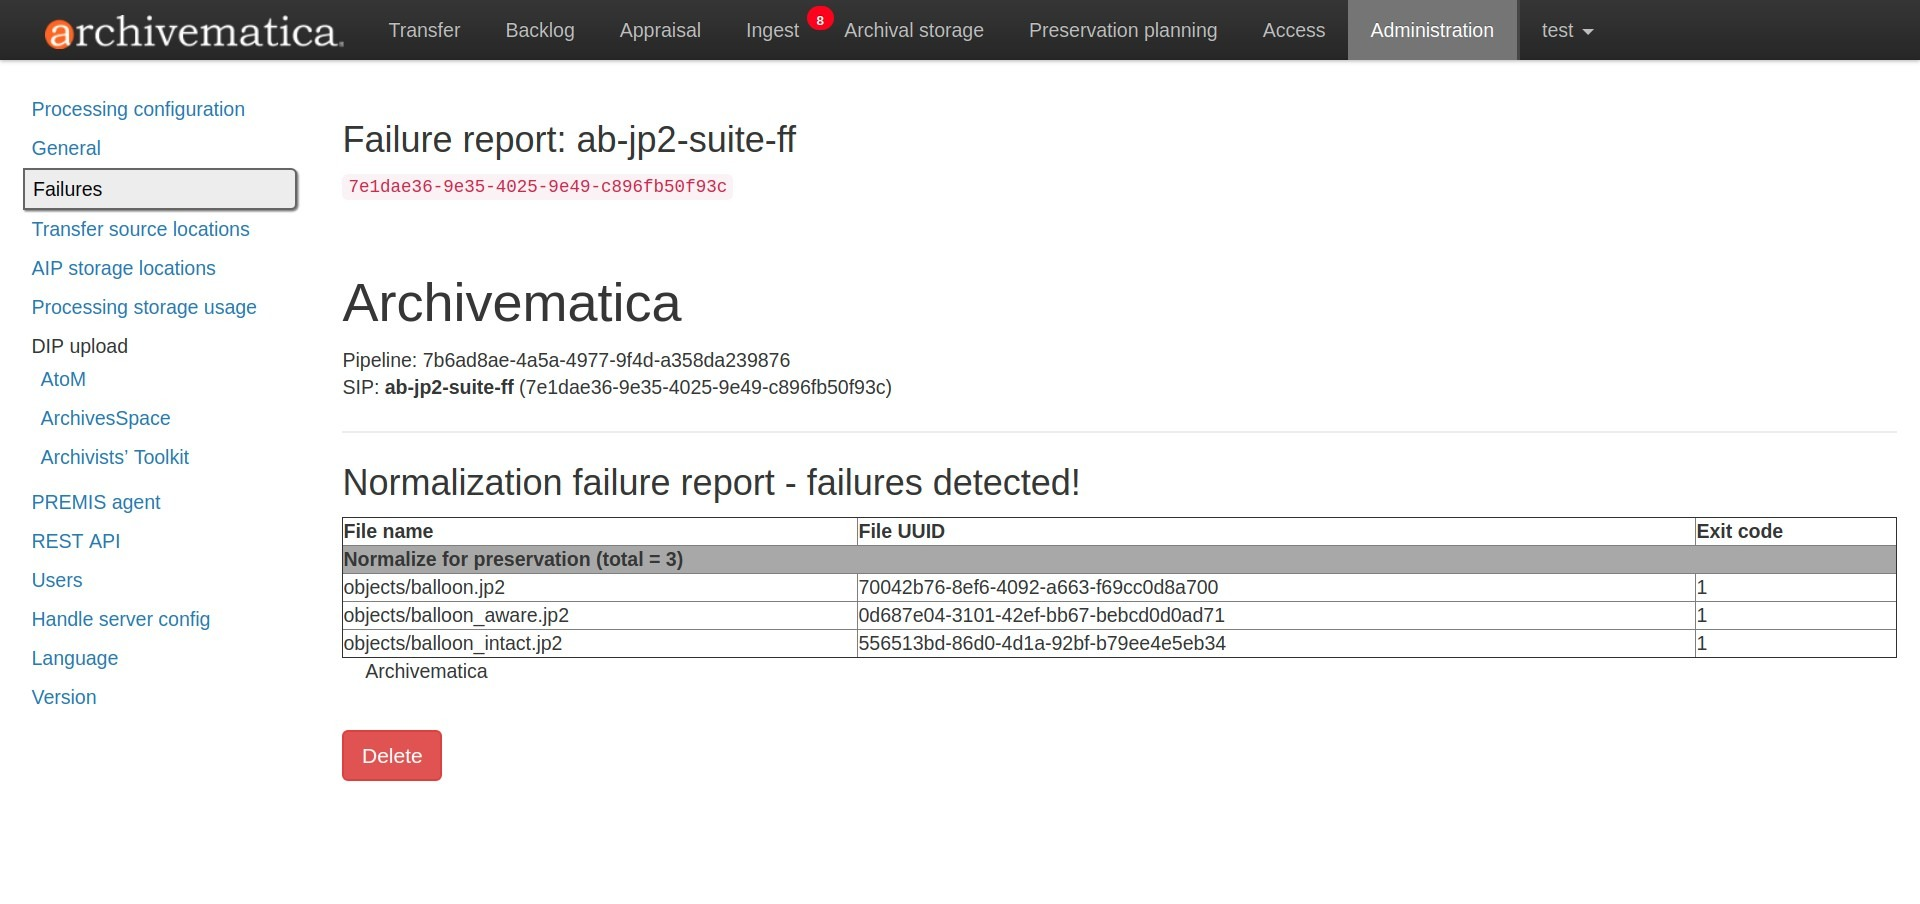
The failure report can be removed from the Dashboard by clicking Delete.
Transfer source location
Archivematica allows you to start transfers using the operating system’s file browser or via a web interface. Source files for transfers, however, cannot be uploaded using the web interface; they must exist on volumes accessible to the Archivematica MCP server and configured via the Storage Service.
When starting a transfer you are required to select one or more directories of files to add to the transfer.
AIP storage locations
AIP storage directories are directories in which completed AIPs are stored. Storage directories can be specified in a manner similar to transfer source directories using the Storage Service.
You can view your transfer source directories in the Administrative tab of the dashboard under “AIP storage locations”.
Processing storage usage
This section of the Administration page displays various processing locations with their current usage of available space.
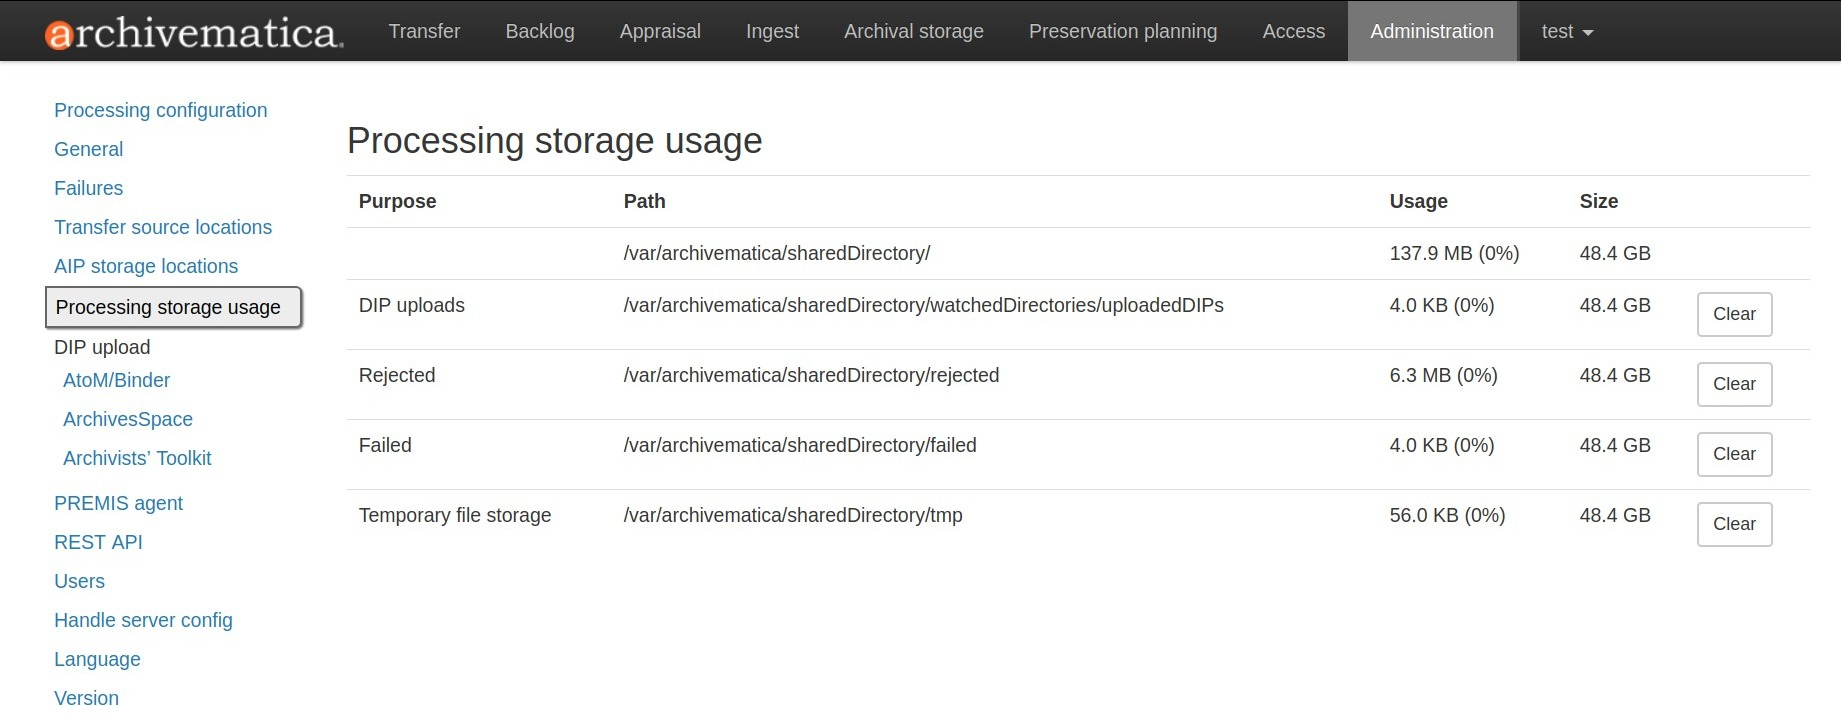
Administrators can use the “clear” buttons to delete the contents of these processing locations to make more room on their server.
DIP upload
Archivematica has access integrations with three access platforms: AtoM, ArchivesSpace, and Archivists’ Toolkit.
AtoM/Binder DIP upload
Archivematica can upload DIPs directly to an AtoM website so that the contents can be accessed online. Using the same configuration screen, you can also configure Archivematica to upload DIPs to Binder, which is built off the AtoM framework.
The AtoM/Binder DIP upload configuration page is where you specify the details of the AtoM or Binder installation you’d like the DIPs uploaded to (and, if using Rsync to transfer the DIP files, Rsync transfer details).
Before setting these details, please ensure that you have a working AtoM or Binder site that is properly connected to Archivematica. See Using AtoM 2.x with Archivematica or Using Binder with Archivematica for more information.
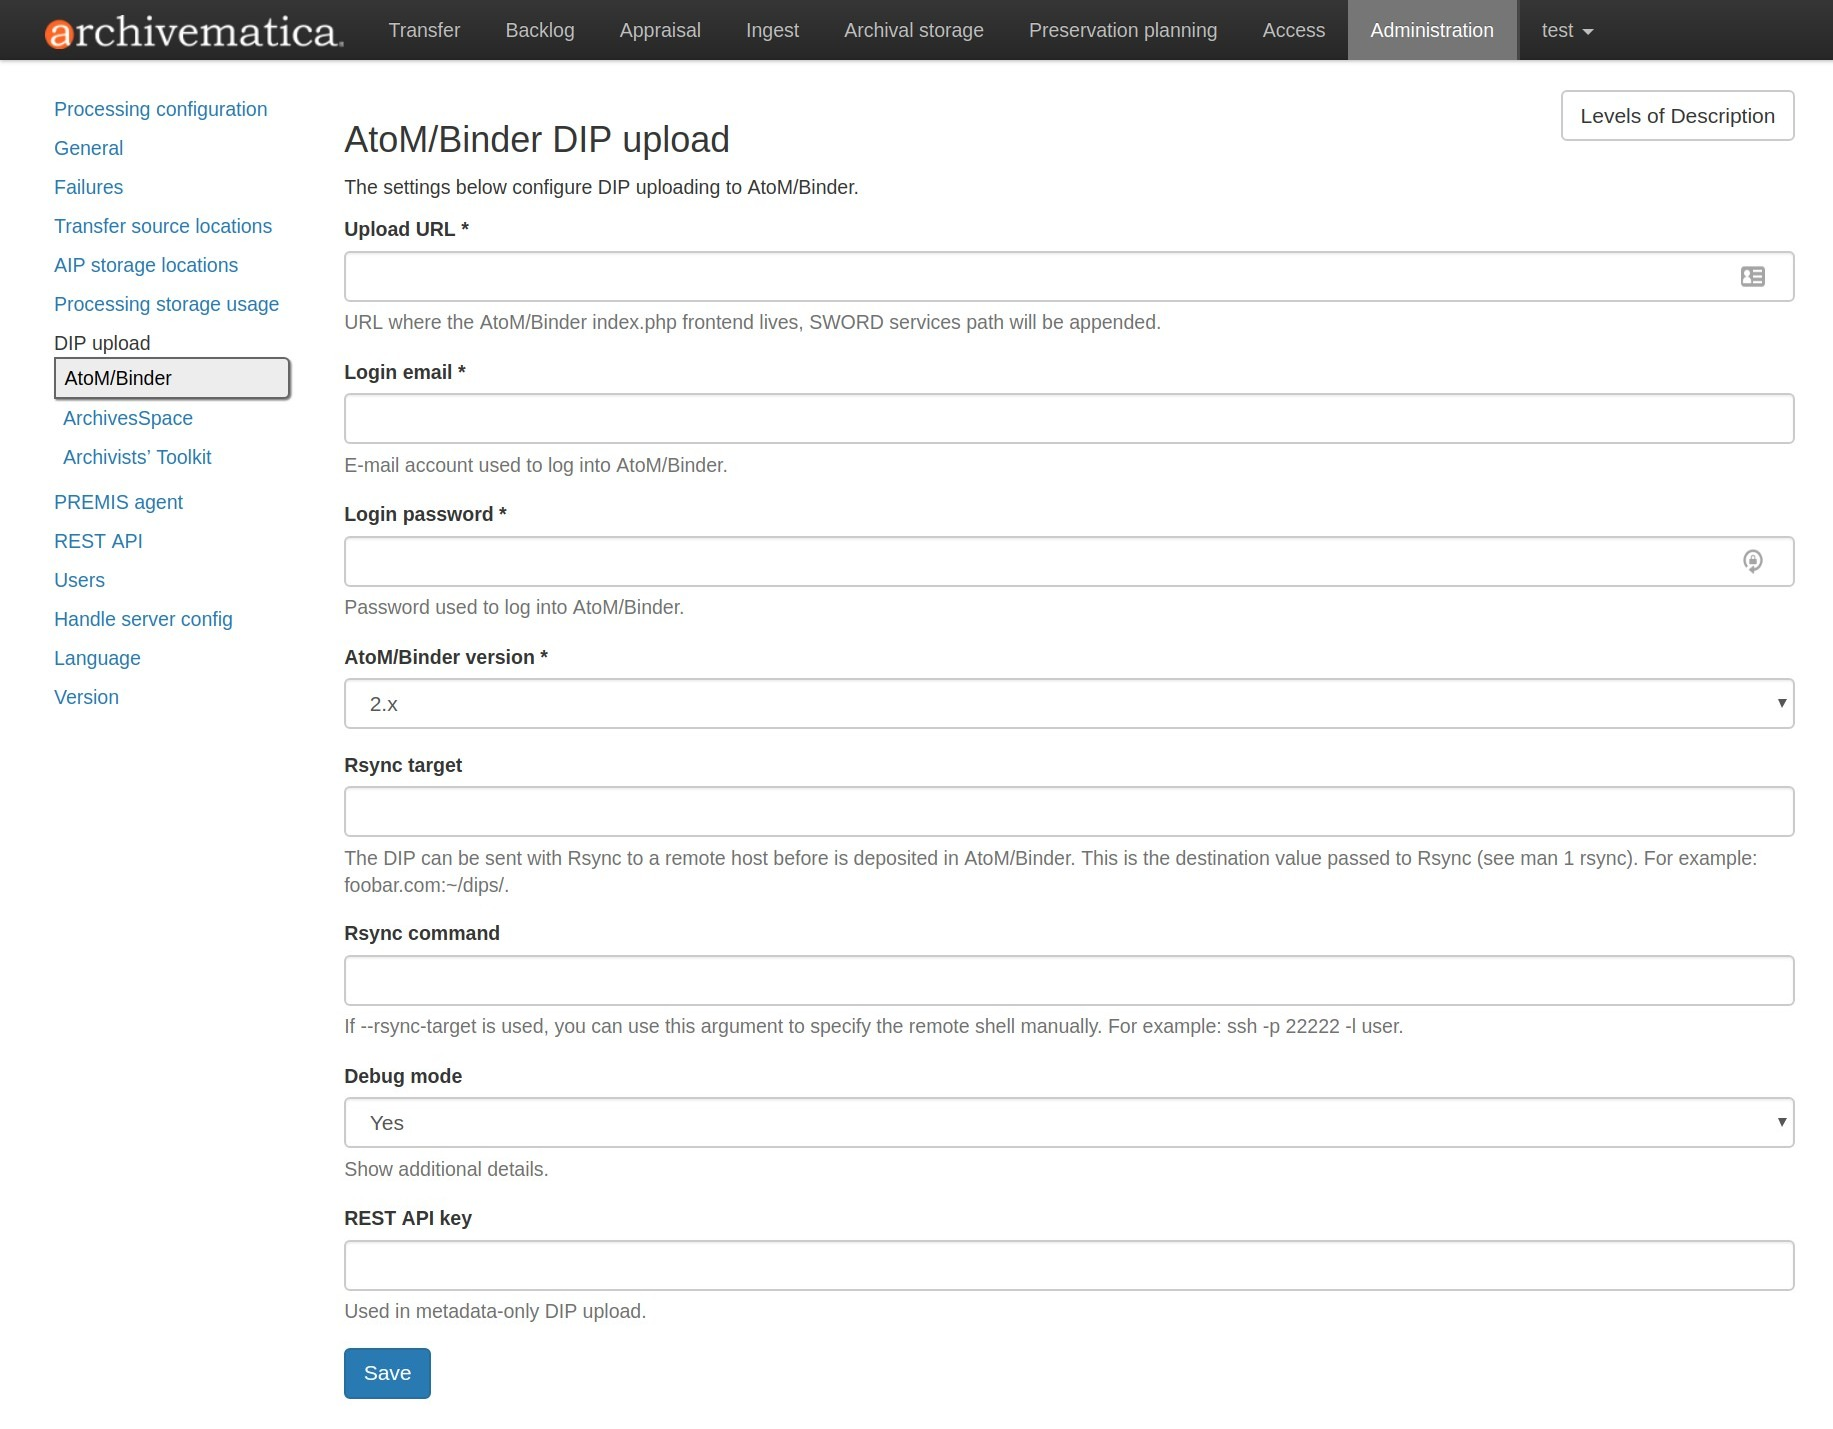
Fields:
- Upload URL: the URL of the destination AtoM or Binder website.
- Login email: the email address used to log in to AtoM or Binder.
- Login password: the password used to log in to AtoM or Binder.
- AtoM/Binder version: the version of the destination AtoM or Binder website.
- Rsync target: if you’d like to send the DIP with Rsync before it is
deposited in AtoM or Binder, enter the destination value for rsync, e.g.
foobar.com:/dips. This field is optional. - Rsync command: if you’ve entered an Rsync target, specify the remote
shell manually, e.g.
ssh -p 22222 -l user. This field is optional. - Debug mode: if you would like to have additional details in failure reports, also enable debug mode by choosing “Yes”.
AtoM DIP upload
If AtoM is installed on a remote server, Archivematica uses SSH and rsync to copy the DIP to a temporary directory on the AtoM server. If Archivematica and AtoM share a common filesystem (e.g. a shared network directory) this step is unnecessary.
Archivematica sends a REST request to AtoM to tell AtoM which archival description is the target of the DIP. The DIP target description is identified by the description’s “slug”. The actual upload of the DIP contents to AtoM is done via a background job, and may take some time to process if a large DIP is uploaded.
An AtoM background worker uploads the DIP metadata (METS file) and digital objects from the temporary directory to AtoM, links them to the target description, then deletes the temporary files.
You will also need to make some changes in the AtoM user interface:
- The SWORD plugin (Admin –> Plugins –> qtSwordPlugin) must be enabled in order for AtoM to receive uploaded DIPs.
- Enabling Job scheduling (Admin –> Settings –> Job scheduling) in version 2.1 or lower is also recommended.
AtoM DIP upload can use Rsync as a transfer mechanism. Rsync is an open source
utility for efficiently transferring files. The rsync-target parameter is used
to specify an Rsync-style target host/directory pairing, foobar.com:~/dips/
for example. The rsync-command parameter is used to specify rsync connection
options, ssh -p 22222 -l user for example. If you are using the rsync
option, please see AtoM server configuration below.
To set any parameters for AtoM DIP upload change the values, preserving the
existing format they’re specified in, in the Command arguments field then
click “Save”.
Note
If you are planning to use the metadata-only DIP upload to AtoM
functionality don’t forget to enable the the API plugin in AtoM, generate a API key and update the REST API key field
accordingly. Metadata-only upload is only available since AtoM 2.4.
AtoM server configuration
This server configuration step is necessary to allow Archivematica to log in to the AtoM server without passwords, and only when the user is deploying the rsync option described above in the AtoM DIP upload section.
To enable sending DIPs from Archivematica to the AtoM server:
Generate SSH keys for the Archivematica user. Leave the passphrase field blank.
$ sudo -u archivematica ssh-keygen
Copy the contents of /var/lib/archivematica/.ssh/id_rsa.pub somewhere
handy, you will need it later.
Now, it’s time to configure the AtoM server so Archivematica can send the DIPs
using SSH/rsync. For that purpose, you will create a user called archivematica
and we are going to assign that user a restricted shell with access only to
rsync:
$ sudo apt-get install rssh
$ sudo useradd -d /home/archivematica -m -s /usr/bin/rssh archivematica
$ sudo passwd -l archivematica
$ sudo vim /etc/rssh.conf // Make sure that allowrsync is uncommented!
Add the SSH key that we generated before:
$ sudo mkdir /home/archivematica/.ssh
$ chmod 700 /home/archivematica/.ssh/
$ sudo vim /home/archivematica/.ssh/authorized_keys // Paste here the contents of id_dsa.pub
$ chown -R archivematica:archivematica /home/archivematica
In Archivematica, make sure that you update the --rsync-target accordingly.
These are the parameters that we are passing to the upload-qubit microservice.
Go to the Administration > Upload DIP page in the dashboard.
Generic parameters:
--url="http://atom-hostname/index.php" \
--email="demo@example.com" \
--password="demo" \
--uuid="%SIPUUID%" \
--rsync-target="archivematica@atom-hostname:/tmp" \
--debug
Binder DIP upload
For more information about configuring Binder, please see the Binder integrations page.
ArchivesSpace DIP upload
Before ingesting digital objects destined for ArchivesSpace, ensure that the ArchivesSpace DIP upload settings in the Administration tab of the dashboard have been set.
These settings should be created and saved before digital objects destined for upload to ArchivesSpace are processed. Note that these can be set once and used for processing any number of transfers (i.e. they do not need to be re-set for each transfer).
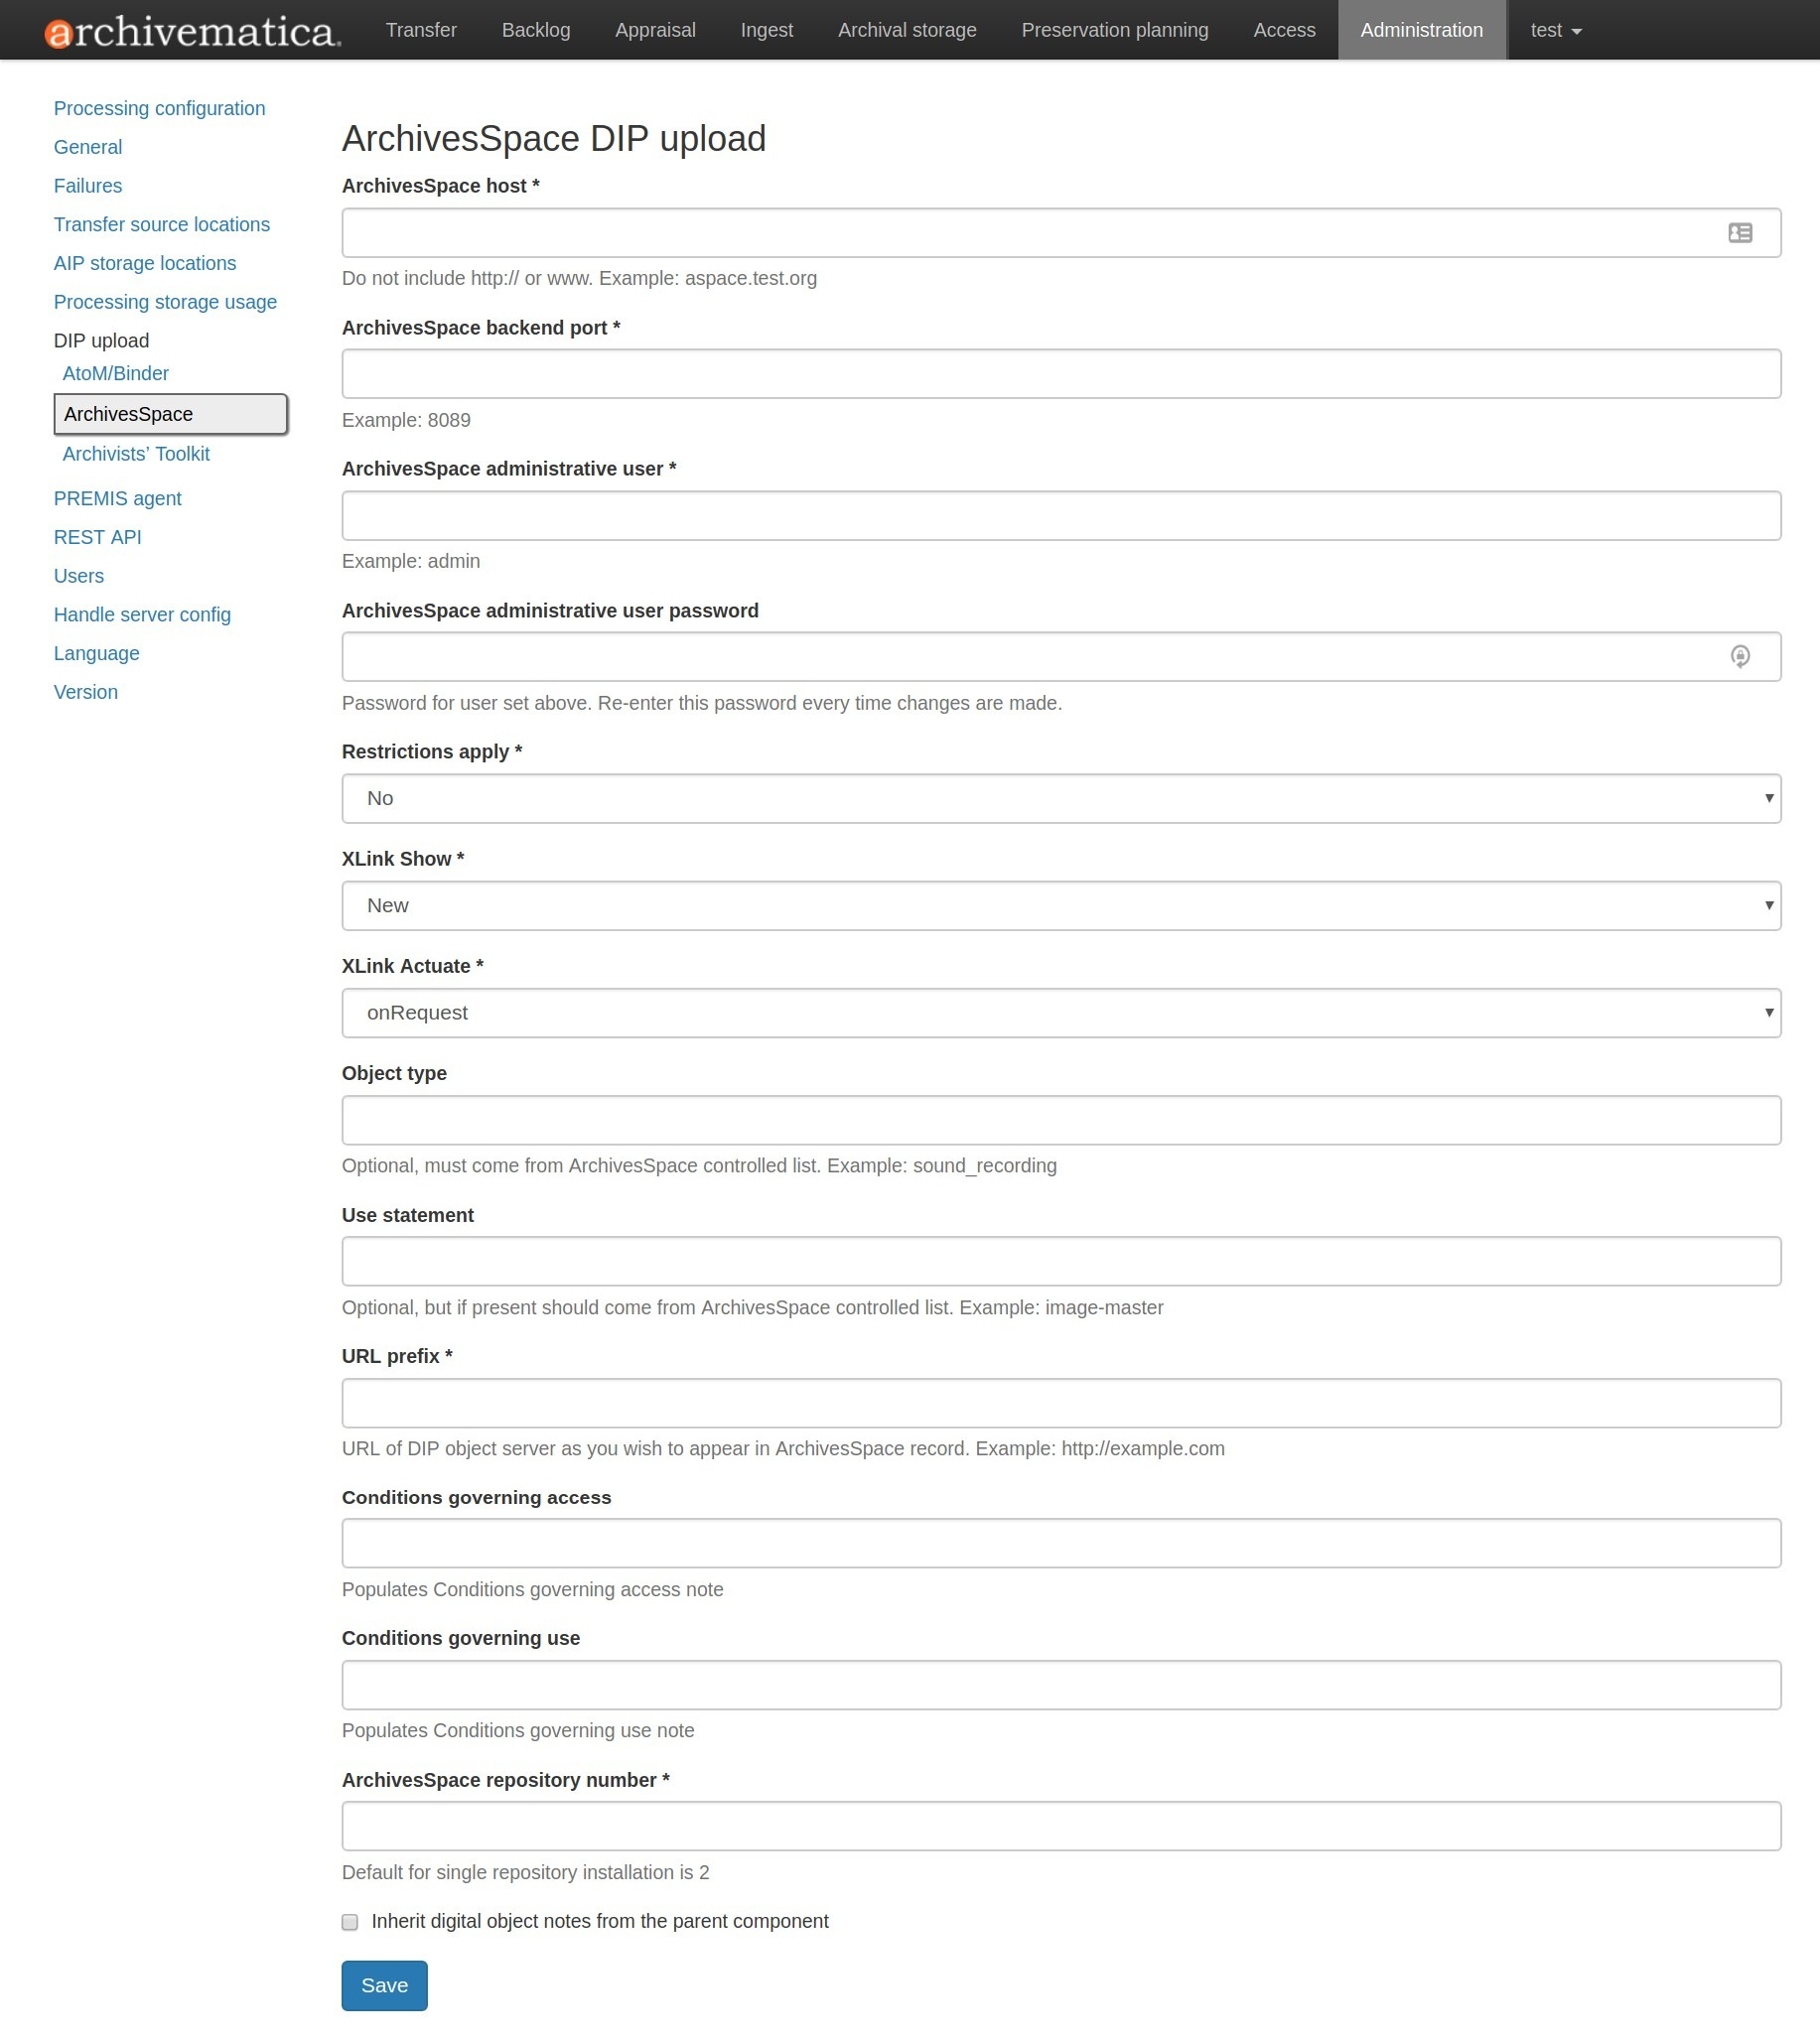
Fields:
- ArchivesSpace host: the URL of the host database. Do not include
https://orwww., e.g.aspace.test.org. - ArchivesSpace backend port: the port of the database, e.g.
8089. - ArchivesSpace administrative user: the username of a user with administrative permissions in ArchivesSpace.
- ArchivesSpace administrative user password: the password for user set above. If you make changes to this configuration, you will need to re-enter the password.
- Restrictions Apply: Selecting Yes will apply a blanket access restriction to all content uploaded from Archivematica to ArchivesSpace. Selecting No will send all content to ArchivesSpace without restrictions. Should you wish to enable the PREMIS-based restrictions functionality, choose Base on PREMIS.
- XLink Show: indicate how the link to the digital object, as it appears in
ArchivesSpace, should operate.
- Embed: the digital object screen is embedded in the current window.
- New: the digital object screen opens in a new window.
- None: no specific behaviour is passed to the link.
- Other: no specific behaviour is passed to the link.
- Replace: the digital object screen opens in the current window.
- XLink Actuate: indicates when a digital object should display in
ArchivesSpace (e.g. whether the link occurs automatically or must be requested
by the user). Used in conjunction with XLink Show attribute.
- None: no specific behaviour is passed to the link.
- onLoad: link is activated when the document loads (used when Show = Embed).
- Other: no specific behaviour is passed to the link.
- onRequest: link is activated when the user selects the link.
- Object Type: entering a value from ArchivesSpace’s controlled list of object types will apply this value to all objects. This field is optional.
- Use statement: entering a value from ArchivesSpace’s controlled list of use statements will apply this value to all objects. This field is optional.
- URL prefix: the URL of DIP object server as you wish it to appear in
ArchivesSpace record. Example:
http://example.com - Conditions governing access: entering a value in this field will populate the Conditions governing access note in ArchivesSpace for all objects.
- Conditions governing use: entering a value in this field will populate the Conditions governing use note in ArchivesSpace for all objects.
- ArchivesSpace repository number: the identifier for the ArchivesSpace repository where you are uploading DIPs. Note that the default identifier for a single-repository ArchivesSpace instance is 2.
Note
In order to save changes to the ArchivesSpace DIP upload configuration, you must enter the password before clicking save. Note that Archivematica will not display an error if the password is not entered.
Archivists’ Toolkit
Before ingesting digital objects destined for Archivists’ Toolkit, ensure that the Achivists’ Toolkit DIP upload settings in the Administration tab of the dashboard have been set.
These settings should be created and saved before digital objects destined for upload to Archivists Toolkit are processed. Note that these can be set once and used for processing any number of transfers (i.e. they do not need to be re-set for each transfer). The screenshots below show the template in the dashboard.
Important
Archivists’ Toolkit is a legacy application that is no longer being maintained as of September 2013. DIP upload to Archivists’ Toolkit is deprecated and this feature is maintained for historical purposes.
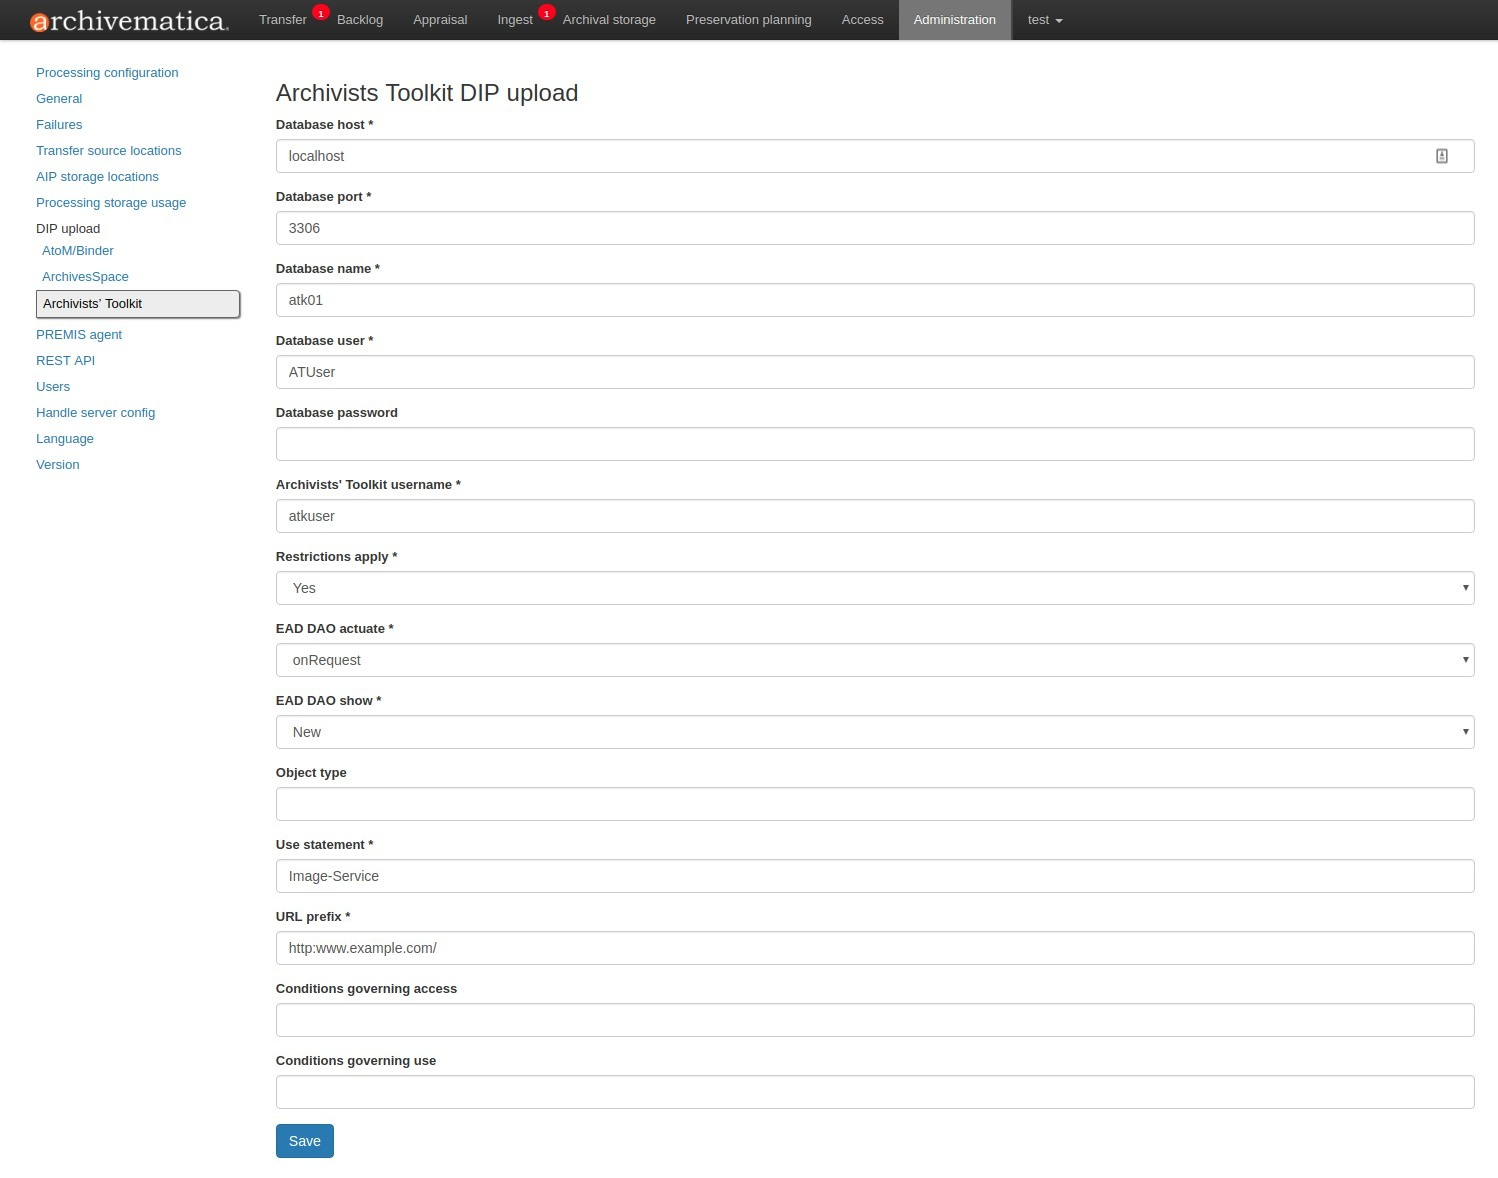
Fields:
- Database host: the URL of the host database. Do not include
https://orwww., e.g.atoolkit.test.org. - Database port: the port of the database, e.g.
8089. - Database name: the name of the database.
- Database user: a username with administrative access to the database.
- Database password: the password for the above user.
- Archivists’ Toolkit username: a username for Archivists’ Toolkit.
- Restrictions apply: if you wish to enable the PREMIS-based restrictions functionality, choose base on PREMIS. To add PREMIS rights, please see Add PREMIS rights and restrictions.
- EAD DAO actuate: indicates when a digital object should display in
Archivists’ Toolkit (e.g. whether the link occurs automatically or must be
requested by the user). Used in conjunction with EAD DAO Show attribute.
- None: no specific behaviour is passed to the link.
- onLoad: link is activated when the document loads (used when Show = Embed).
- Other: no specific behaviour is passed to the link.
- onRequest: link is activated when the user selects the link.
- EAD DAO show: indicate how the link to the digital object, as it appears
in Archivists’ Toolkit, should operate.
- Embed: the digital object screen is embedded in the current window.
- New: the digital object screen opens in a new window.
- None: no specific behaviour is passed to the link.
- Other: no specific behaviour is passed to the link.
- Replace: the digital object screen opens in the current window.
- Object type: entering a value from Archivists’ Toolkit’s controlled list of use statements will apply this value to all objects. This field is optional.
- Use statement: entering a value from Archivists’ Toolkit’s controlled list of use statements will apply this value to all objects. This field is optional.
- URL prefix: the URL of DIP object server as you wish it to appear in
Archivists’ Toolkit record. Example:
http://example.com - Conditions governing access: entering a value in this field will populate the Conditions governing access note in Archivists’ Toolkit for all objects. This field is optional.
- Conditions governing use: entering a value in this field will populate the Conditions governing use note in Archivists’ Toolkit for all objects. This field is optional.
PREMIS agent
The PREMIS agent name and code can be set here via the administration interface.
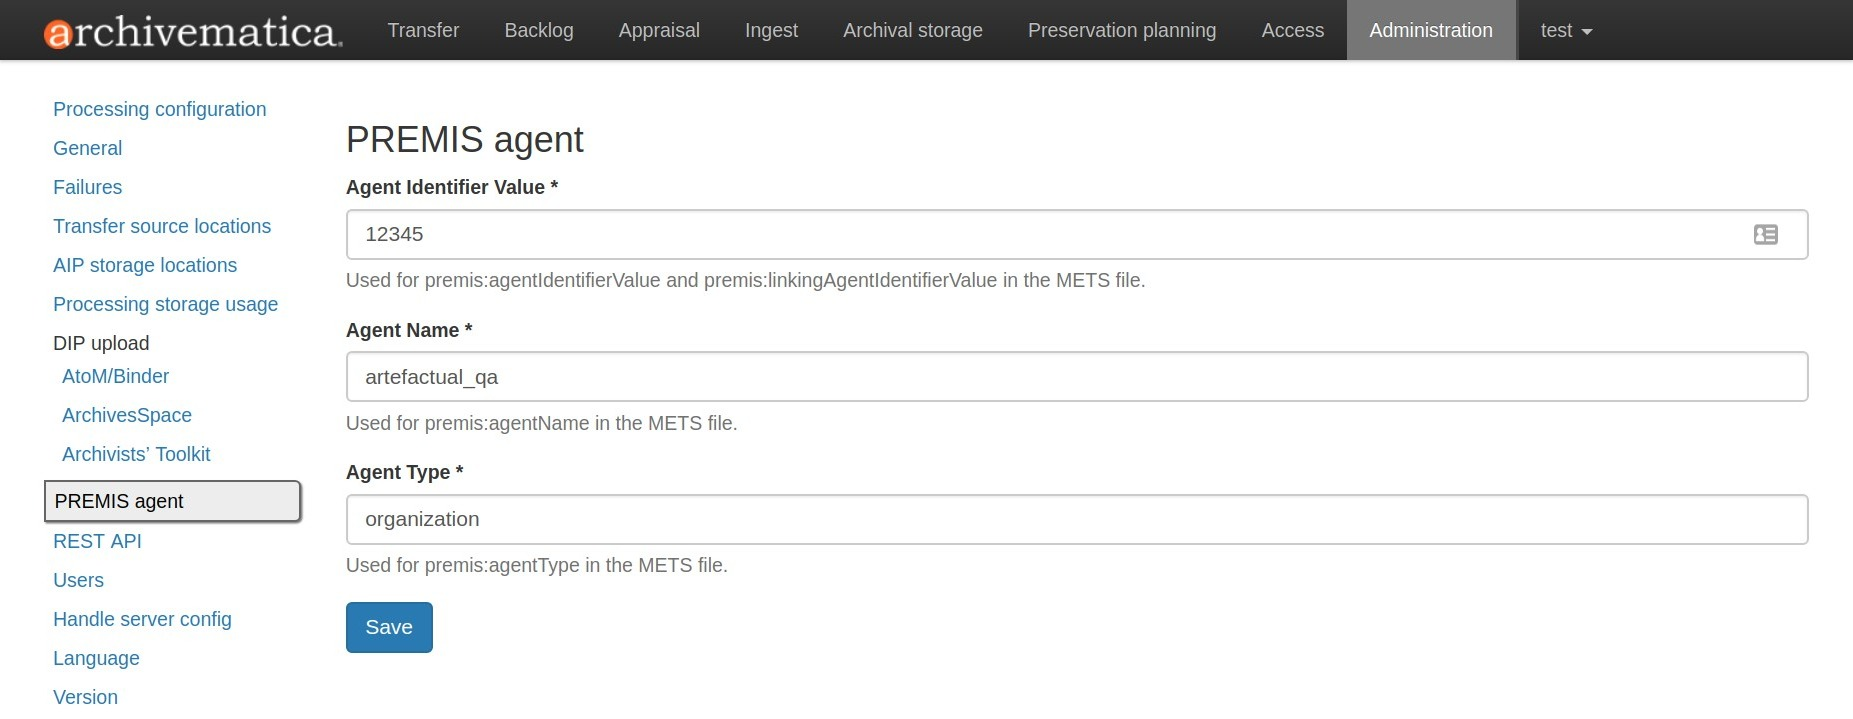
The PREMIS agent information is used in the METS files created by Archivematica to identify the agency performing the digital preservation events.
Rest API
In addition to automation using the processingMCP.xml file, Archivematica
includes a REST API for automating transfer approval. Using this API, you can
create a custom script that copies a transfer to the appropriate directory
then uses the curl command, or some other means, to let Archivematica know
that the copy is complete.
API keys
Use of the REST API requires the use of API keys. An API key is associated with a specific user. To generate an API key for a user:
- Browse to /administration/accounts/list/
- Click the “Edit” button for the user you’d like to generate an API key for
- Click the “Regenerate API key” checkbox
- Click “Save”
After generating an API key, you can click the “Edit” button for the user and you should see the API key.
IP whitelist
The API key is always required but in some cases the administrator may want to add an additional security measurement. IP whitelisting allows you to create a list of trusted IP addresses from which you can access to the API.
The IP whitelist can be edited in the administration interface at
/administration/api/. If the whitelist is empty all requests will be
allowed.
Approving a transfer
The REST API can be used to approve a transfer. The transfer must first be
copied into the appropriate watch directory. To determine the location of the
appropriate watch directory, first figure out where the shared directory is
from the watchDirectoryPath value of
/etc/archivematica/MCPServer/serverConfig.conf. Within that directory is a
subdirectory activeTransfers. In this subdirectory are watch directories for
the various transfer types.
When using the REST API to approve a transfer, if a transfer type isn’t specified, the transfer will be deemed a standard transfer.
HTTP Method: POST
URL: /api/transfer/approve
Parameters:
directory: directory name of the transfer
type (optional): transfer type [standard|dspace|unzipped bag|zipped bag]
api_key: an API key
username: the username associated with the API key
Example curl command:
curl --data "username=rick&api_key=f12d6b323872b3cef0b71be64eddd52f87b851a6&type=standard&directory=MyTransfer" http://127.0.0.1/api/transfer/approve
Example result:
{"message": "Approval successful."}
Listing unapproved transfers
The REST API can be used to get a list of unapproved transfers. Each transfer’s directory name and type is returned.
Method: GET
URL: /api/transfer/unapproved
Parameters:
api_key: an API key
username: the username associated with the API key
Example curl command:
curl "http://127.0.0.1/api/transfer/unapproved?username=rick&api_key=f12d6b323872b3cef0b71be64eddd52f87b851a6"
Example result:
{
    "message": "Fetched unapproved transfers successfully.",
    "results": [{
            "directory": "MyTransfer",
           "type": "standard"
        }
    ]
}
Users
The dashboard provides a simple cookie-based user authentication system using the Django authentication framework. Access to the dashboard is limited only to logged-in users and a login page will be shown when the user is not recognized. If the application can’t find any user in the database, the user creation page will be shown instead, allowing the creation of an administrator account.
Users can be also created, modified and deleted from the Administration tab. Only users who are administrators can create and edit user accounts.
You can add a new user to the system by clicking the “Add new” button on the user administration page. By adding a user you provide a way to access Archivematica using a username/password combination. Should you need to change a user’s username or password, you can do so by clicking the “Edit” button, corresponding to the user, on the administration page. Should you need to revoke a user’s access, you can click the corresponding “Delete” button.
CLI creation of administrative users
If you need an additional administrator user one can be created via the command-line, issue the following commands:
sudo -u archivematica bash -c " \
    set -a -e -x
    source /etc/default/archivematica-dashboard || \
        source /etc/sysconfig/archivematica-dashboard \
            || (echo 'Environment file not found'; exit 1)
    cd /usr/share/archivematica/dashboard
    /usr/share/archivematica/virtualenvs/archivematica-dashboard/bin/python manage.py createsuperuser
";
CLI password resetting
If you’ve forgotten the password for your administrator user, or any other user, you can change it via the command-line:
sudo -u archivematica bash -c " \
    set -a -e -x
    source /etc/default/archivematica-dashboard || \
        source /etc/sysconfig/archivematica-dashboard \
            || (echo 'Environment file not found'; exit 1)
    cd /usr/share/archivematica/dashboard
    /usr/share/archivematica/virtualenvs/archivematica-dashboard/bin/python manage.py changepassword <username>
";
CLI configuration pipeline and registration on the Storage Service
On new installations, the superuser can be configured and the pipeline registered on the Storage Service using the command-line instead of the GUI. These commands configure the pipeline and register it on the Storage Service exactly like the GUI for the initial configuration screen:
sudo -u archivematica bash -c " \
    set -a -e -x
    source /etc/default/archivematica-dashboard || \
        source /etc/sysconfig/archivematica-dashboard \
            || (echo 'Environment file not found'; exit 1)
    cd /usr/share/archivematica/dashboard
    /usr/share/python/archivematica-dashboard/bin/python manage.py install \
        --username=<username> \
        --password=<password> \
        --email=<email-address> \
        --org-name=<org-name> \
        --org-id=<org-id> \
        --api-key=<api-key>\
        --ss-url=<ss-ulr> \
        --ss-user=<ss-username> \
        --ss-api-key=<ss-api-key> \
        --whitelist=<whitelist>
";
Where:
api-key: API key that will be added to the username <username>. For example: “test”, “4e5f32ab2aefd3577e1b19a2de5d4dd65f90101a”.ss-url: Archivematica Storage Service URL. For example: http://example.archivematica.org:8000.ss-user: The Storage Service username that will be used to register the pipeline. This username must already exist in the Storage Service.ss-api-key: The <ss-username> API key. This key must already exist in the Storage Service for the user <ss-username>.whitelist: Whitespace-separated list of IP addresses or hostnames allowed to use the API. If the whitelist is left empty, all IP addresses and hostnames will be allowed. For example: “192.168.1.3 example.archivematica.org 127.0.0.1” or “”.
This command is most suitable to use on automated installations, for example when deploying using ansible. For manual installations, please use the web configuration method described in the Post Install Configuration sections:
Security
Archivematica uses PBKDF2 as the default algorithm to store passwords. This should be sufficient for most users: it’s quite secure, requiring massive amounts of computing time to break. However, other algorithms could be used as the following document explains: How Django stores passwords .
Handle server config
Archivematica can to be configured to make requests to a Handle System HTTP API so that files, directories and entire AIPs can be assigned persistent identifiers (PIDS) and derived persistent URLs (PURLs).
Language
The language menu allows you to choose from select languages.
Archivematica is translated by volunteers through Transifex. The completeness of a language is dependent on how many strings have been translated in Transifex. For information about contributing translations to the Archivematica project, see Translations.
Archivematica 1.9.3
Contents
Search
Open the general index or type your search in the search box.
Available projects
Archivematica
- Version 1.18.0 (stable-current)
- Version 1.17.1 (stable-previous)
- Version 1.16.0 (legacy)
- Version 1.15.1 (legacy)
- Version 1.14.1 (legacy)
- Version 1.13.2 (legacy)
- Version 1.12.2 (legacy)
- Version 1.11.2 (legacy)
- Version 1.10.2 (legacy)
- Version 1.9.3 (legacy)
- Version 1.8.1 (legacy)
- Version 1.7.2 (legacy)
- Version 1.6.1 (legacy)
- Version 1.5 (legacy)
- Version 1.4 (legacy)
Archivematica Storage Service
- Version 0.24.0 (stable-current)
- Version 0.23.0 (stable-previous)
- Version 0.22.0 (legacy)
- Version 0.21.1 (legacy)
- Version 0.20.1 (legacy)
- Version 0.19.0 (legacy)
- Version 0.18.1 (legacy)
- Version 0.17.1 (legacy)
- Version 0.16.1 (legacy)
- Version 0.15.1 (legacy)
- Version 0.14.1 (legacy)
- Version 0.13.0 (legacy)
- Version 0.12.0 (legacy)
- Version 0.11.1 (legacy)
- Version 0.10 (legacy)
- Version 0.9 (legacy)
- Version 0.8 (legacy)
License
Archivematica documentation by Artefactual Systems Inc. is licensed under a Creative Commons Attribution-ShareAlike 4.0 International License.
