Access
During ingest, access copies of digital objects are generated and packaged into a DIP (Dissemination Information Package). The user uploads the DIP to the access system, or stores it for future use.
When the DIP is prepared, Archivematica moves the DIP into the uploadDIP directory, which triggers the dashboard to display the DIP upload options to the operator. After a DIP is uploaded/stored, it is moved to the uploadedDIPs directory, which can be emptied in the Administration tab- see Processing storage usage.
Nota
The user must create the description in AtoM (or other access system) before uploading the DIP. The user will need to indicate part of the description’s URL or a target collection in order to send the DIP to the appropriate place in the description.
Should you run into an error during this process, please see Error handling.
On this page:
Default access system
A content management tool called AtoM is Archivematica’s default access system. AtoM supports standards-compliant hierarchical archival description and digital object management.
AtoM stands for Access to Memory. It is a web-based, open source application for standards-based archival description and access in a multilingual, multi- repository environment. User and Administrator manuals for AtoM are available here .
To configure Archivematica for uploading the DIP to AtoM, see the Administrator manual - AtoM DIP upload.
Upload DIP to AtoM
Importante
The user must create the target description in AtoM before uploading the DIP. The user will need to indicate part of the description’s URL or a target collection in order to send the DIP to the appropriate place during DIP upload
In this example, we will upload a DIP to a sample description in AtoM called «Sample fonds».
1. In the ingest tab, select «Upload DIP to AtoM» in the upload DIP Actions drop-down menu.
- A dialogue box will appear.
Enter the permalink of the description in the dialogue box: sample-fonds
Truco
The permalink is the «slug» from the AtoM target description. See slug in the AtoM glossary.
- Click the blue «Upload» button.
Digital objects are uploaded as items within the description to which the DIP is being uploaded.
If you want to create a child level of description under the target description, you must add the title of that level of description using the DC metadata template prior to normalization.
4. When the DIP has finished uploading, open the Access tab in the dashboard. This tab shows the AIP and its uploaded DIP. Click on the DIP URL to go to the uploaded DIP in AtoM.
5. If you are not already logged in to AtoM you will need to log in using your login credentials.
6. You will see an archival description with the metadata you added during ingest, displayed in the context of the level of archival description to which the DIP was uploaded. To view an individual digital object, scroll through the thumbnails on the left of the screen and click on an image.
- Below, the digital is object displayed in AtoM.
Clicking on the image will open the uploaded object.
Store DIP
Archivematica also provides the option to store the DIP to a location that you have configured via the Storage Service. This can be configured to be a local server, NFS-mounted or another storage protocol such as DuraCloud.https://groups.google.com/forum/#!topic/archivematica/ZQ-ttlGxEkA
To store a DIP:
1. Ensure that at least one DIP storage location has been configured in the Storage Service.
- When prompted to Upload DIP, choose Store DIP.
- Choose the DIP storage location from the configured options.
The DIP will include the access copies made through either Archivematica’s normalization rules or a manual normalization process, and the METS file.
Review/Download DIP
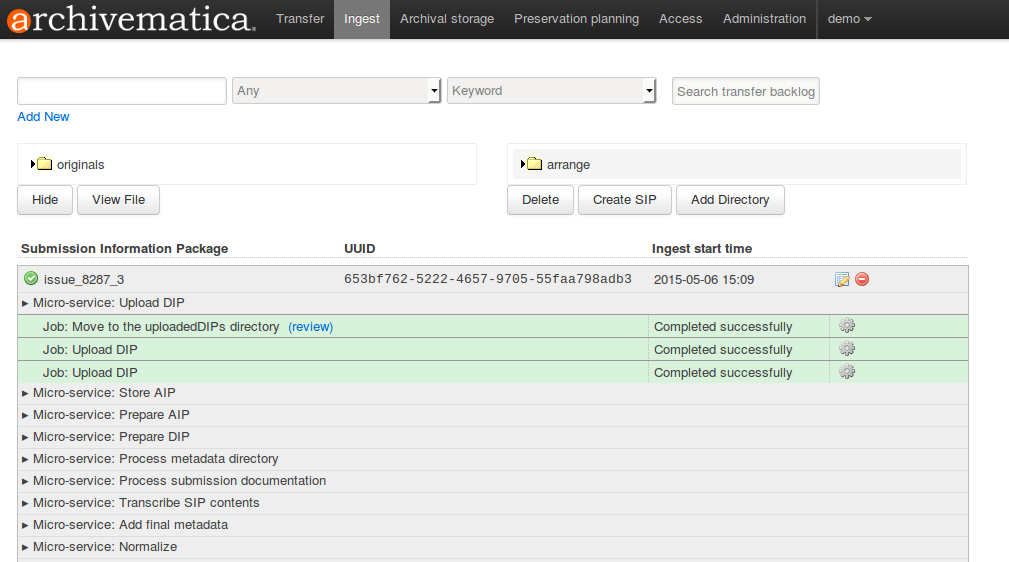
Regardless of the access path chosen (an integrated access system, or storing the DIP) the dashboard will present the operator with the option of reviewing and downloading the DIP objects. When the Upload DIP micro-service is complete, a «review» link will appear:
This will present the operator with a page displaying the uploadedDIPs directory which can then be navigated to locate any DIP in this directory. As shown below, when expanded, the DIP objects, thumbnails and METS files can be viewed or downloaded within the browser window.
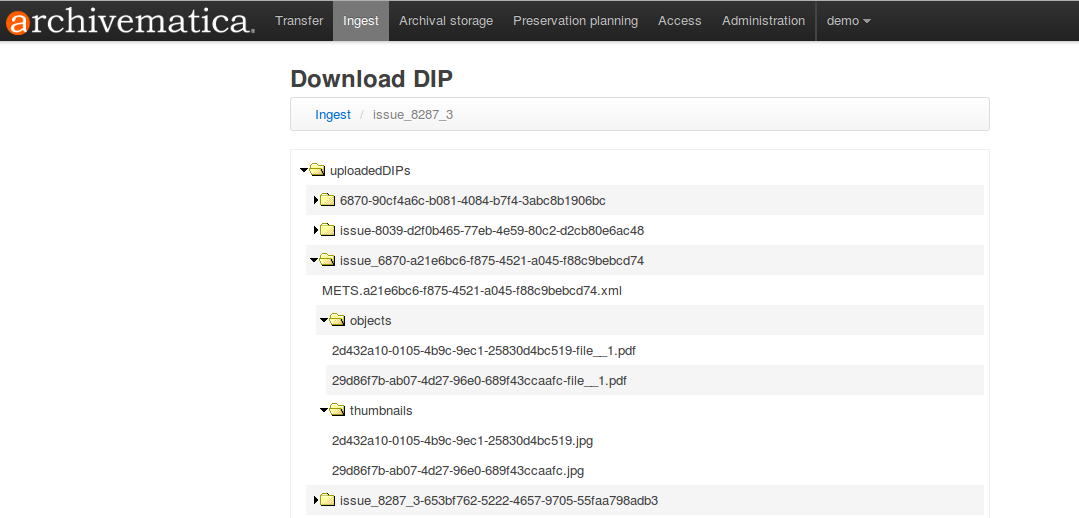
Your ability to view the objects in the browser will be dependent on your browser having a plugin for the particular filetypes. However, all files can be downloaded locally in this manner.
Access tab
By clicking the Access tab in the Dashboard, you can see a table showing all DIPs upload to AtoM including the URL, the associated AIP, the upload date and status, and the option to delete from the Access tab. Note that this link will delete the record of the DIP in the Access tab, not the actual DIP.
At this time, the Access tab only provides links to DIPs uploaded to AtoM, not to other access systems or DIPs that have been stored.
Archivematica 1.4
Buscar
Abrir el índice general o introduce una búsqueda en el campo de búsqueda.
Proyectos disponibles
Archivematica
- Version 1.17.1 (stable-current)
- Version 1.16.0 (stable-previous)
- Version 1.15.1 (legacy)
- Version 1.14.1 (legacy)
- Version 1.13.2 (legacy)
- Version 1.12.2 (legacy)
- Version 1.11.2 (legacy)
- Version 1.10.2 (legacy)
- Version 1.9.3 (legacy)
- Version 1.8.1 (legacy)
- Version 1.7.2 (legacy)
- Version 1.6.1 (legacy)
- Version 1.5 (legacy)
- Version 1.4 (legacy)
Archivematica Storage Service
- Version 0.23.0 (stable-current)
- Version 0.22.0 (stable-previous)
- Version 0.21.1 (legacy)
- Version 0.20.1 (legacy)
- Version 0.19.0 (legacy)
- Version 0.18.1 (legacy)
- Version 0.17.1 (legacy)
- Version 0.16.1 (legacy)
- Version 0.15.1 (legacy)
- Version 0.14.1 (legacy)
- Version 0.13.0 (legacy)
- Version 0.12.0 (legacy)
- Version 0.11.1 (legacy)
- Version 0.10 (legacy)
- Version 0.9 (legacy)
- Version 0.8 (legacy)
Licencia
Archivematica documentation by Artefactual Systems Inc. is licensed under a Creative Commons Attribution-ShareAlike 4.0 International License.
