Onglet Administration du tableau de bord
Cette page décrit le volet administration de l’utilisateur du tableau de bord dans Archivematica. Pour consulter la documentation administrative technique de plus haut niveau, veuillez vous reporter au Manuel de l’administrateur.
The Archivematica administration pages, under the Administration tab of the dashboard, allows you to configure various parts of the application and manage integrations and users.
Sur cette page :
- Configuration du traitement
- Général
- Échecs
- Emplacements du transfert source
- Emplacements de stockage d’AIP
- Utilisation de l’espage de traitement
- DIP upload
- Agent PREMIS
- REST API
- Utilisateurs
- Handle server config
- Language
- Version
Configuration du traitement
The processing configuration administration page of the dashboard allows users to configure the job decision points presented by Archivematica during transfer and ingest. There are two processing configurations available on installation:
Default, which is used for any transfer started manually from the Transfer tab, automatically via the automation tools, or in any other context where no other processing configuration is specified.Automated, which is used for transfers automatically started from Jisc RDSS environments (if you are not a Jisc user, feel free to delete this configuration).

To edit an existing processing configuration file, click on the Edit button to the right of the processing configuration name.
Multiple processing configurations can be created using the Add button on the Processing Configuration screen. Often, users create multiple configurations for different types of content - one for audio-visual material, one for images, one for textual records, etc.
You can also revert the default and automated processing configurations to their pre-sets by clicking on Reset. Please note that the pre-sets for the default processing configuration are noted in the Processing configuration fields section below.
Note that alternate processing configurations (i.e. anything other than default) are used in two ways:
- When you reingest an AIP, you are given the opportunity to select which processing configuration you’d like to use.
- You can download the processingMCP.xml file by clicking Download. Then,
rename the file
processingMCP.xmland include it at the top level of your transfer. Archivematica will then use this to automate your transfer selections, rather than the default configuration. For more information on the processingMCP.xml file, see Creating a custom config with processingMCP.xml.
All other transfers will use the default processing configuration.
In order to edit any of the selections, select a choice from the drop-down menu to the right of the job name. Once you’ve made all of your selections, save the processing configuration. The fields are described in the next section.
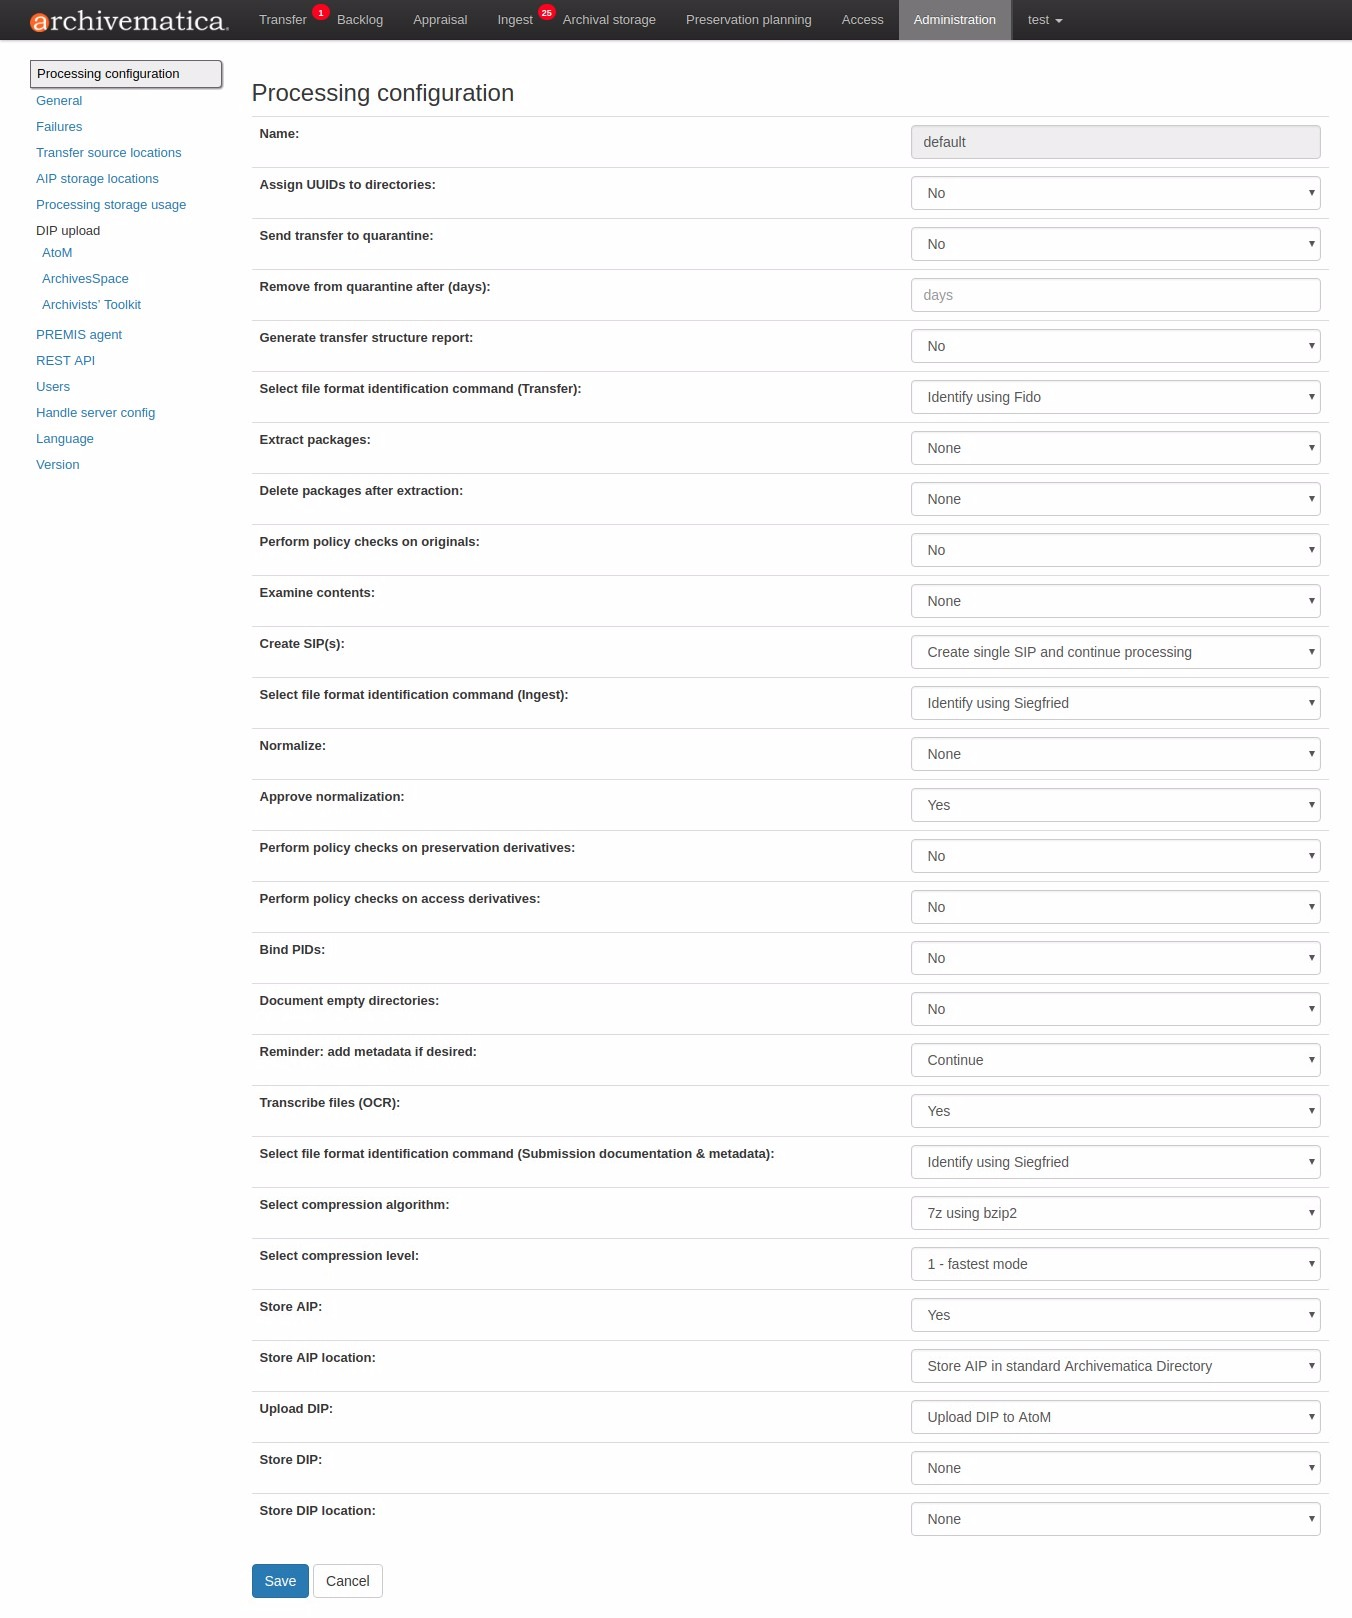
Champs de la configuration de traitement
Many jobs in the Archivematica transfer and ingest tabs have configurable decision points. Automating these decisions can make the transfer and ingest process substantially quicker, especially if you find yourself selecting the same decisions over and over. Below is a list of the processing configuration form fields with a short description about how they work and the drop-down options for each.
The option marked by an asterisk is the pre-set value for the default processing configuration. If you change the default configuration, you can click on Reset to revert all changes back to the installation pre-sets.
Name
The name of the processingMCP.xml that you are editing.
Assign UUIDs to directories
Directories are given an entry in the fileSec and assigned a unique universal identifier (UUID). Note that the digital objects in the transfer are always assigned a UUID.
Options:
- None - the user is prompted for a decision.*
- Yes - UUIDs are assigned.
- No - UUIDs are not assigned.
Send transfer to quarantine
Transfers are sequestered until virus definitions can be updated.
Options:
- None - the user is prompted for a decision.
- Yes - transfers are automatically quarantined.
- No - transfers are not sent to quarantine.*
Remove from quarantine after (days)
Transfers are automatically removed from quarantine after a defined number of days and made available for further processing.
Enter the number of days that transfers should remain in quarantine (i.e. 5).
The default value for this field is 28 days.
Generate transfer structure report
A text file is generated showing a directory tree of the original transfer structure.
Options:
- None - the user is prompted for a decision.
- Yes - structure report is created.
- No - structure report is not created.*
Select file format identification command (Transfer)
Choose a tool to identify the format of the files in your transfer.
Options:
- None - the user is prompted for a decision.*
- Identify using Fido - use Fido to identify files by their file signature.
- Skip File Identification - files will not be identified.
- Identify using Siegfried - use Siegfried to identify files by their signature.
- Identify by File Extension - identify files by their extension rather than signature.
Extract packages
Packages (such as .zip files) are unzipped and extracted into a directory.
Options:
- None - the user is prompted for a decision.
- Yes - the contents of the package are extracted.*
- No - package is left as-is.
Delete packages after extraction
Packages that have been extracted in the previous step can be deleted after extraction.
Options:
- None - the user is prompted for a decision.
- Yes - the package is deleted.*
- No - the package is preserved along with the extracted content.
Note
If you are processing a Dataverse transfer, you must select « No ». The Dataverse transfer will fail if packages are deleted.
Perform policy checks on originals
If you have created policies using MediaConch, Archivematica runs the original transfer materials against the policies to assess conformance.
Options:
- None - the user is prompted for a decision.*
- Yes - the transfer is checked against any policies.
- No - policies are ignored.
Examine contents
Run Bulk Extractor, a forensics tool that can recognize credit card numbers, social security numbers, and other patterns in data. For more information on reviewing Bulk Extractor logs, see the Analysis pane on the Appraisal tab.
Options:
- None - the user is prompted for a decision.use
- Skip examine contents - Bulk Extractor does not run.*
- Yes - Bulk Extractor scans content and creates log outputs of recognized patterns for review.
Create SIP(s)
Create a formal SIP out of the transfer or send it to the backlog.
Options:
- None - the user is prompted for a decision.*
- Send to backlog - transfer is sent to a backlog storage space for temporary storage or appraisal.
- Create single SIP and continue processing - transfer becomes a SIP and is made available for further processing on the ingest tab.
Note
If you are running Archivematica in indexless mode (without Elasticsearch), the backlog will be unavailable and the Send to backlog option will not be present in this dropdown.
Select file format identification command (Ingest)
Choose a tool to identify the format of files in your SIP.
Options:
- None - the user is prompted for a decision.
- Use existing data - re-use file identification data from the transfer tab.*
- Identify using Fido - use fido to identify files by their file signature.
- Identify using Siegfried - use Siegfried to identify files by their signature.
- Identify by File Extension - identify files by their extension rather than their signature.
Normalize
Convert ingested digital objects to preservation and/or access formats. See Normalize for more information.
Options:
- None - the user is prompted for a decision.*
- Normalize for preservation and access - creates preservation copies of the objects plus access copies which will be used to generate the DIP.
- Normalize for preservation - creates preservation copies only. No access copies are created and no DIP will be generated.
- Normalize manually - see Manual Normalization for more information.
- Do not normalize - the AIP will contain originals only. No preservation or access copies are generated and no DIP will be generated.
- Normalize service files preservation - see Transferring material with service (mezzanine) files for more information.
- Normalize for access - the AIP will contain originals only. No preservation copies will be generated. Access copies will be created which will be used to generate the DIP.
Approve normalization
The dashboard allows users to review the normalization output and the normalization report.
Options:
- None - the user has a chance to review and approve normalization.*
- Yes - skip the review step and automatically continue processing.
Generate thumbnails
This gives the option of generating thumbnails for use in the AIP and DIP.
Options:
- None - the user is prompted for a decision.*
- Yes, without default - thumbnails will be produced for any format which has a normalize for thumbnails rule in the FPR. Formats which do not have a rule will not have a thumbnail generated.
- No - thumbnails will not be generated.
- Yes - thumbnails will be generated according to the format rules in the FPR. Formats which do not have a rule will have a default thumbnail generated (grey document icon).
Perform policy checks on preservation derivatives
If you create policies using MediaConch, run the policies against the newly-created preservation derivatives to ensure conformation.
Options:
- None - the user is prompted for a decision.*
- Yes - the normalized files are checked against any policies.
- No - policies are ignored.
Perform policy checks on access derivatives
If you create policies using MediaConch, run the policies against the newly-created preservation derivatives to ensure conformation.
Options:
- None - the user is prompted for a decision.*
- Yes - the normalized files are checked against any policies.
- No - policies are ignored.
Bind PIDs
Assign persistent identifiers and send the information to a Handle Server (must be configured).
Options:
- None - the user is prompted for a decision.*
- Yes - PIDs are created and a API call posts the PIDs to the Handle Server.
- No - PIDs are not created.
Document empty directories
By default, Archivematica removes empty directories and does not document that they existed.
Options:
- None - the user is prompted for a decision.*
- Yes - an entry for the directory is created in the structmap.
- No - the directory is not documented.
Reminder: add metadata if desired
Archivematica allows users to see add metadata to a SIP through the user interface. This reminder occurs at the last moment that it is possible to add metadata; once the ingest proceeds past this point, it is no longer possible to add metadata to the SIP.
Options:
- None - the user has a chance to add metadata.
- Continue - skip the reminder and automatically continue processing.*
Transcribe files (OCR)
Users can elect to run Tesseract, an OCR tool that is included in Archivematica, to produce text files containing file transcripts. For more information, see (see Transcribe SIP contents).
Options:
- None - the user is prompted for a decision.
- Yes - Tesseract runs on all OCR-able files.
- No - Tesseract does not run.*
Select file format identification command (Submission documentation & metadata)
Choose a tool to identify the format of any submission documentation and/or metadata files that were included in your transfer.
Options:
- None - the user is prompted for a decision.*
- Identify using Siegfried - use Siegfried to identify files by their signature.
- Identify using Fido - use fido to identify files by their file signature.
- Identify by File Extension - identify files by their extension rather than their signature.
- Skip File Identification - file identification is not run on submission documentation or metadata files.
Select compression algorithm
AIPs created by Archivematica can be stored as compressed packages or uncompressed, depending on your storage requirements.
Options:
- None - the user is prompted for a decision.
- 7z using bzip2 - a 7Zip file is created using the tool bzip2.*
- 7z using LZMA - a 7Zip file is created using the tool LZMA.
- Uncompressed - the AIP is not compressed.
- Parallel bzip2 - a 7Zip file is created using the tool Parallel bzip2 (pbzip2).
Select compression level
If you selected a compression choice in the step above, you can determine how compressed you would like your AIP to be. Selecting a higher compression level means that the resulting AIP is smaller, but compression also takes longer. Lower compression levels mean quicker compression, but a larger AIP.
Options:
- None - the user is prompted for a decision.
- 5 - normal compression mode - the compression tool will strike a balance between speed and compression to make a moderately-sized, moderately- compressed AIP.*
- 7 - maximum compression - a smaller AIP that takes longer to compress.
- 9 - ultra compression - the smallest possible AIP.
- 3 - fast compression mode - a larger AIP that will be compressed quickly.
- 1 - fastest mode - the AIP will be compressed as quickly as possible.
Store AIP
Once processing is complete, AIPs can be stored without interrupting the workflow in the dashboard.
Options:
- None - the user is prompted for a decision.*
- Yes - the AIP is marked for storage automatically.
Store AIP location
If the previous step and this step are configured, all AIPs will be sent to the selected storage location (unless you have included a custom processing configuration with the transfer that defines another location).
Options:
- None - the user is prompted for a decision.*
- Default location - the AIP is stored in the AIP storage location that has been defined as the default in the Storage Service.
- [Other storage locations] - any other AIP storage locations that are available will also appear on this list.
Upload DIP
If a DIP was created, it can be automatically sent to an access system for which there is an Archivematica integration.
Options:
- None - the user is prompted for a decision.*
- Upload DIP to CONTENTdm - see CONTENTdm DIP upload documentation.
- Upload DIP to Archivists Toolkit - see Archivists Toolkit DIP upload documentation.
- Upload DIP to AtoM - see AtoM DIP upload documentation.
- Do not upload - the DIP will not be uploaded to an access system.
- Upload DIP to ArchivesSpace - see ArchivesSpace DIP upload documentation.
Store DIP
If a DIP was created, it can be stored without interrupting the workflow in the dashboard. Note that DIP storage is not required, and that DIPs can be created on demand by reingesting the AIP.
Options:
- None - the user is prompted for a decision.*
- Yes - the DIP is marked for storage automatically.
Store DIP location
If the previous step and this step are configured, all DIPs will be sent to the selected storage location (unless you have included a custom processing configuration with the transfer that defines another location).
Options:
- None - the user is prompted for a decision.*
- Default location - the DIP is stored in the DIP storage location that has been defined as the default in the Storage Service.
- [Other storage locations] - any other DIP storage locations that are available will also appear on this list.
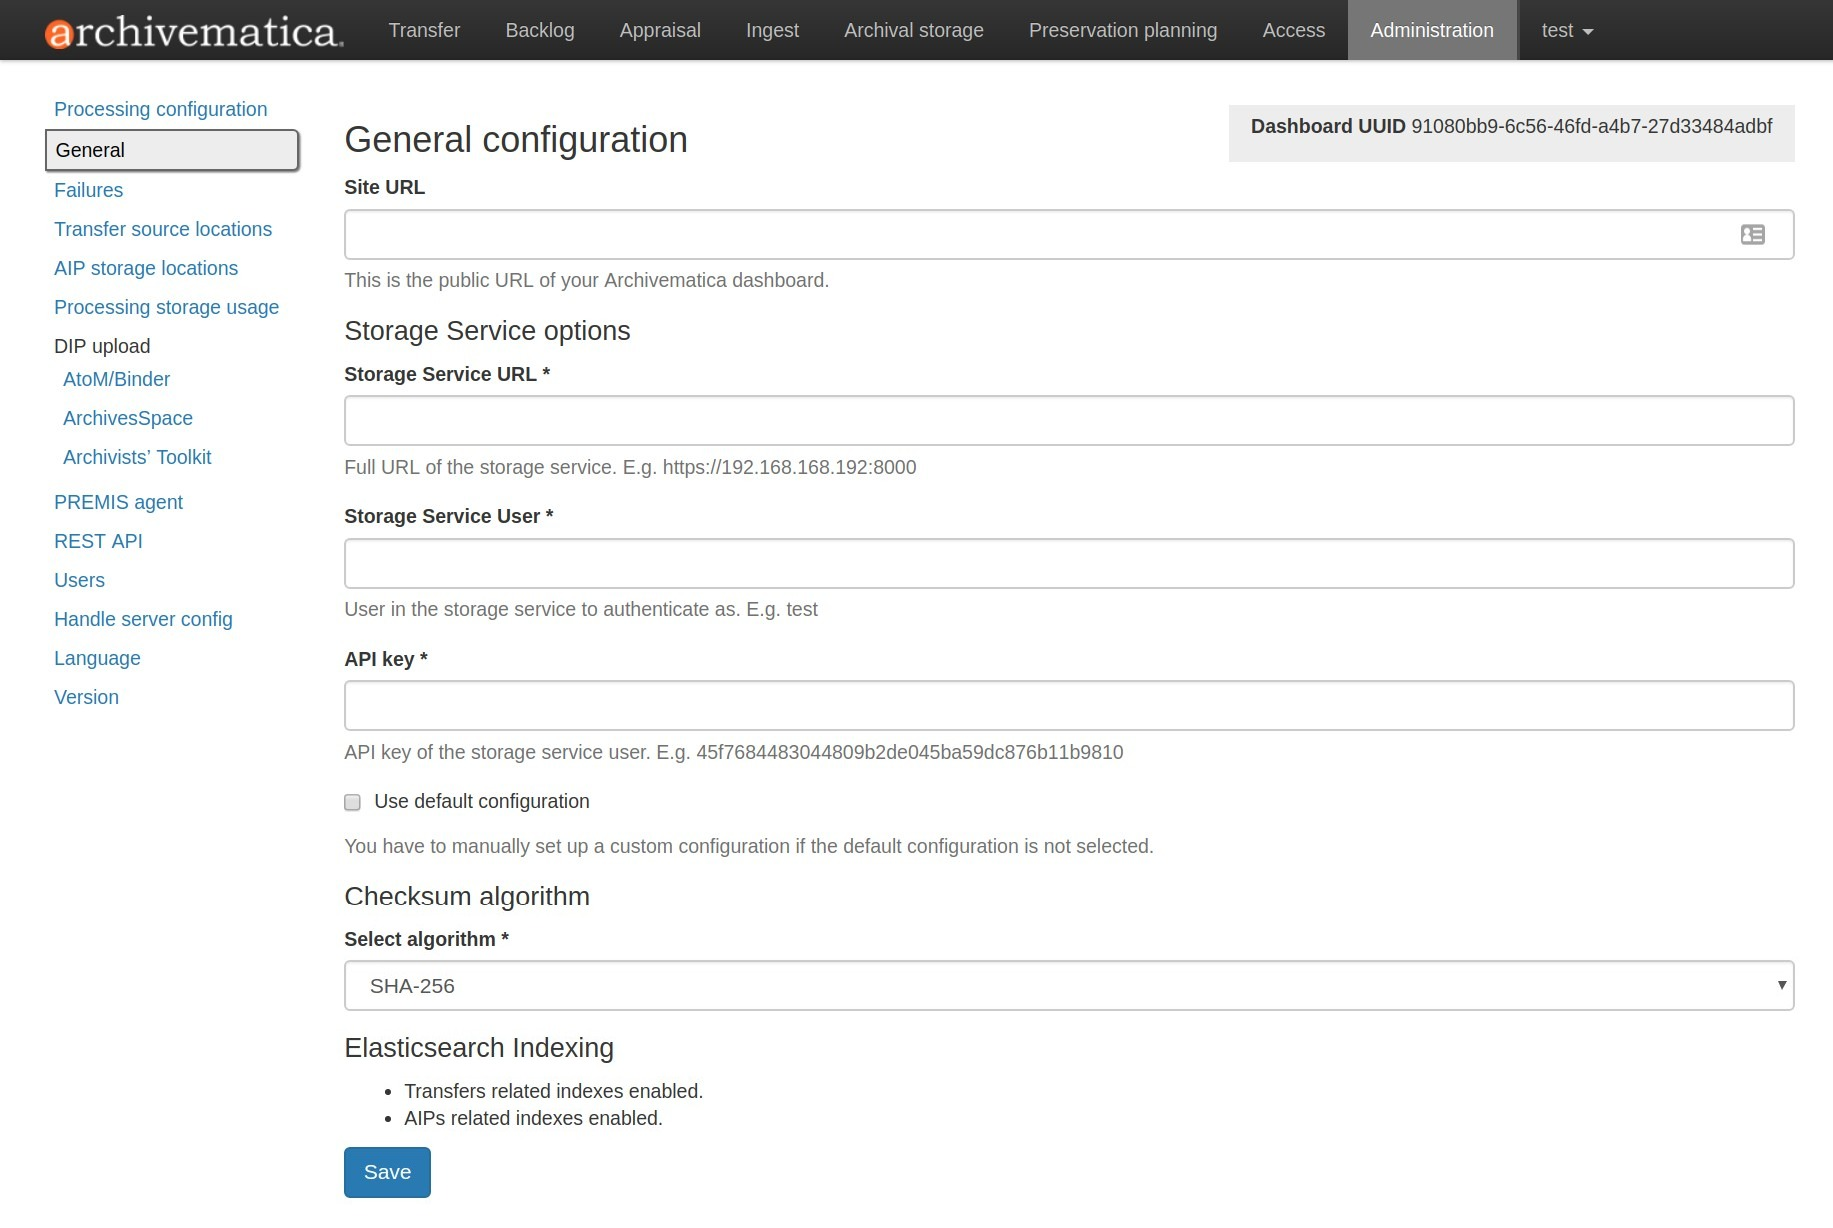
Général
In this section, you can configure the following for your Archivematica client:
- Storage Service options
- Checksum algorithm
- Elasticsearch indexing
Options de configuration générale dans l’onglet Administration du tableau de bord
Storage Service options
This is where you’ll find the complete URL for the Storage Service, along with a username and API key. See the Storage Service documentation for more information about this feature.
Checksum algorithm
You can select which checksum algorithm Archivematica will use during the Assign UUIDs and checksums microservice in Transfer. Choose between MD5, SHA-1, SHA-256 and SHA-512.
Elasticsearch indexing
As of Archivematica 1.7, Elasticsearch is optional. Installing Archivematica without Elasticsearch means reduced consumption of compute resources and lower operational complexity. Disabling Elasticsearch means that the Backlog, Appraisal, and Archival Storage tabs do not appear and their functionality is not available.
This section in the General configuration shows if Elasticsearch is enabled or disabled.
Échecs
Cette page affiche les paquets qui ont échoué durant le traitement.

Rapport d’échec sur le tableau de bord
Cliquez sur Date, Nom ou UUID pour afficher un rapport d’échec :
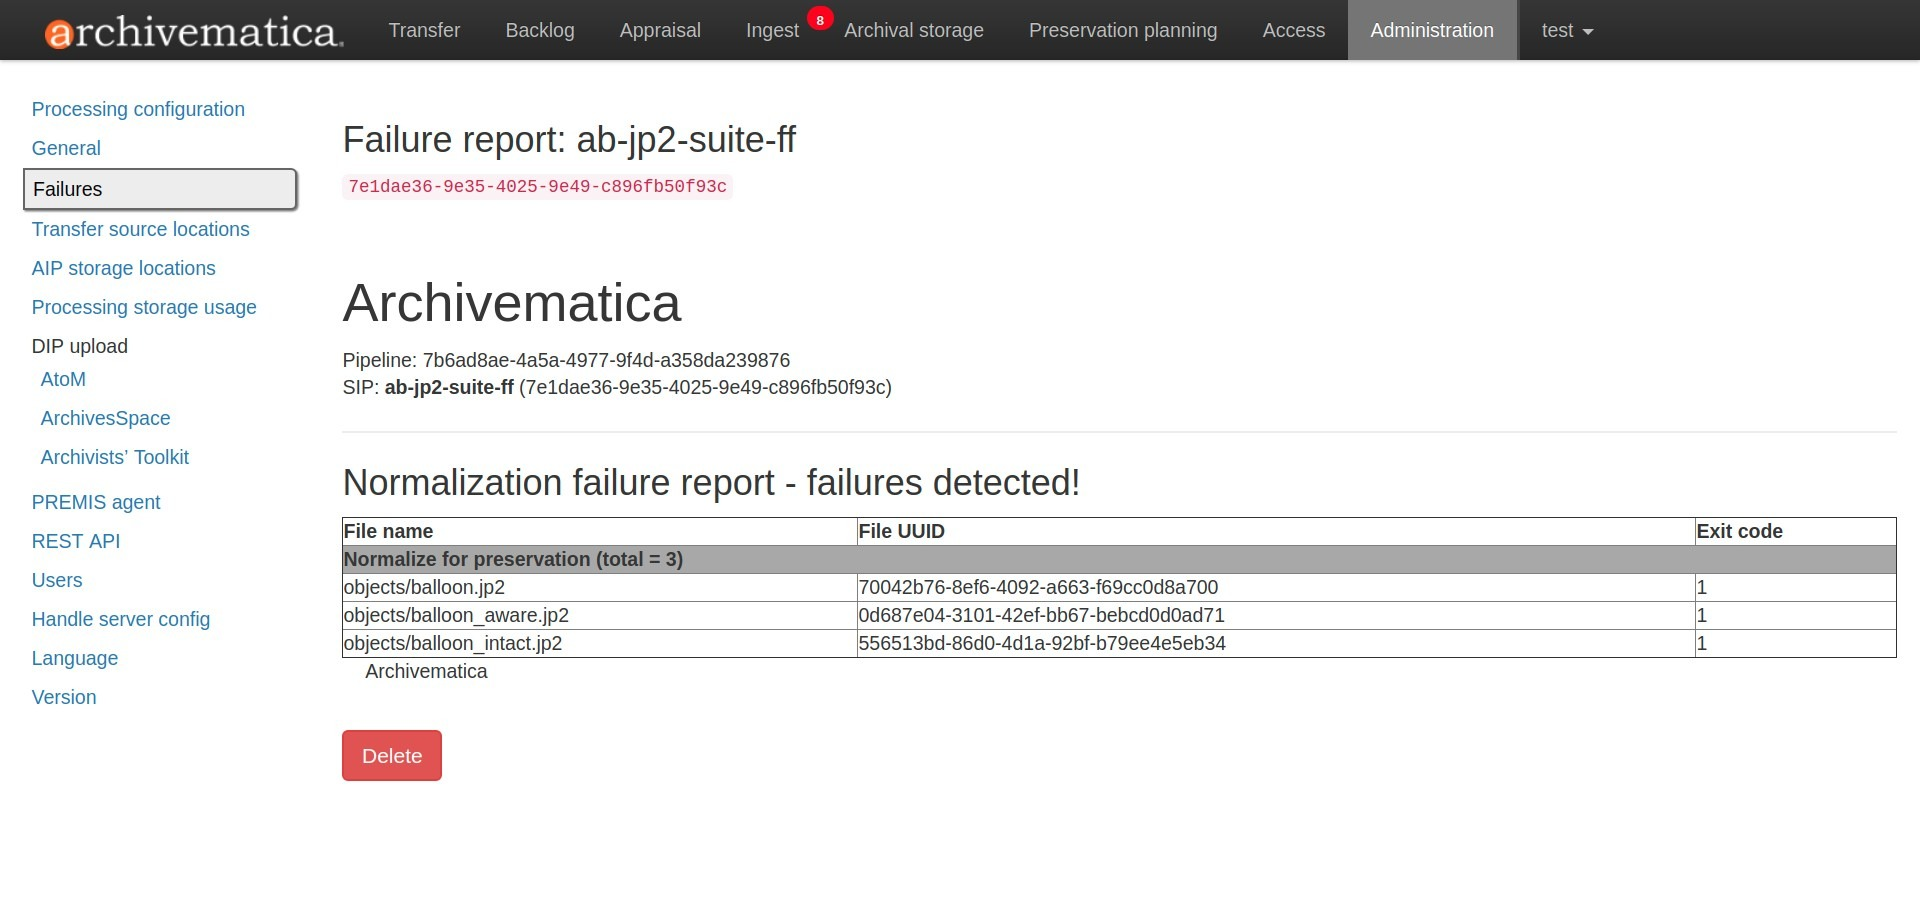
The failure report can be removed from the Dashboard by clicking Delete.
Emplacement du transfert source
Archivematica vous permet de lancer des transferts au moyen du navigateur de fichiers de votre système d’exploitation ou d’une interface Web. Mais les fichiers sources des transferts ne peuvent pas être téléchargés au moyen de l’interface Web. Ils doivent se trouver dans des volumes accessibles au serveur MCP Archivematica et être configurés au moyen du Service de stockage.
Lorsque vous lancez un transfert, vous devez sélectionner un ou plusieurs répertoires de fichiers à ajouter au transfert.
Emplacements de stockage d’AIP
Les répertoires de stockage d’AIP représentent des répertoires dans lesquels les AIP sont stockés. Ces répertoires peuvent être identifiés de manière similaire à celle utilisée pour les répertoires sources de transfert à l’aide du Service de stockage.
Vous pouvez visualiser vos répertoires sources de transfert dans l’onglet Administration du tableau de bord sous « Emplacements de stockage d’AIP ».
Utilisation de l’espage de traitement
Cette section de la page Administration affiche plusieurs emplacements de traitement et l’utilisation actuelle de l’espace disponible.
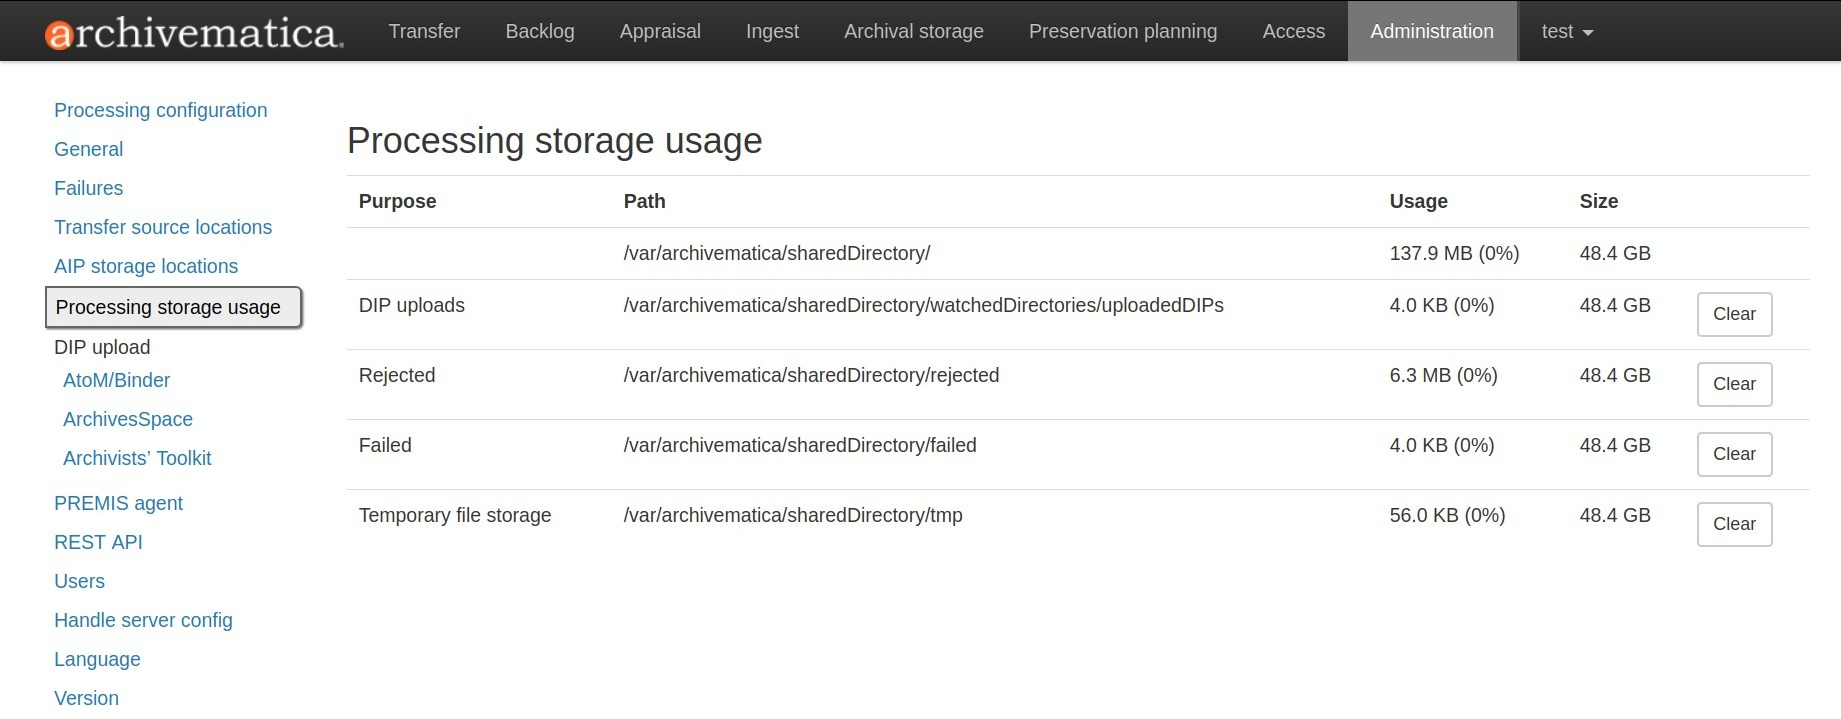
Les administrateurs peuvent utiliser les boutons « Effacer » pour supprimer le contenu de ces emplacements de traitement et récupérer de la capacité sur leur serveur.
DIP upload
Archivematica has access integrations with three access platforms: AtoM, ArchivesSpace, and Archivists” Toolkit. For more information on Archivematica integrations, please see the Integrations page.
AtoM/Binder DIP upload
Archivematica can upload DIPs directly to an AtoM website so that the contents can be accessed online. Using the same configuration screen, you can also configure Archivematica to upload DIPs to Binder, which is built off the AtoM framework.
For more information on configuring the AtoM/Binder DIP upload parameters and the servers, please see the AtoM/Binder DIP upload configuration instructions.
Niveaux de description
Vous pouvez extraire des niveaux de description dans AtoM afin de pouvoir les utiliser dans Classer un SIP. Cliquez sur Niveaux de description, puis sur Extraire d’AtoM pour obtenir une liste actualise de la taxonomie des niveaux de description AtoM.
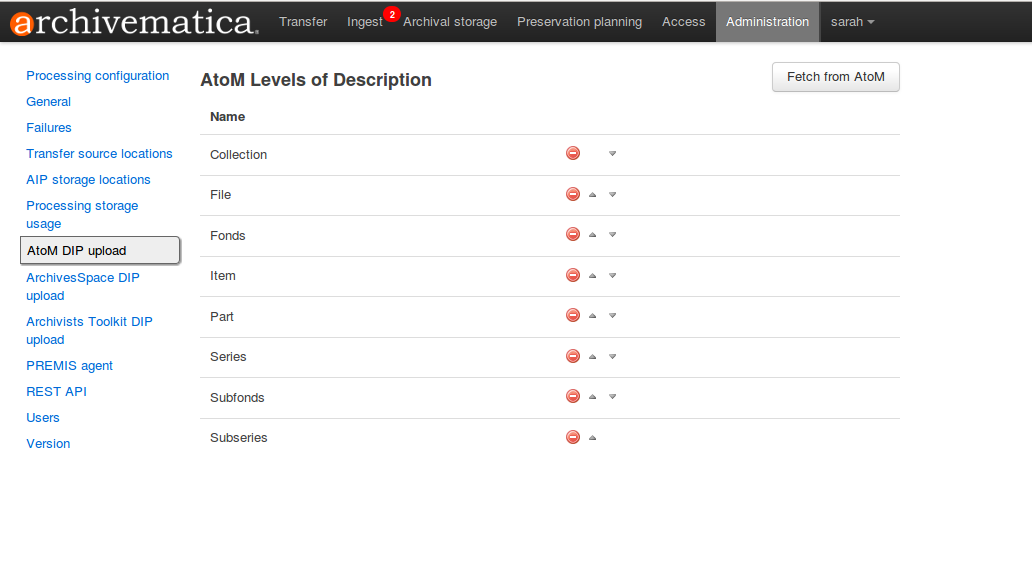
Si vous préférez ne pas utiliser certains niveaux de description de la taxonomie AtoM dans Classer un SIP sur Archivematica , vous pouvez les supprimer en cliquant sur le bouton rouge. Vous pouvez modifier l’ordre dans lequel ils figurant dans SIP en utilisant les flèches haut-bas.
Note
You may need an administrator to configure AtoM for DIP uploads from Archivematica. For administrator instructions, see AtoM DIP upload in the Administrator manual
Téléchargement DIP via ArchivesSpace
Avant d’acquérir les objets numériques dans ArchivesSpace, il faut régler les paramètres Téléchargement DIP via ArchivesSpace dans l’onglet administration du tableau de bord.
For more information on configuring the ArchivesSpace DIP upload parameters, please see the Admin Manual ArchivesSpace DIP upload configuration instructions.
Téléchargement DIP via Archivists” Toolkit
Avant d’acquérir les objets numériques destinés au Archivists’ Toolkit, il faut régler les paramètres Téléchargement DIP via Archivists” Toolkit dans l’onglet Administration du tableau de bord.
Should you wish to enable the PREMIS-based restrictions functionality, choose base on PREMIS under Restrictions Apply. To add PREMIS rights, please see Add PREMIS rights and restrictions.
For more information on configuring the Archivists” Toolkit DIP upload parameters, please see the Admin Manual Archivists” Toolkit DIP upload configuration instructions.
Voir aussi
Important
We no longer actively test DIP uploads to Archivists” Toolkit.
Agent PREMIS
Le nom et le code de l’agent PREMIS peuvent être réglés à l’aide de l’interface d’administration.
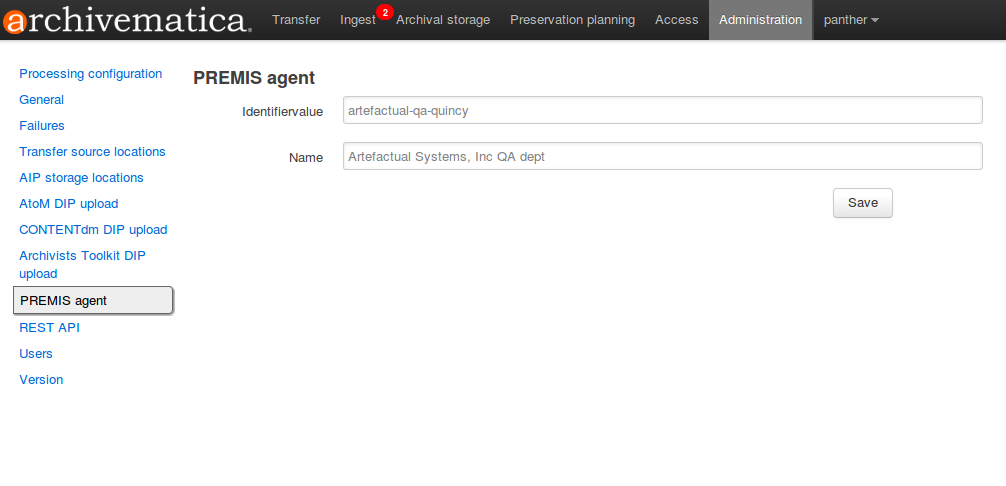
L’information de l’agent PREMIS est utilisée dans les fichiers METS que crée Archivematica pour identifier l’organisation qui exécute les événements de préservation numérique.
REST API
Archivematica prévoit un REST API pour automatiser l’approbation des transferts. Artefactual recommande qu’un administrateur technique configure les options de cette fonctionnalité.
Afin de configurer Archivematica pour utiliser REST API aux fins d’automatisation, reportez-vous au Manuel de l’administrateur - REST API.
Utilisateurs
The dashboard provides a simple cookie-based user authentication system using the Django authentication framework. Access to the dashboard is limited only to logged-in users and a login page will be shown when the user is not recognized. If the application can’t find any user in the database, the user creation page will be shown instead, allowing the creation of an administrator account.
Vous pouvez également créer, modifier et supprimer des utilisateurs à partir de l’onglet Administration. Seuls les utilisateurs identifiés comme étant des administrateurs peuvent créer et modifier des comptes d’utilisateurs.
Vous pouvez ajouter un nouvel utilisateur dans le système en cliquant sur le bouton « Ajouter » de la page d’administration des utilisateurs. Lorsque vous ajoutez un utilisateur, vous fournissez l’accès à Archivematica au moyen d’un nom d’utilisateur/mot de passe. Si vous devez modifier l’un ou l’autre de ces paramètres, vous pouvez le faire en cliquant sur le bouton « Modifier » correspondant à l’utilisateur en question, sur la page d’administration. Pour révoquer l’accès d’un utilisateur, vous cliquez alors sur le bouton « Supprimer » correspondant.
For more information about user creation, deletion, and security, please see the Users section in the Admin Manual.
Handle Server config
Archivematica can to be configured to make requests to a Handle System HTTP API so that files, directories and entire AIPs can be assigned persistent identifiers (PIDS) and derived persistent URLs (PURLs).
Language
The language menu allows you to choose from select languages.
Archivematica is translated by volunteers through Transifex. The completeness of a language is dependent on how many strings have been translated in Transifex. For information about contributing translations to the Archivematica project, see Translations.
Archivematica 1.8.1
Contenu
- Onglet Administration du tableau de bord
- Configuration du traitement
- Champs de la configuration de traitement
- Name
- Assign UUIDs to directories
- Send transfer to quarantine
- Remove from quarantine after (days)
- Generate transfer structure report
- Select file format identification command (Transfer)
- Extract packages
- Delete packages after extraction
- Perform policy checks on originals
- Examine contents
- Create SIP(s)
- Select file format identification command (Ingest)
- Normalize
- Approve normalization
- Generate thumbnails
- Perform policy checks on preservation derivatives
- Perform policy checks on access derivatives
- Bind PIDs
- Document empty directories
- Reminder: add metadata if desired
- Transcribe files (OCR)
- Select file format identification command (Submission documentation & metadata)
- Select compression algorithm
- Select compression level
- Store AIP
- Store AIP location
- Upload DIP
- Store DIP
- Store DIP location
- Champs de la configuration de traitement
- Général
- Échecs
- Emplacement du transfert source
- Emplacements de stockage d’AIP
- Utilisation de l’espage de traitement
- DIP upload
- Agent PREMIS
- REST API
- Utilisateurs
- Handle Server config
- Language
- Version
- Configuration du traitement
Faire une recherche
Open the general index or type your search in the search box.
Projets disponibles
Archivematica
- Version 1.18.0 (stable-current)
- Version 1.17.1 (stable-previous)
- Version 1.16.0 (legacy)
- Version 1.15.1 (legacy)
- Version 1.14.1 (legacy)
- Version 1.13.2 (legacy)
- Version 1.12.2 (legacy)
- Version 1.11.2 (legacy)
- Version 1.10.2 (legacy)
- Version 1.9.3 (legacy)
- Version 1.8.1 (legacy)
- Version 1.7.2 (legacy)
- Version 1.6.1 (legacy)
- Version 1.5 (legacy)
- Version 1.4 (legacy)
Archivematica Storage Service
- Version 0.24.0 (stable-current)
- Version 0.23.0 (stable-previous)
- Version 0.22.0 (legacy)
- Version 0.21.1 (legacy)
- Version 0.20.1 (legacy)
- Version 0.19.0 (legacy)
- Version 0.18.1 (legacy)
- Version 0.17.1 (legacy)
- Version 0.16.1 (legacy)
- Version 0.15.1 (legacy)
- Version 0.14.1 (legacy)
- Version 0.13.0 (legacy)
- Version 0.12.0 (legacy)
- Version 0.11.1 (legacy)
- Version 0.10 (legacy)
- Version 0.9 (legacy)
- Version 0.8 (legacy)
License
Archivematica documentation by Artefactual Systems Inc. is licensed under a Creative Commons Attribution-ShareAlike 4.0 International License.
