Dashboard administration tab
This page describes dashboard user administration in Archivematica via the dashboard. For higher level, technical administrative documentation, please see Administrator manual.
The Archivematica administration pages, under the Administration tab of the dashboard, allows you to configure application components and manage users.
On this page:
- Processing configuration
- General
- Failures
- Transfer source locations
- AIP storage locations
- Processing storage usage
- AtoM DIP upload
- ArchivesSpace DIP upload
- Archivists Toolkit DIP upload
- PREMIS agent
- REST API
- Users
Processing configuration
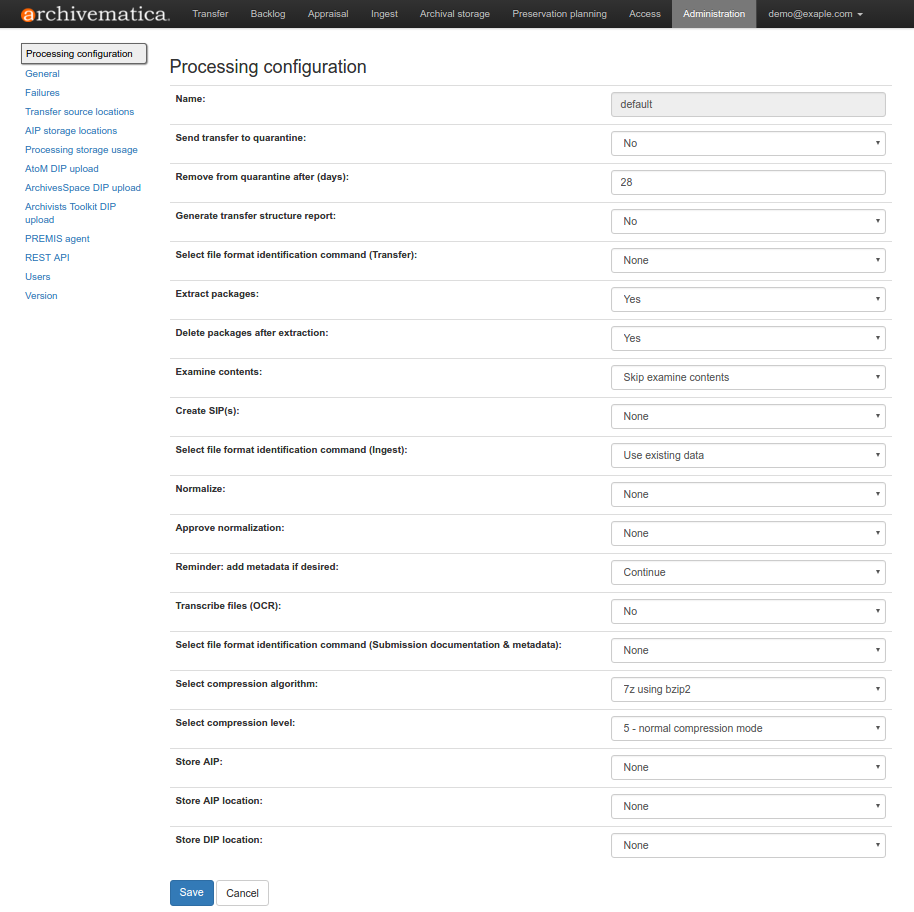
The processing configuration administration page of the dashboard allows users to configure the job decision points presented by Archivematica during transfer and ingest. This screen provides you with an easy form to configure the default processingMCP.xml that governs these decisions. When you change the options using the web interface the necessary XML will be written behind the scenes.
Multiple processing configurations can be created using the Add button on the Processing Configuration screen. Often, users create multiple configurations for different types of content - one for audio-visual material, one for images, one for textual records, etc. To edit an existing processing configuration file, click on the Edit button to the right of the processing configuration name.
In order to edit any of the selections, select a choice from the drop-down menu to the right of the job name. Once you’ve made all of your selections, save the processing configuration.
Processing configuration fields
Many jobs in the Archivematica transfer and ingest tabs have configurable decision points. Automating these decisions can make the transfer and ingest process substantially quicker, especially if you find yourself selecting the same decisions over and over. Below is a list of the processing configuration form fields with a short description about how they work.
Note
Selecting None means that Archivematica will prompt you to make the decision as the transfer/ingest is being processed.
- Name: The name of the processingMCP.xml file that you are editing.
- Send transfer to quarantine: Select whether or not to send transfers to quarantine.
- Remove from quarantine after (days): Indicate how long transfers should remain in quarantine. Once they are removed from quarantine, they will be available for continued processing. Note that this field will not be invoked unless the Send transfer to quarantine field is set to « Yes ».
- Generate transfer structure report: Select whether or not Archivematica should generate a directory tree of the original transfer and place it as a text file in the AIP.
- Select file format identification command (Transfer): Select the file format identification tool to be used on file format identification jobs in the transfer tab.
- Extract packages: Select whether or not Archivematica should extract any packages included in the transfer (i.e. .zip files).
- Delete packages after extraction: Select whether packages should be deleted after extraction. Note that this field will not be invoked unless the Extract packages field is set to « Yes ».
- Examine contents: Select whether or not to run Bulk Extractor to generate content reports to identify personally identifying information (PII).
- Create SIP(s): Select if Archivematica should create one SIP from the transfer and continue processing or send the transfer to backlog.
- Select file format identification comment (Ingest): Select the file format identification tool to be used on file format identification jobs in the ingest tab.
- Normalize: Select Normalization options (see Normalize).
- Approve normalization: Select whether or not to automatically approve normalization.
- Reminder: add metadata if desired: Select whether or not Archivematica should remind the user to add metadata to the SIP using the GUI. Note: this job occurs at the last moment that it is possible to add metadata to the SIP; once the ingest proceeds past this point, it is no longer possible to add metadata to the SIP.
- Transcribe files (OCR): Select whether or not to transcribe the contents of the SIP (see Transcribe SIP contents)
- Select file format identification command (Submission documentation & metadata): Select the file format identification tool to be used on submission documentation and metadata files.
- Select compression algorithm: Select which tool you would like to use to compress your AIP.
- Select compression level: Select how compressed you would like your AIP to be. Selecting a higher compression level means that the resulting AIP is smaller, but compression also takes longer. Lower compression levels mean quicker compression, but a larger AIP.
- Store AIP: Store the AIP without interrupting the workflow in the dashboard.
- Store AIP location: Select one archival storage location where you will consistently send your AIPs.
- Store DIP location: Select one archival storage location where you will consistently send your DIPs, if you wish to store them.
General
In the general configuration section, you can select interface options and set Storage Service options for your Archivematica client.
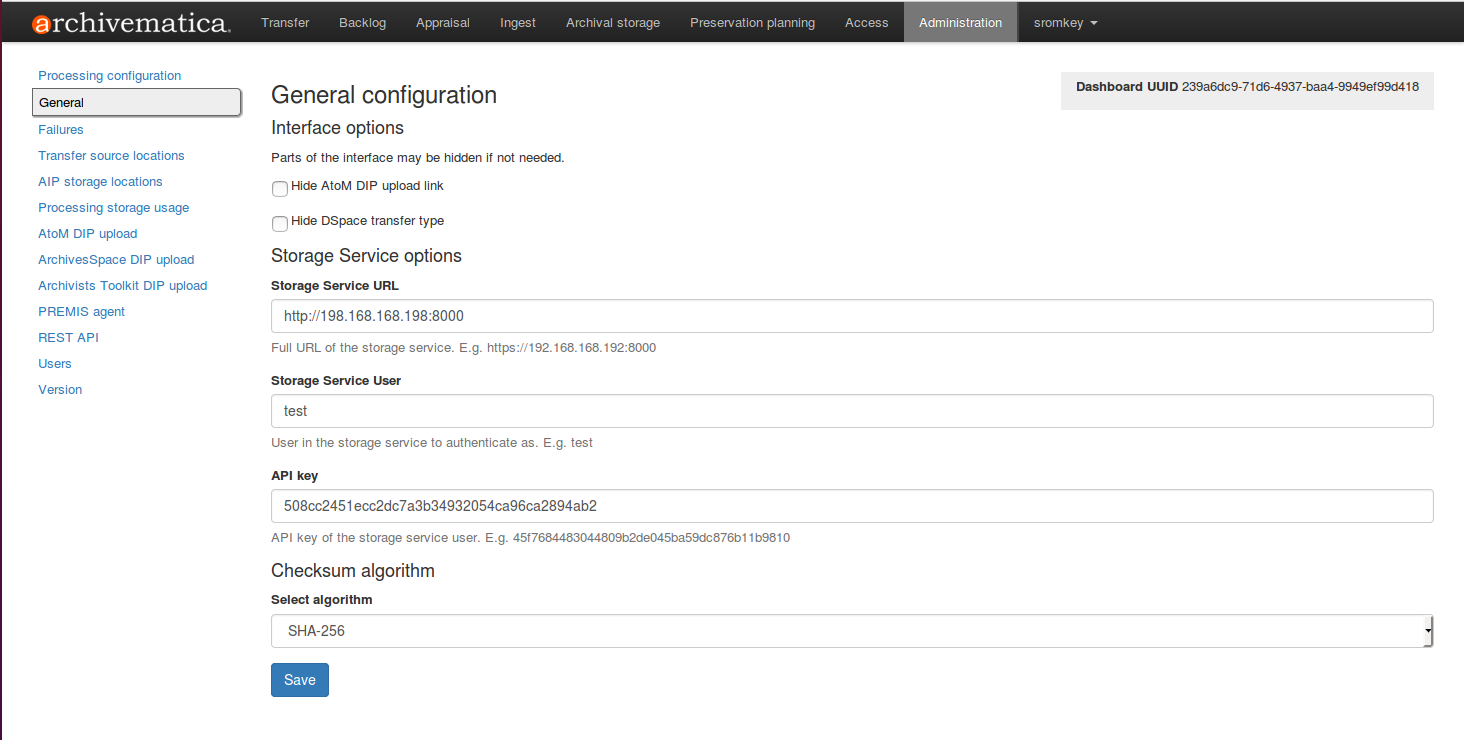
General configuration options in Administration tab of the dashboard
Interface options
Here, you can hide parts of the interface that you don’t need to use. In particular, you can hide CONTENTdm DIP upload link, AtoM DIP upload link and DSpace transfer type.
Storage Service options
This is where you’ll find the complete URL for the Storage Service, along with a username and API key. See Storage Service for more information about this feature.
Checksum algorithm
You can select which checksum algorithm Archivematica will apply upon each object in Assign UUIDs and checksums micro-service in Transfer. Choose between MD5, SHA-1, SHA-256 and SHA-512.
Failures
This page displays packages that failed during processing.
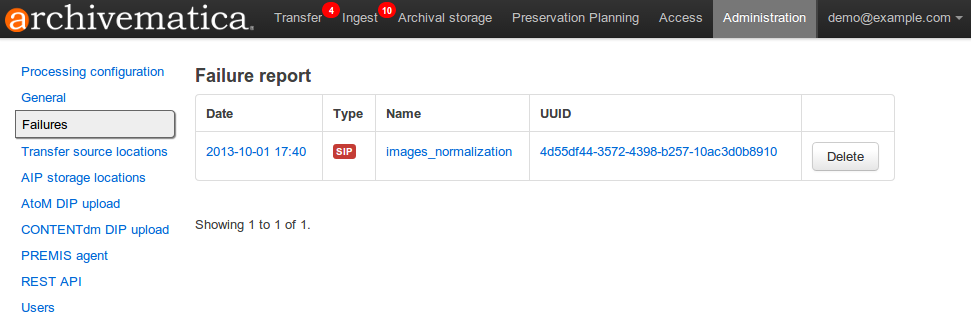
Failures report in the dashboard
Clicking the date, name or UUID will display a report of the failure:
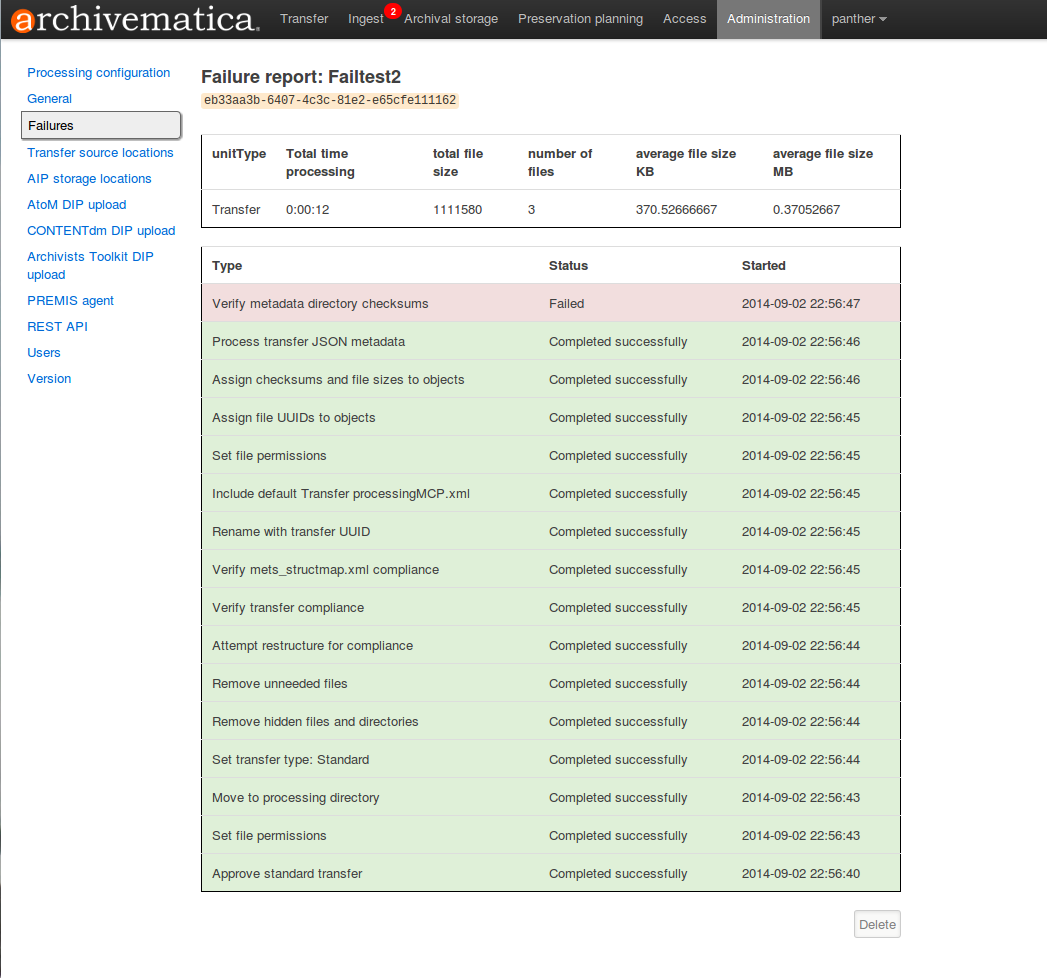
The Failure report can be removed from the Dashboard by clicking Delete.
Transfer source location
Archivematica allows you to start transfers using the operating system’s file browser or via a web interface. Source files for transfers, however, cannot be uploaded using the web interface; they must exist on volumes accessible to the Archivematica MCP server and configured via the Storage Service.
When starting a transfer you are required to select one or more directories of files to add to the transfer.
AIP storage locations
AIP storage directories are directories in which completed AIPs are stored. Storage directories can be specified in a manner similar to transfer source directories using the Storage Service.
You can view your transfer source directories in the Administrative tab of the dashboard under « AIP storage locations ».
Processing storage usage
This section of the Administration page displays various processing locations with their current usage of available space.
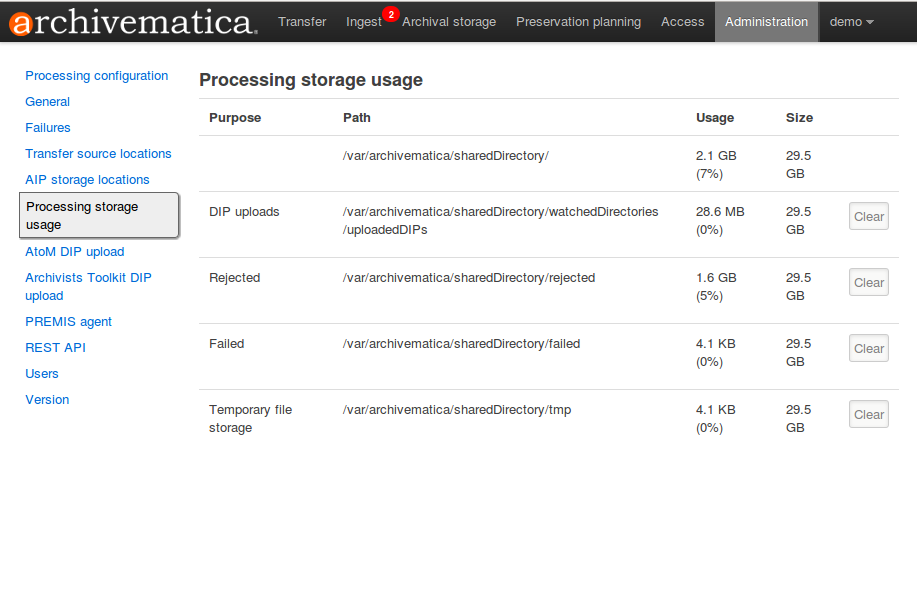
Administrators can use the « clear » buttons to delete the contents of these processing locations to make more room on their server.
AtoM DIP upload
Archivematica can upload DIPs directly to an AtoM website so that the contents can be accessed online. The AtoM DIP upload configuration page is where you specify the AtoM installation where you’d like to upload DIPs (and, if you are using Rsync to transfer the DIP files, the Rsync transfer details).
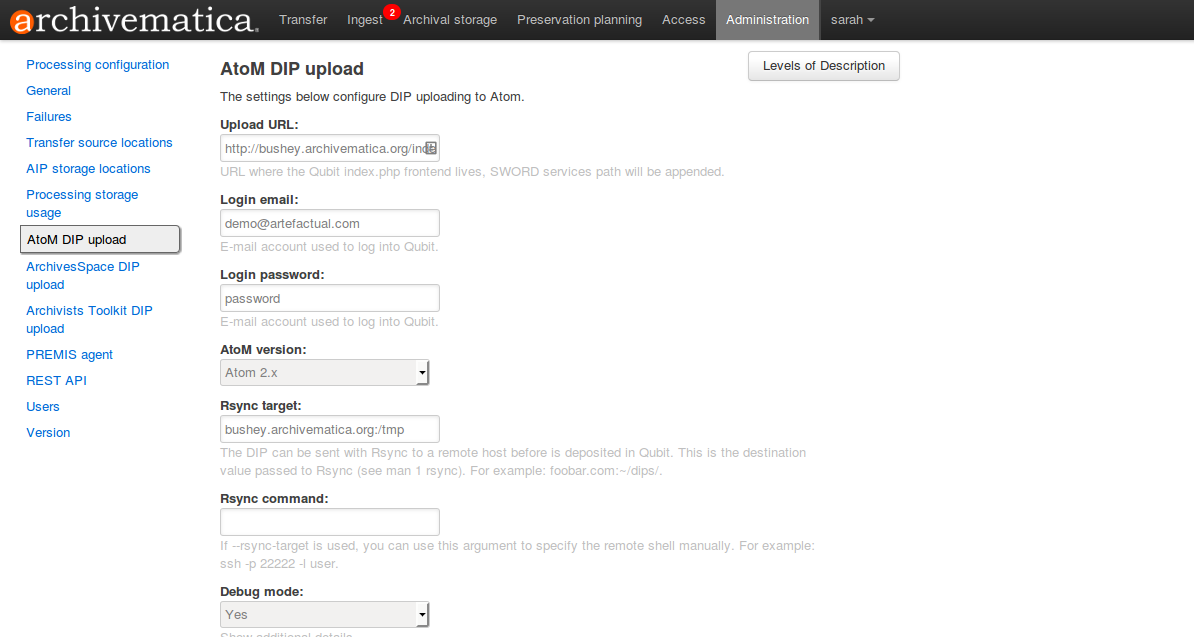
AtoM DIP upload configuration in Dashboard.
The required parameters are:
- Upload URL : the URL of the destination AtoM website.
- Login email : the email address used to log in to AtoM.
- Login password : the password used to log in to AtoM.
- AtoM version : the version of the destination AtoM website (find in Admin -> Settings -> Global).
Note
Archivematica 1.5 has been tested with and is recommended for use with AtoM 2.2 and AtoM 2.3.
If you are using Rsync to send the DIP to AtoM, enter Rsync details:
- Rsync target : Destination value for rsync, e.g.
foobar.com:/dips - Rsync command : Used to specify the remote shell manually, e.g.
ssh -p 22222 -l user
If you are not using Rsync, leave these fields blank.
If you would like to have additional details in failure reports, also enable debug mode by choosing « Yes ».
AtoM user interface
In the AtoM user interface, please take note of the following:
- The sword plugin (Admin –> Plugins –> qtSwordPlugin) must be enabled in order for AtoM to receive uploaded DIPs.
- Enabling Job scheduling (Admin –> Settings –> Job scheduling) in version 2.1 or lower is also recommended.
Levels of description
You can fetch levels of description from AtoM so that they can be used in SIP arrange. Click on Levels of Description, then Fetch from AtoM to get an updated list from the AtoM levels of description taxonomy.
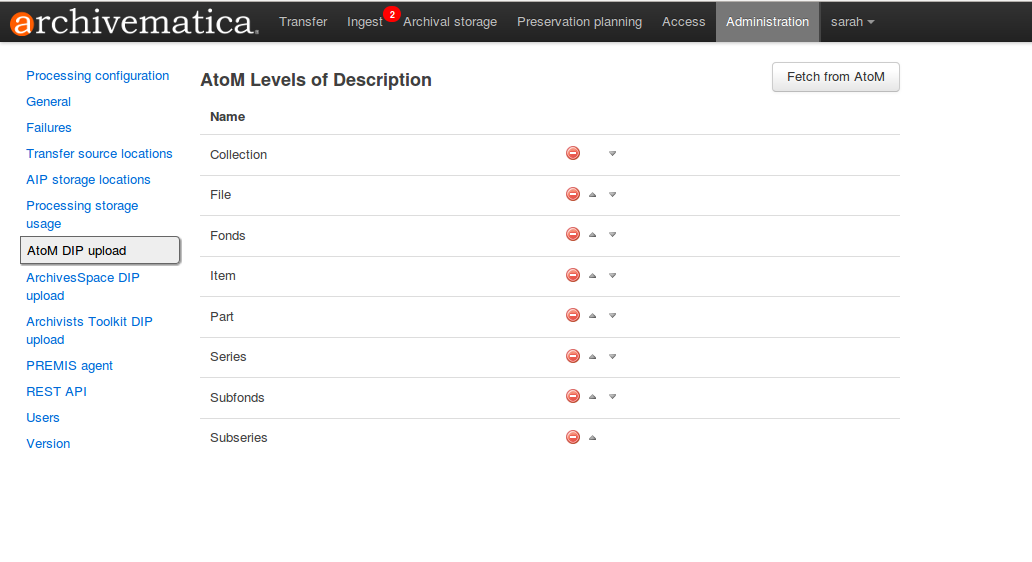
If there are levels of description in the AtoM taxonomy that you prefer not to use in Archivematica SIP arrange, you can remove them using the red delete button. You can change the order that they appear in SIP arrange by using the up/down arrows in this screen.
Note
You may need an administrator to configure AtoM for DIP uploads from Archivematica. For administrator instructions, see AtoM configuration in the Administrator manual
ArchivesSpace DIP upload
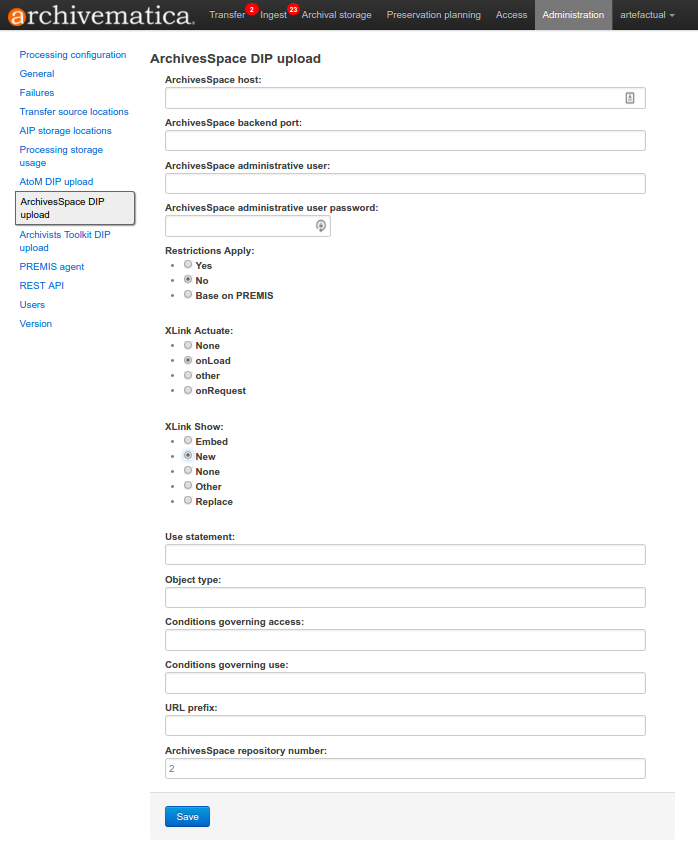
Before ingesting digital objects destined for ArchivesSpace, ensure that the ArchivesSpace DIP upload settings in the administration tab of the dashboard have been set.
- These settings should be created and saved before digital objects destined for upload to ArchivesSpace are processed. Note that these can be set once and used for processing any number of transfers (i.e. they do not need to be re-set for each transfer).
- Include the IP address of the host database (ArchivesSpace host), the database port (ArchivesSpace backend port), an ArchivesSpace administrative username, the ArchivesSpace administrative user password, and the Use Statement (see note below).
- Restrictions Apply: Selecting Yes will apply a blanket access restriction to all content uploaded from Archivematica to ArchivesSpace. Selecting No will send all content to ArchivesSpace without restrictions. Should you wish to enable the PREMIS-based restrictions functionality, choose « base on PREMIS » under « Restrictions Apply ». To add PREMIS rights, please see Add PREMIS rights and restrictions.
- ArchivesSpace repository number: Insert the identifier for the ArchivesSpace repository to which you would like to upload DIPs here. Note that the default identifier for a single-repository ArchivesSpace instance is 2.
Note
The Use statement field is required. To populate this fields, you must refer to ArchivesSpace’s Controlled Value Lists.
The Use statement field in Archivematica is mapped to the Use Statement list in
ArchivesSpace. If the uploaded materials are original master images, for example,
you could enter image-master in the Use statement field to apply the label
image-master to all of the uploads.
Note
The Object type field can be left blank. To populate this fields, you must refer to ArchivesSpace’s Controlled Value Lists.
The Object type field in Archivematica is mapped to the Digital Object Type list in
ArchivesSpace. If the uploaded materials are sound recordings, you could enter sound_recording
in the Object type field to apply the label sound_recording to all of the uploads. For mixed
media uploads, it is best to leave this field blank.
Important
In order to save changes to the ArchivesSpace DIP upload configuration, you must enter the password before clicking save. Note that Archivematica will not show you an error if the password is not entered.
Archivists Toolkit DIP upload
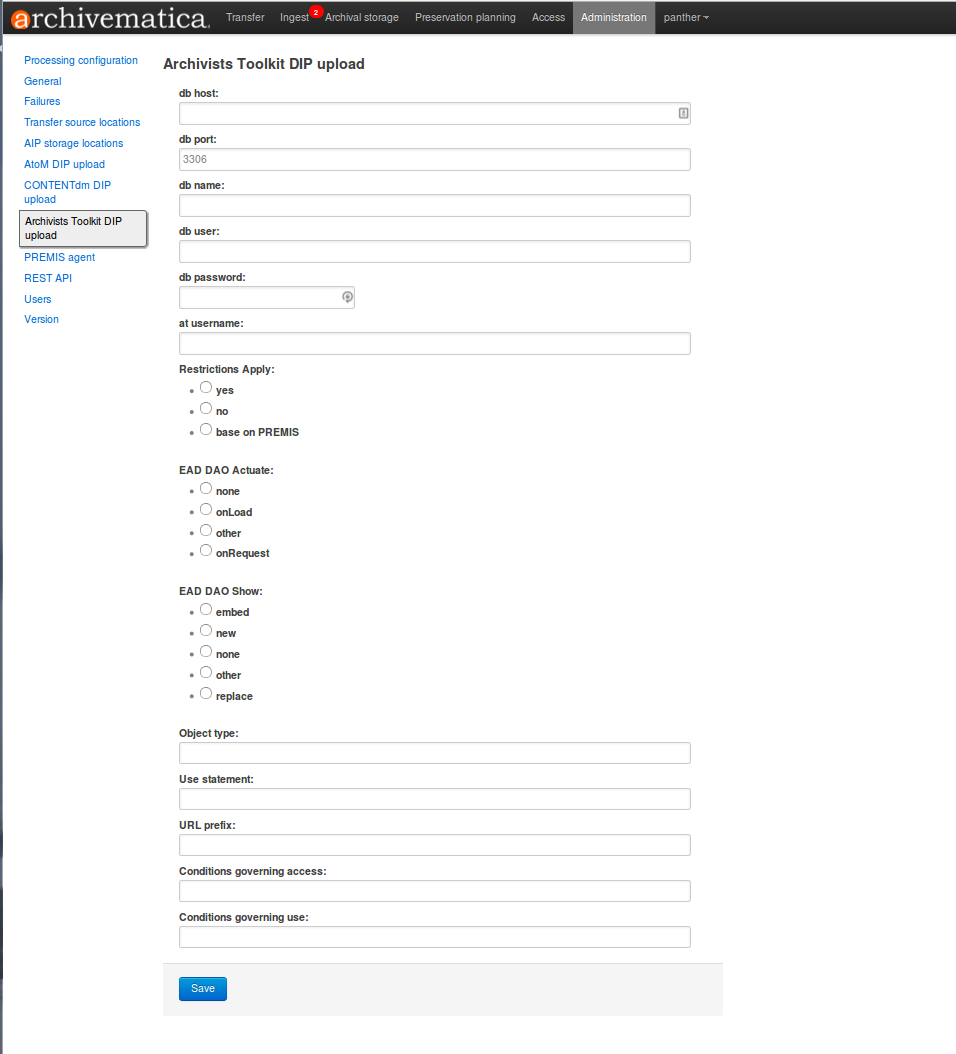
Before ingesting digital objects destined for Archivists” Toolkit, ensure that the Achivists” Toolkit DIP upload settings in the administration tab of the dashboard have been set.
- These settings should be created and saved before digital objects destined for upload to Archivists Toolkit are processed. Note that these can be set once and used for processing any number of transfers (i.e. they do not need to be re-set for each transfer). The screenshots below show the template in the dashboard.
- Include the IP address of the host database (db host), the database port (db port), the database name (db name), the database user (db user), and the Archivists” Toolkit user name (at username).
- Should you wish to enable the PREMIS-based restrictions functionality, choose « base on PREMIS » under « Restrictions Apply ». To add PREMIS rights, please see Add PREMIS rights and restrictions.
PREMIS agent
The PREMIS agent name and code can be set via the administration interface.
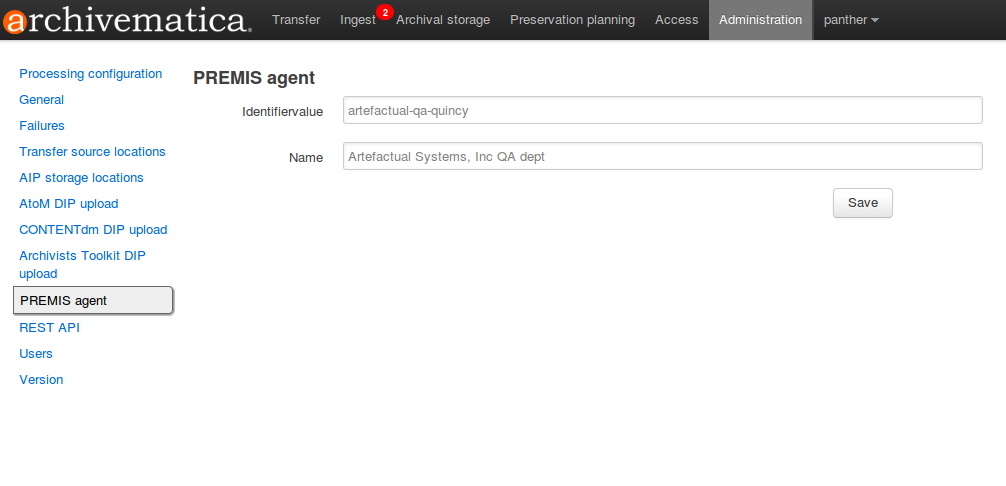
The PREMIS agent information is used in the METS files created by Archivematica to identify the agency performing the digital preservation events.
Voir aussi
REST API
Archivematica includes a REST API for automating transfer approval. Artefactual recommends that a technical administrator configure the options for this feature.
To configure Archivematica to use the REST API for automation, see Administrator manual - REST API.
Users
The dashboard provides a simple cookie-based user authentication system using the Django authentication framework. Access to the dashboard is limited only to logged-in users and a login page will be shown when the user is not recognized. If the application can’t find any user in the database, the user creation page will be shown instead, allowing the creation of an administrator account.
Users can be also created, modified and deleted from the Administration tab. Only users who are administrators can create and edit user accounts.
You can add a new user to the system by clicking the « Add new » button on the user administration page. By adding a user you provide a way to access Archivematica using a username/password combination. Should you need to change a user’s username or password, you can do so by clicking the « Edit » button, corresponding to the user, on the administration page. Should you need to revoke a user’s access, you can click the corresponding « Delete » button.
Archivematica 1.6
Contenu
Faire une recherche
Open the general index or type your search in the search box.
Projets disponibles
Archivematica
- Version 1.18.0 (stable-current)
- Version 1.17.1 (stable-previous)
- Version 1.16.0 (legacy)
- Version 1.15.1 (legacy)
- Version 1.14.1 (legacy)
- Version 1.13.2 (legacy)
- Version 1.12.2 (legacy)
- Version 1.11.2 (legacy)
- Version 1.10.2 (legacy)
- Version 1.9.3 (legacy)
- Version 1.8.1 (legacy)
- Version 1.7.2 (legacy)
- Version 1.6.1 (legacy)
- Version 1.5 (legacy)
- Version 1.4 (legacy)
Archivematica Storage Service
- Version 0.24.0 (stable-current)
- Version 0.23.0 (stable-previous)
- Version 0.22.0 (legacy)
- Version 0.21.1 (legacy)
- Version 0.20.1 (legacy)
- Version 0.19.0 (legacy)
- Version 0.18.1 (legacy)
- Version 0.17.1 (legacy)
- Version 0.16.1 (legacy)
- Version 0.15.1 (legacy)
- Version 0.14.1 (legacy)
- Version 0.13.0 (legacy)
- Version 0.12.0 (legacy)
- Version 0.11.1 (legacy)
- Version 0.10 (legacy)
- Version 0.9 (legacy)
- Version 0.8 (legacy)
License
Archivematica documentation by Artefactual Systems Inc. is licensed under a Creative Commons Attribution-ShareAlike 4.0 International License.
