Acquisition
During ingest, digital objects are packaged into SIPs and run through several microservices, including normalization, packaging into an AIP and generation of a DIP.
Si vous désirez sauter certains points de décisions par défaut ou effectuer des choix préconfigurés pour votre flux de travail, consultez Administration des utilisateurs - Configuration de traitement.
Si une erreur se produit durant l’acquisition, consultez Gestion des erreurs.
Sur cette page :
- Créer un SIP
- Add descriptive metadata
- Ajouter des privilèges PREMIS
- Normaliser
- Bind PIDs
- Transcrire le contenu du SIP
- Stocker l’AIP
- Télécharger le DIP
- Re-ingest AIP
- Clean up the ingest dashboard
Créer un SIP
Traitez les transferts tel que décrit dans Transferts. Si vous avez sélectionné « Créer un seul SIP et poursuivre le traitement » dans l’onglet Transfert, votre SIP a été créé et Archivematica lancera les tâches d’Acquisition. Cliquez sur l’onglet Acquisition pour continuer à travailler avec votre SIP.
The single SIP will move through a number of microservices. If you have preconfigured Archivematica to do so, processing will stop at a decision point that allows you to run file identification again or to use the existing file identification information captured during transfer. Archivematica’s default is to use existing data. For more about this option, see Processing configuration.
Lorsque le SIP arrive à l’étape « Normaliser », vous pourrez sélectionner la méthode de normalisation privilégiée pour le SIP. Sélectionnez celle qui convient le mieux à votre flux de travail.
Normalization microservice
Pour ajouter des métadonnées descriptives, reportez-vous à la section Ajouter des métadonnées ci-dessous.
Pour ajouter de l’information sur les privilèges PREMIS, reportez-vous à la section Ajouter des privilèges PREMIS ci-dessous.
Pour sélectionner une option de normalisation, reportez-vous à la section Normalisation ci-dessous.
The microservices that run on the Ingest tab include:
- Verify SIP compliance: verifies that the SIP conforms to the folder structure required by Archivematica for processing.
- Rename SIP directory with SIP UUID: associates the SIP with its metadata by appending the SIP UUID to the SIP directory name and checks if SIP is from Maildir transfer type to determine workflow. Both the transfer UUID and the SIP UUID are captured in the final AIP.
- Normalize: normalization converts ingested digital objects to preferred preservation and/or access formats according to user preference, using rules from Preservation planning. Choices about normalization can be made at the time the service is run, or automated in Processing configuration.
- Process manually normalized files: processes files that have been normalized prior to transfer or allows manual normalization during ingest.
- Policy checks for derivatives: checks access and preservation derivatives created during normalization against the Format Policy Registry.
- Add final metadata: allows the user to add metadata through the UI if desired.
- Transcribe SIP contents: runs Tesseract OCR tool on JPG or TIFF images in the SIP.
- Process submission documentation: processes any submission documentation
included in the SIP and adds it to the
objectsdirectory. - Bind PIDs: this microservice uses integration with the Handle.Net registry to create persistent identifiers.
- Generate AIP METS: generates the Archivematica AIP METS.xml file.
- Prepare DIP: if normalizing for access, creates a DIP containing access copies of the objects, thumbnails, and a copy of the METS.xml file.
- Prepare AIP: creates an AIP in Bagit format; creates the AIP pointer file; indexes the AIP, then losslessly compresses it.
- Review AIP: part of the Prepare AIP microservice, allows the user to review the structure and content of the AIP before proceeding.
- Upload DIP: when DIP is created, allows the user to upload the DIP to connected access options if desired. [link]
- Store DIP: allows the user to choose to store the DIP in a location pre-configured in the Storage Service.
- Store AIP: moves the AIP to
sharedDirectoryStructure/www/AIPsStoreor another specified directory. Before the AIP has been stored, a copy of it is extracted to a local temp directory, where it is subjected to standard BagIt checks: verifyvalid, checkpayloadoxum, verifycomplete, verifypayloadmanifests, verifytagmanifests.
Add descriptive metadata
Archivematica can accept descriptive metadata about your digital objects. For information on including descriptive metadata prior to starting your transfer, see Transfers with descriptive and/or rights metadata. This section will describe how to add descriptive metadata to your materials once processing has begun in Archivematica.
Archivematica can be configured to prompt you with a reminder to add metadata by
setting the processing configuration field
Reminder: add metadata if desired to None. This reminder occurs at the
last moment that it is possible to add metadata; once the ingest proceeds past
this point, it is no longer possible to add metadata to the SIP.
There are two methods for adding metadata while materials are being processed: by entering it into a form or by uploading a CSV file.
If you are planning to pass descriptive metadata to AtoM, see AtoM Dublin Core for information about the Dublin Core elements available.
Adding metadata using the user interface form
This method is best for users who are creating transfer-level metadata at the time of processing, or who don’t wish to do the extra work to prepare a CSV to upload metadata to Archivematica. The metadata form implements the Dublin Core Metadata Element Set.
Note that this method only allows you to add descriptive metadata to the transfer as a whole. To add metadata on a per-item basis, you must import metadata using a CSV file and either include the CSV with your transfer before transfer or upload the CSV through the user interface.
Important
You must carry out the following steps before the microservice
Reminder: add metadata if desired is completed. After this point, any
metadata that is entered will not be properly attached to the SIP or entered
into the METS.
While on the Transfer or Ingest tab, click on the metadata template icon to the right of the transfer name.
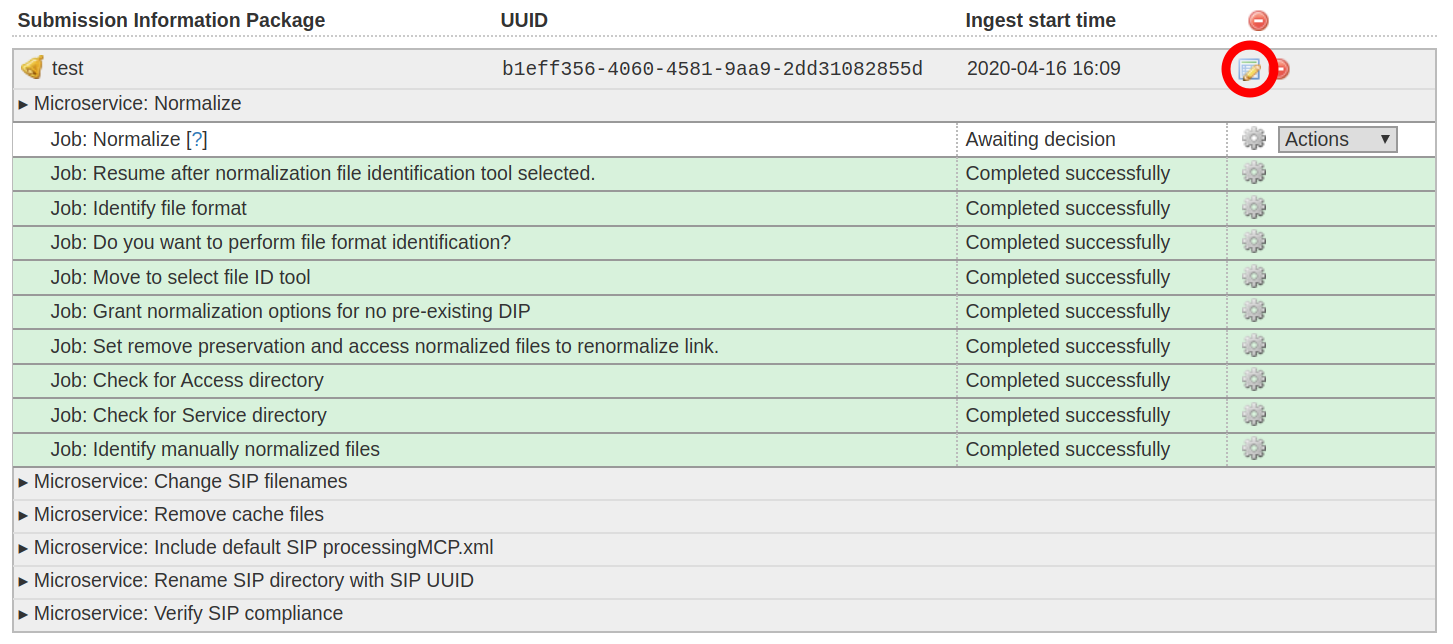
Pour ajouter des métadonnées, cliquez sur l’icône de modèle
This will take you to the SIP detail page. Under the Metadata heading, click Add.
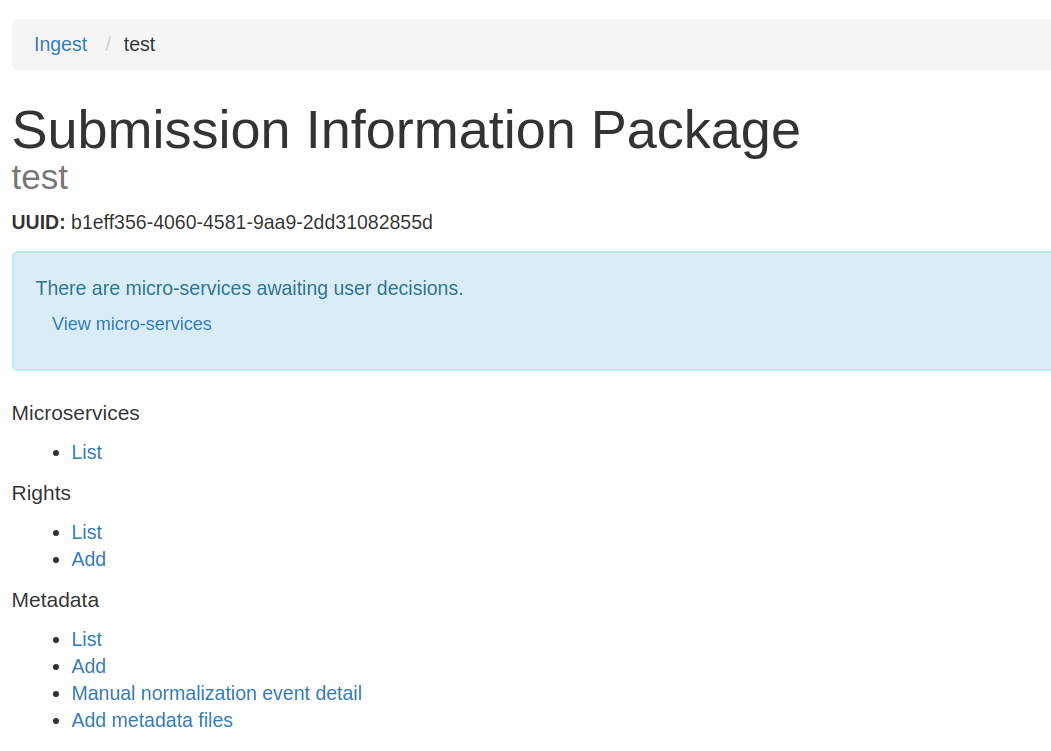
Page d’information du SIP
Add metadata as desired and save it by clicking Create at the bottom of the screen. Clicking and hovering over a field will show a tooltip that defines element and provide a link to the Dublin Core Metadata Element Set.
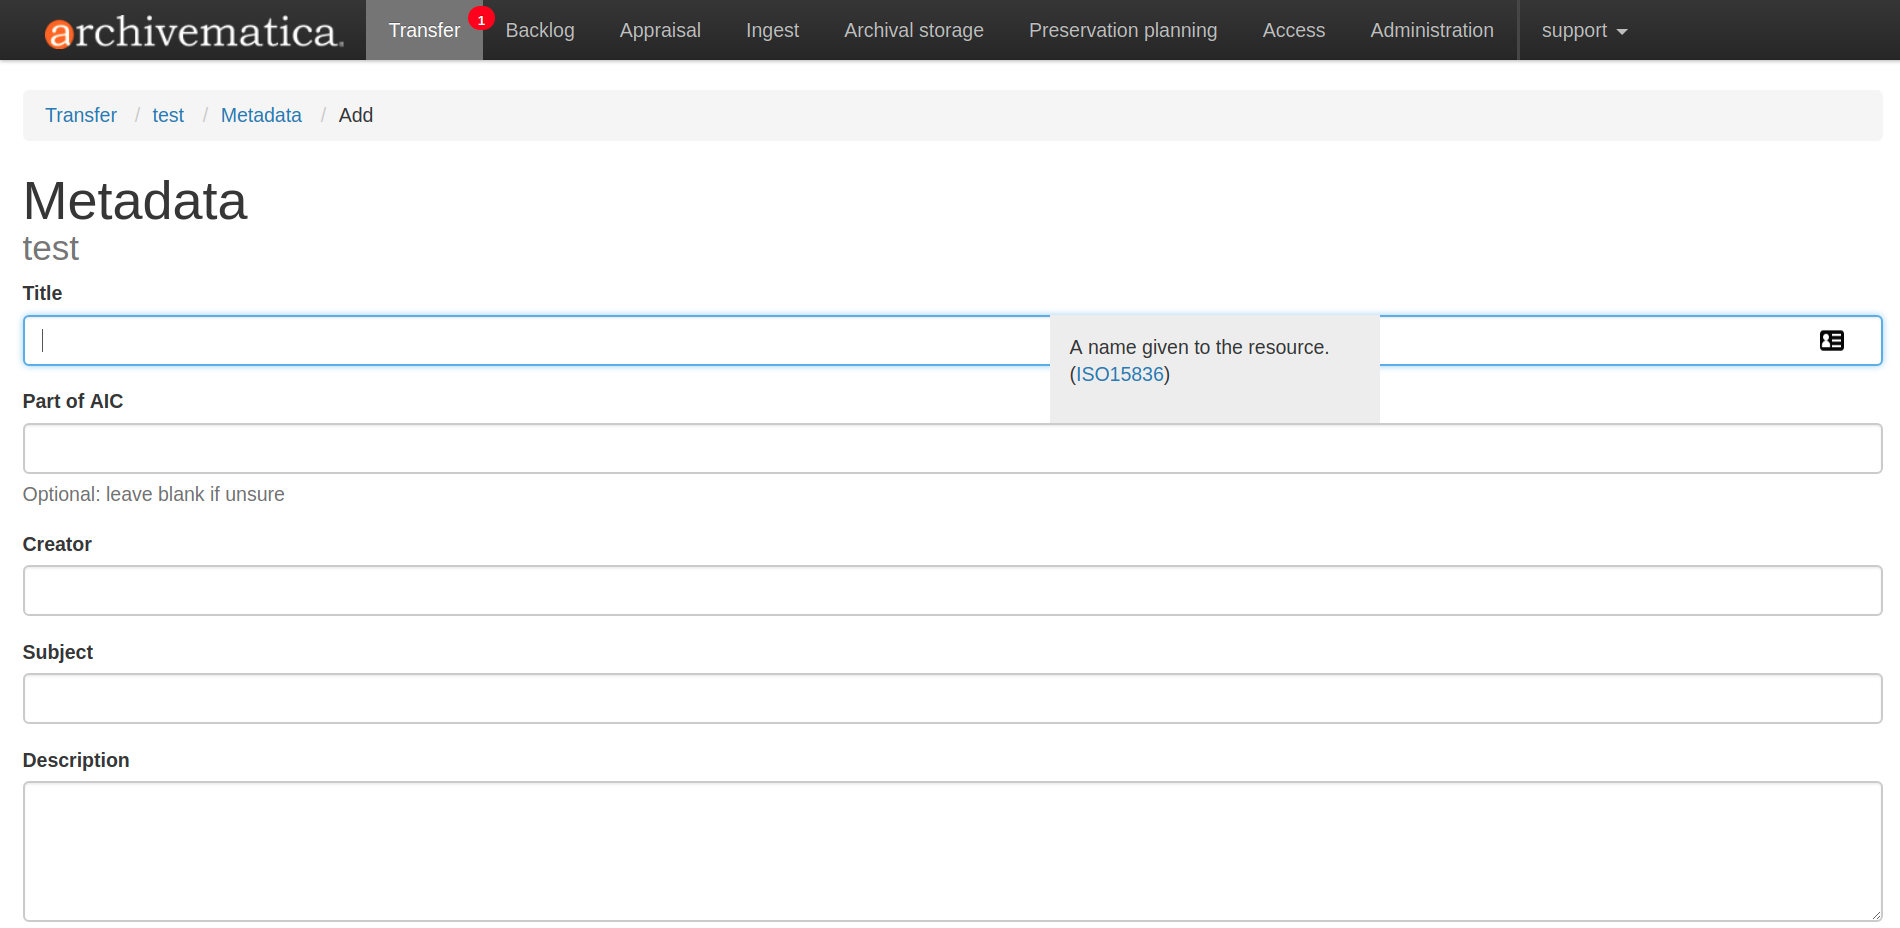
Metadata entry form
When you click Create, you will see the metadata entry in the list page. To edit it further, click Edit on the right-hand side. To delete it, click Delete. To add more descriptive metadata, click the Add button below the list.
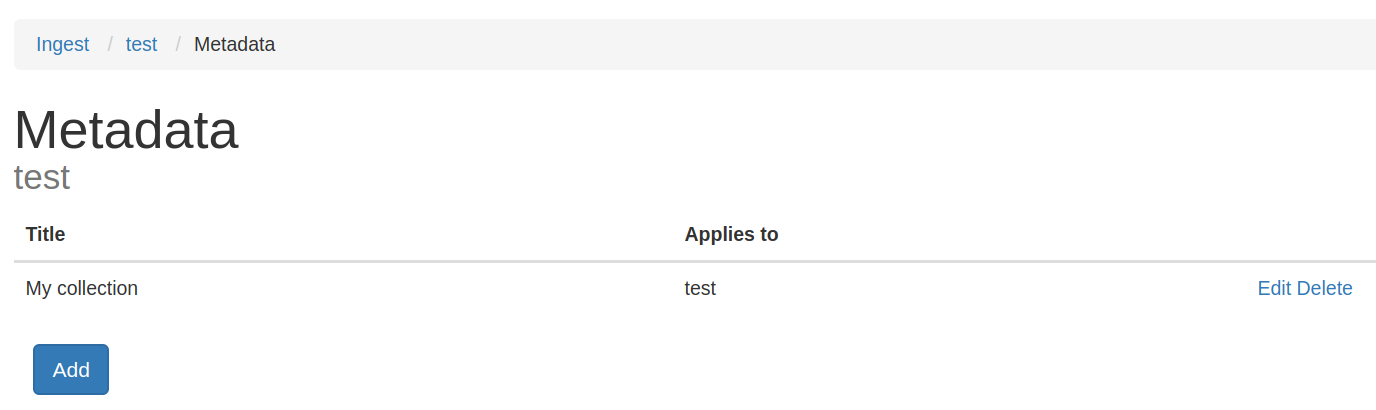
Liste de métadonnées du SIP
Return to the Transfer or Ingest tab to continue processing the SIP.
Uploading metadata CSV files through the user interface
Descriptive metadata CSV files are ideal if you are creating hierarchical metadata, want to apply metadata to individual objects, or if you want to use metadata fields other than those available in the Dublin Core Metadata Element Set.
In order to upload a CSV file, it must be available in a transfer source location connected to Archivematica, the same way that digital objects are made available. For more information about transfer source locations, see Transfer source locations.
For more information about importing metadata into Archivematica, including how to structure metadata CSV files, see Import metadata.
Important
You must carry out the following steps before the microservice
Reminder: add metadata if desired. After this point, any metadata that is
entered will not be properly attached to the SIP or entered into the METS.
While on the Ingest tab, click on the metadata template icon to the right of the transfer name.
Pour ajouter des métadonnées, cliquez sur l’icône de modèle
This will take you to the SIP detail page. Under the Metadata heading, click Add metadata files.
Page d’information du SIP
Select a transfer source location and click Browse. Navigate through the folders to find your CSV file. Once you have located the CSV file, click Add to the right of the file name. Repeat as needed.
Once you’ve added all of your files, click Add files. A spinning wheel will indicate that the file is being uploaded. Once it disappears, return to the Ingest tab to continue processing the SIP.
Ajouter des privilèges PREMIS
Archivematica can accept PREMIS rights metadata about your digital objects and parse this information into the METS file. For information on including rights metadata prior to starting your transfer, see Transfers with descriptive and/or rights metadata. This section will describe how to add rights metadata to your materials once processing has begun in Archivematica.
Archivematica can be configured to prompt you with a reminder to add metadata by
setting the processing configuration field
Reminder: add metadata if desired to None. This reminder occurs at the
last moment that it is possible to add metadata; once the ingest proceeds past
this point, it is no longer possible to add metadata to the SIP.
Note
The rights form consists of two pages: one for the rights basis, and another for acts. For more information about Archivematica’s PREMIS rights implementation, see PREMIS template.
While on the Transfer or Ingest tab, click on the metadata template icon to the right of the transfer name.
To add rights, click on the template icon.
This will take you to the SIP detail panel. On the left-hand side, under Rights, click Add.
Panneau de détails du SIP
Add the rights basis information and save the data by clicking the Save button at the bottom of the screen, or click Next if you are finished and ready to move on to the second page of data entry.
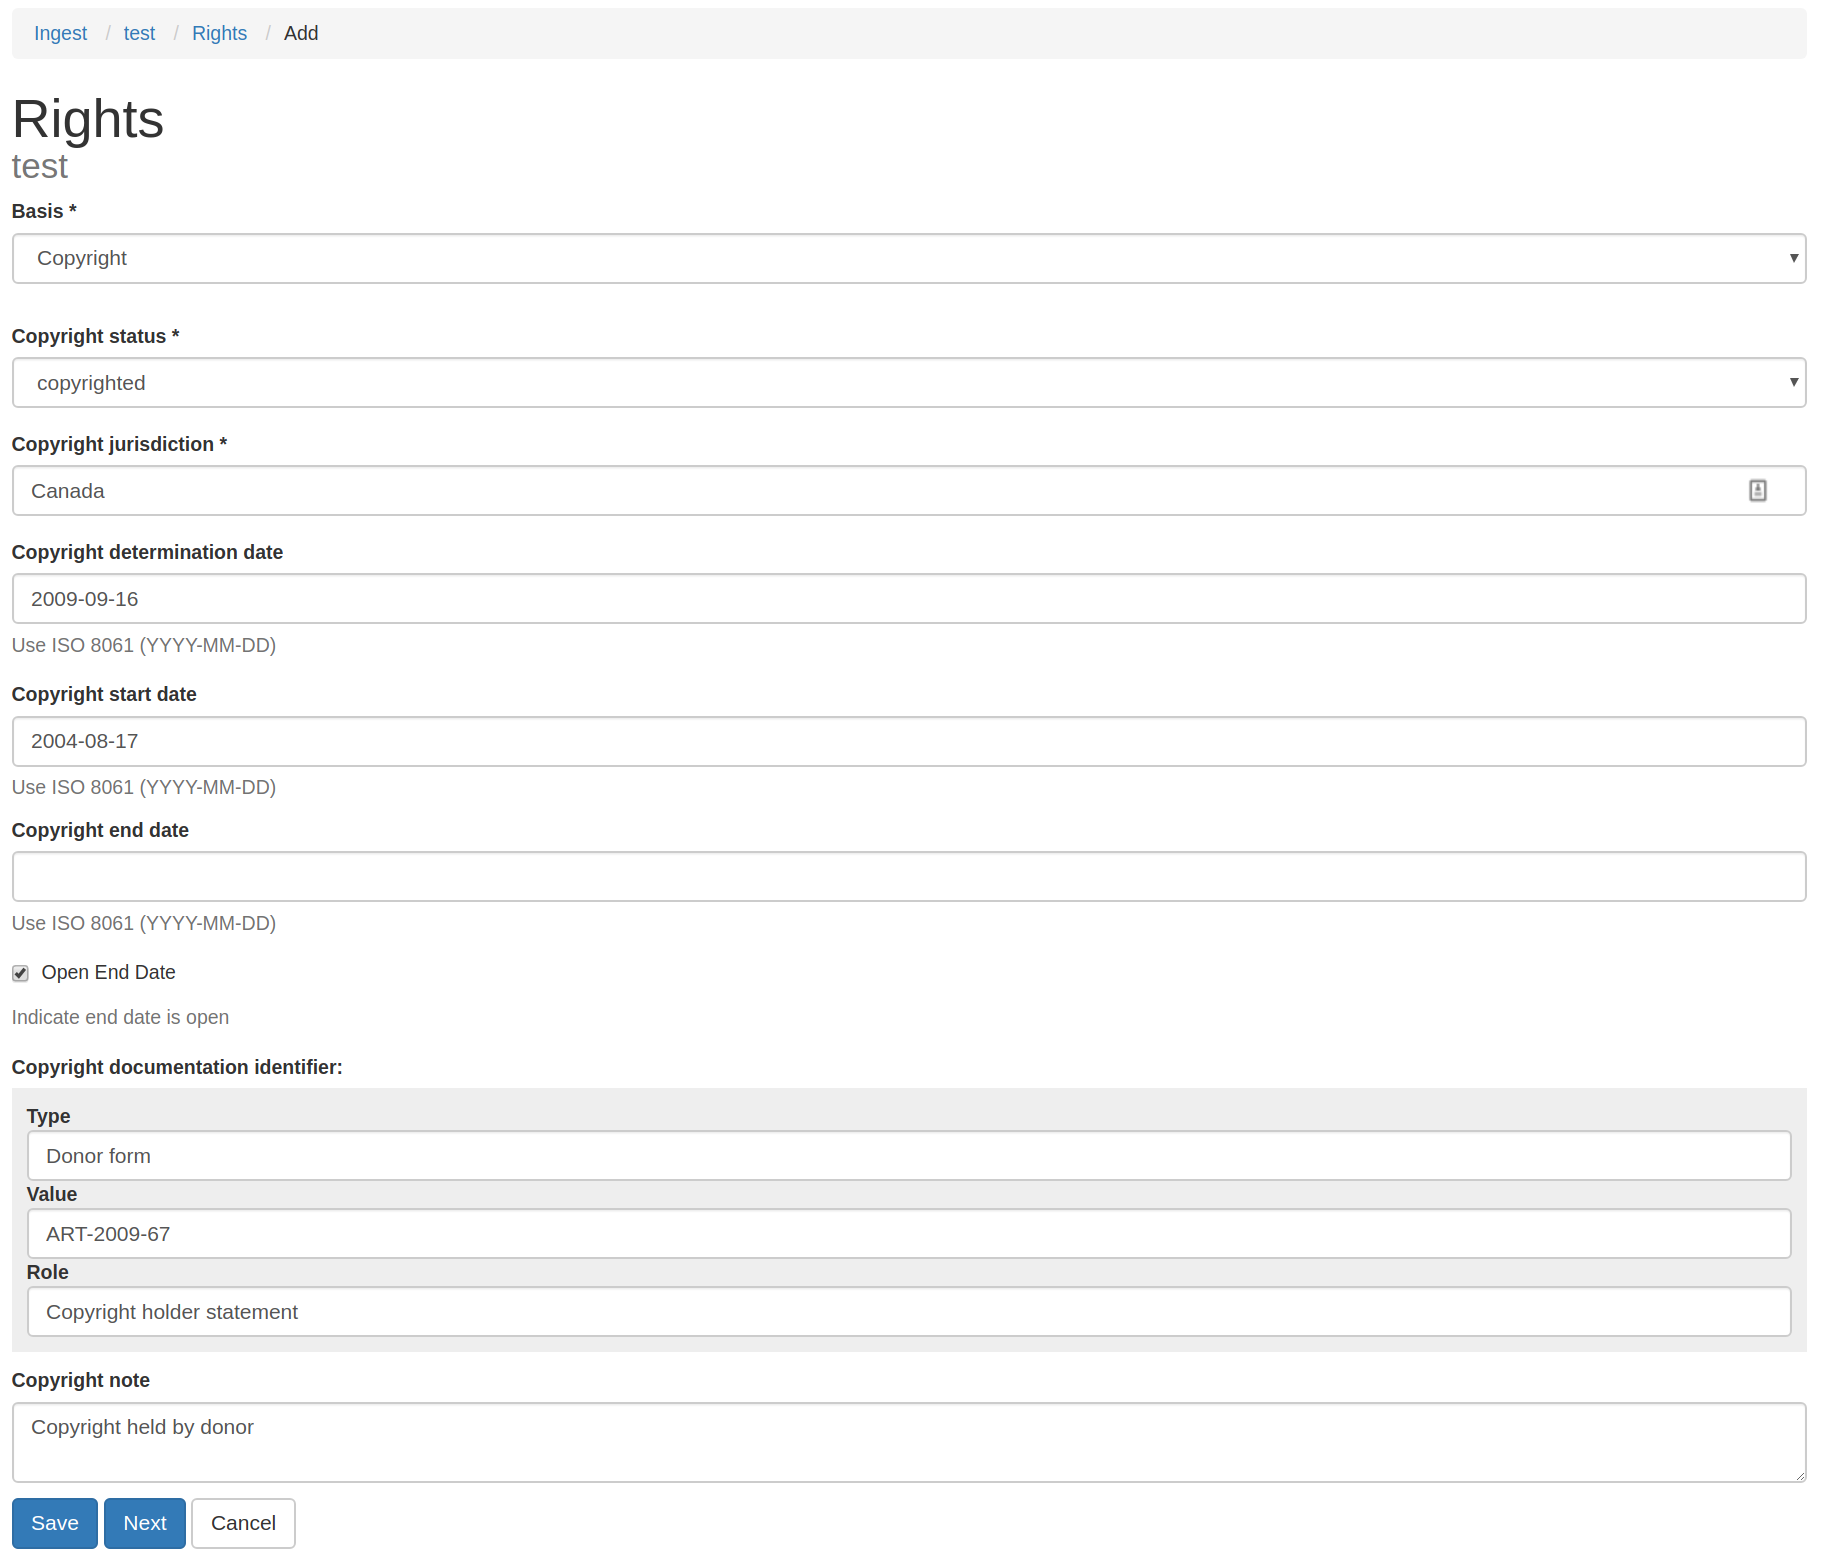
Modèle de privilèges SIP - première page
Enter act information and the associated grants/restrictions and save the data by clicking Save.
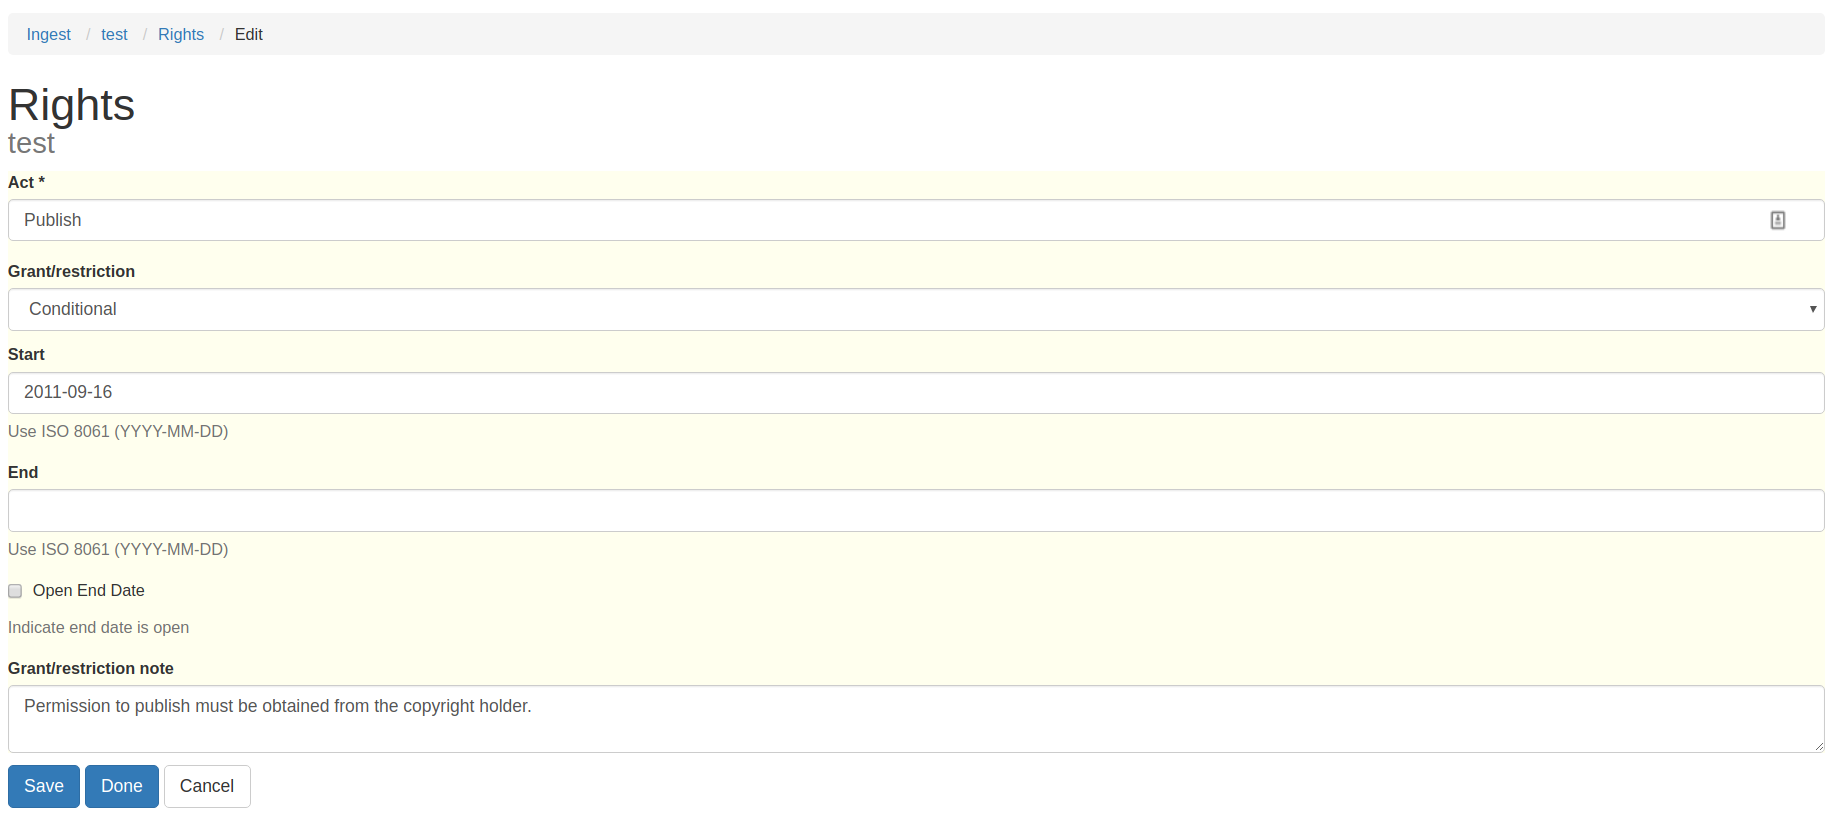
Modèle de privilèges du SIP – seconde page
When you click Save on the acts page, you will be given the option to add another act and further grants/restrictions.
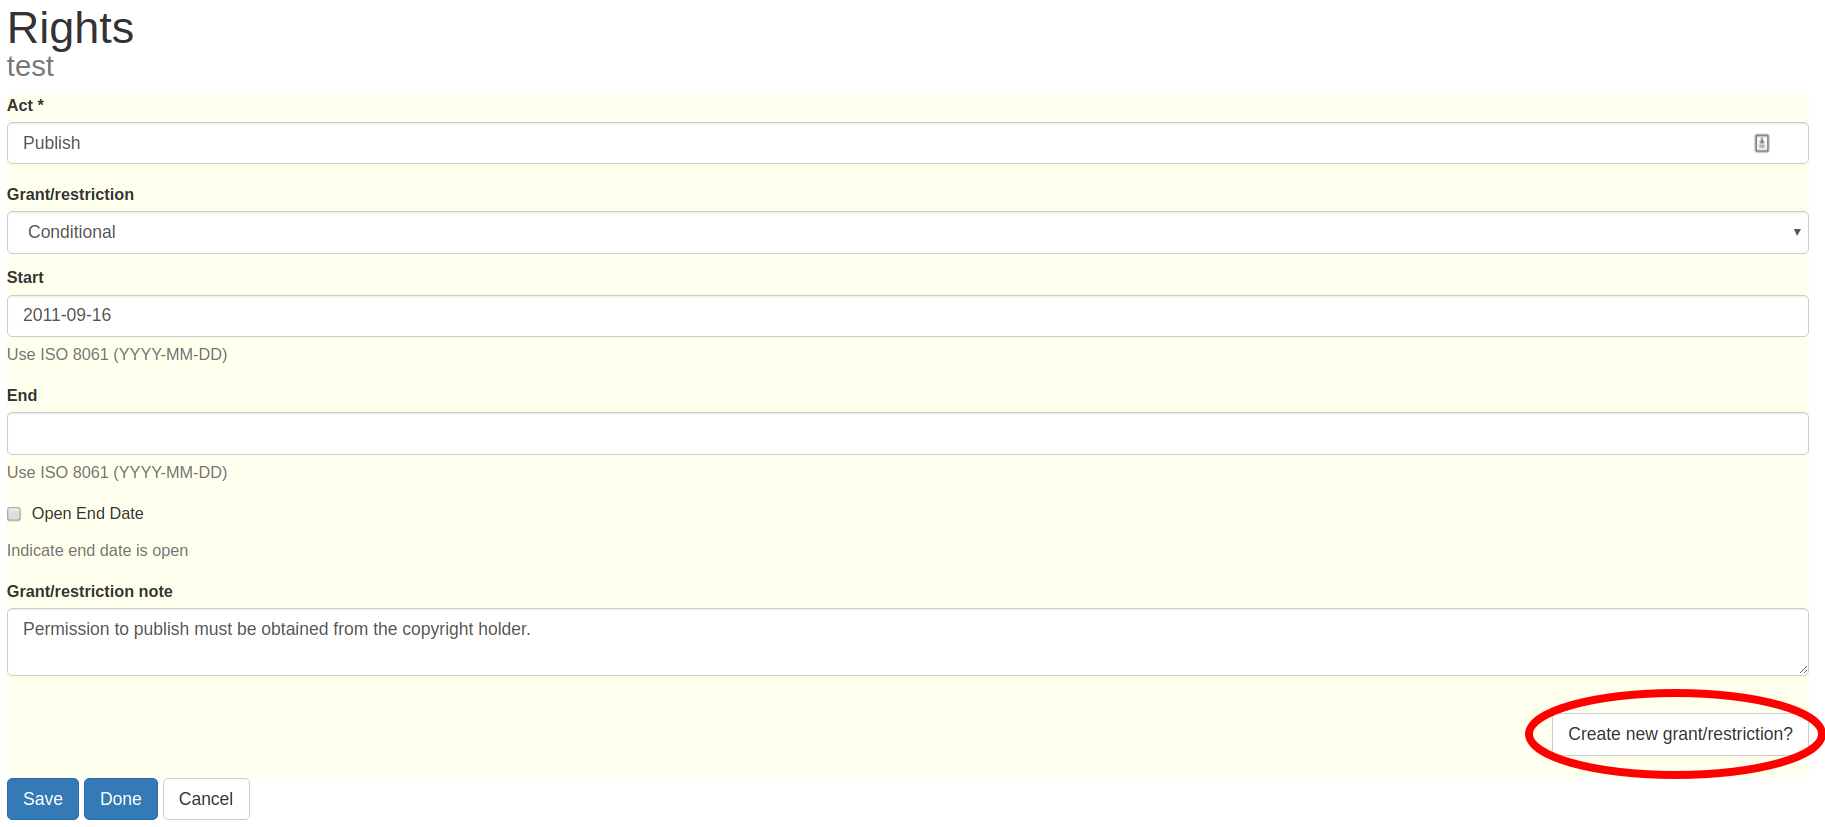
Actions répétitives du modèle des privilèges
Once you have finished adding acts, click Done. You will see the rights entry in the list page. You can add more rights by clicking Add again, or edit or delete existing rights from this page.
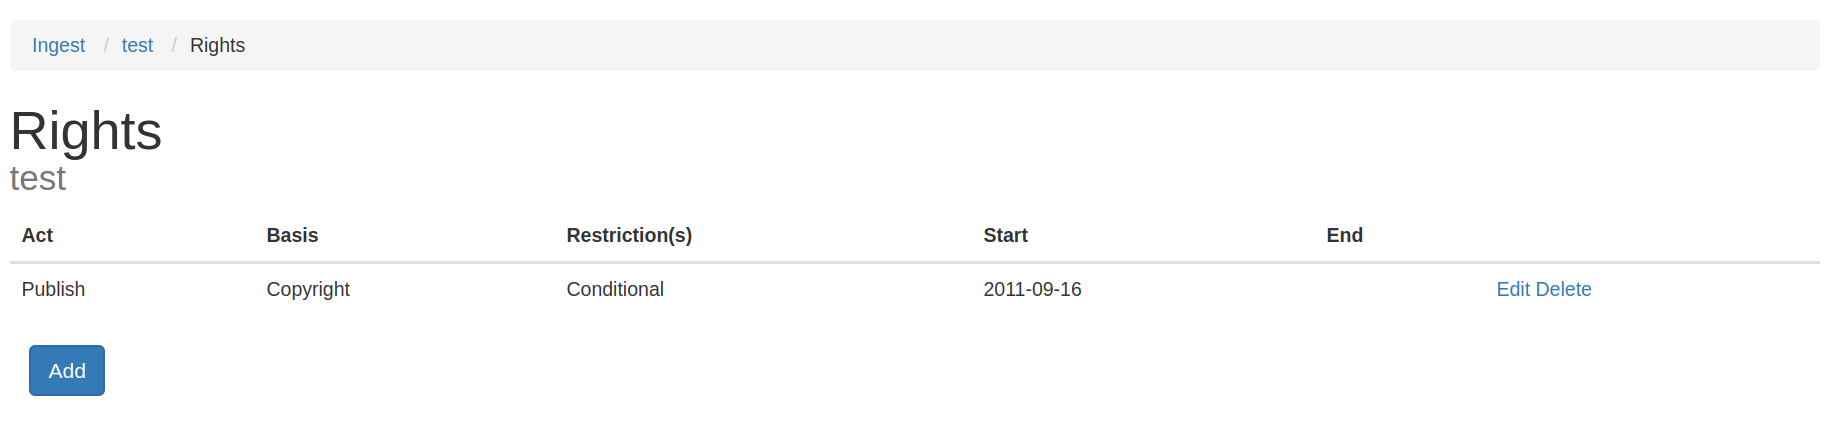
Panneau de détails du SIP avec privilèges
- Return to the Transfer or Ingest tab to continue processing the SIP.
Normaliser
Normalization is the process of converting an ingested digital object to a preferred preservation and/or access format.
Note that the original objects are always kept along with their normalized versions. For more information about Archivematica’s preservation strategy, go to the Preservation Planning section of the manual.
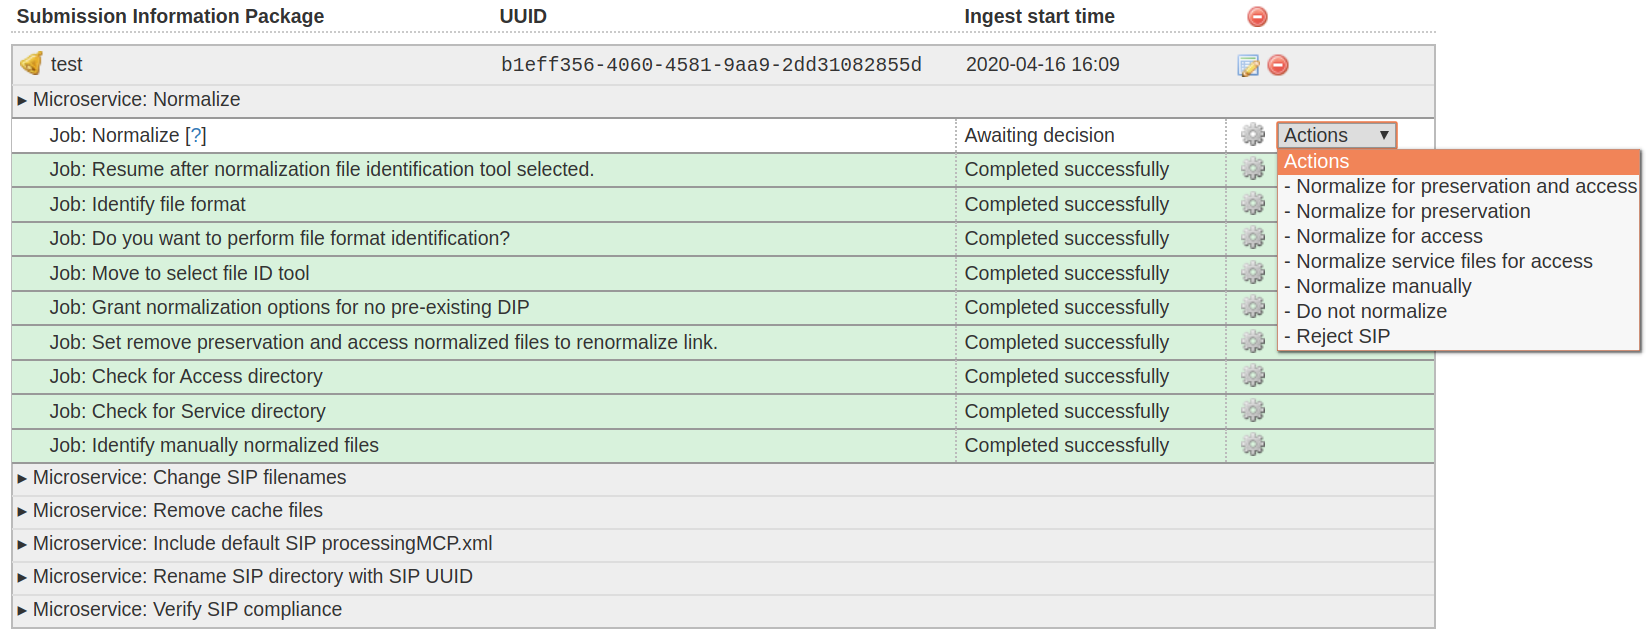
At the normalization microservice, the SIP will appear in the dashboard with a bell icon next to it. Select one of the normalization options from the Actions drop-down menu:
Sélectionner une option de normalisation
- Normalize for preservation and access - creates preservation copies of the objects plus access copies which will be used to generate the DIP.
- Normalize for preservation - creates preservation copies only. No access copies are created and no DIP will be generated.
- Normalize for access - the AIP will contain originals only. No preservation copies will be generated. Access copies will be created which will be used to generate the DIP.
- Normalize service files for access - see Transferring material with service (mezzanine) files for more information.
- Normalize manually - see Manual Normalization for more information.
- Do not normalize - the AIP will contain originals only. No preservation or access copies are generated and no DIP will be generated.
- Reject SIP - the ingest will be cancelled.
Note that depending on the setup of your transfer, you may not see all of the options listed above.
Lorsque la normalisation est terminée, vous pouvez examiner les résultats dans le Rapport de normalisation. Cliquez sur l’icône de rapport à côté du menu déroulant Actions.
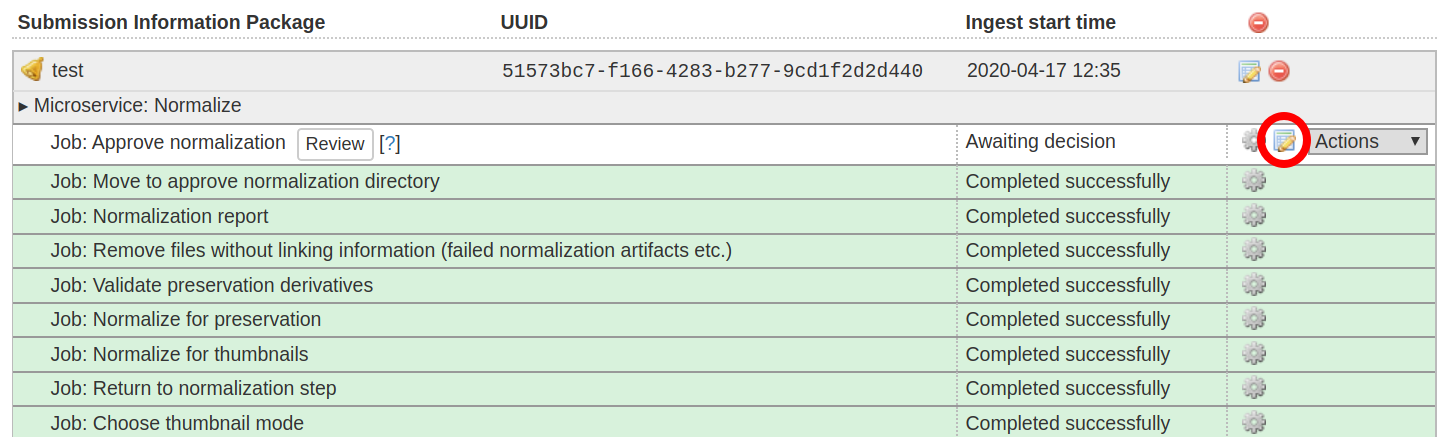
Cliquez sur l’icône de rapport pour ouvrir le rapport de normalisation
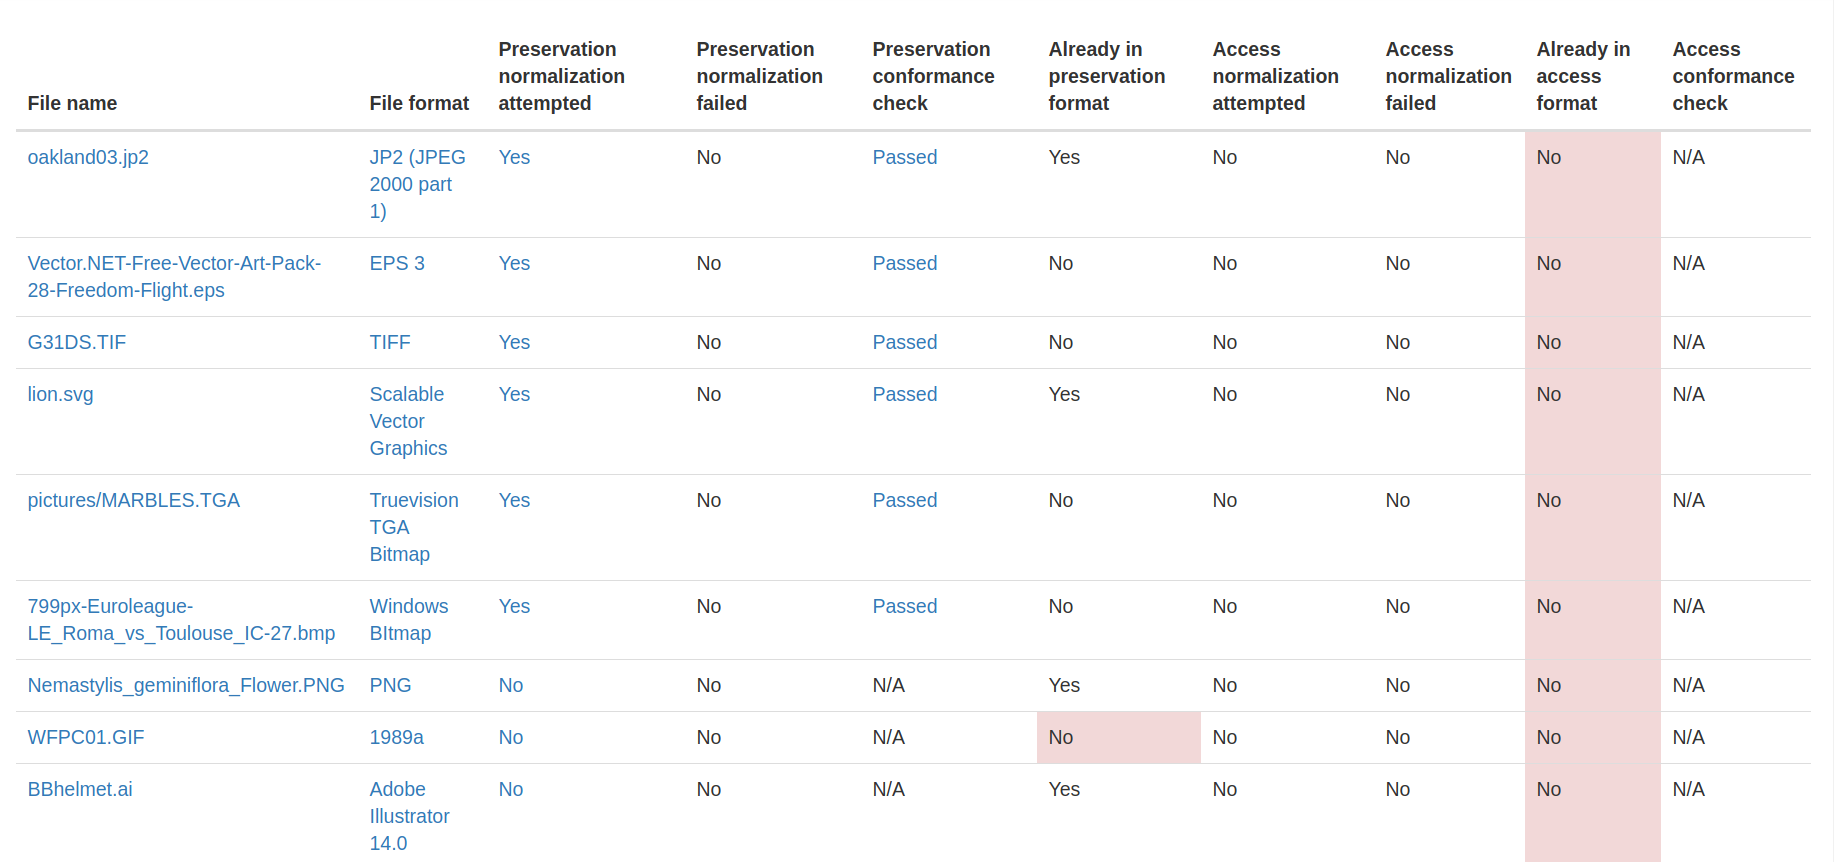
The report provides detailed information about whether normalization was atttempted and for what purpose. Pink shading indicates that a file has not been normalized to an accepted preservation or access format.
You may review the normalization results in a new tab by clicking on Review.
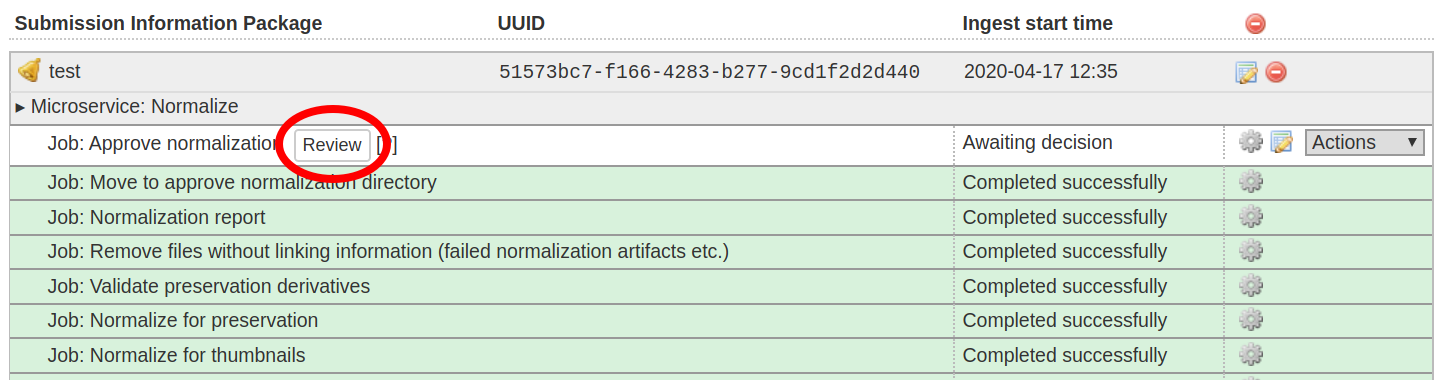
Examiner les résultats de la normalisation dans un nouvel onglet
If your browser has plug-ins to view a file, you may open it in another tab by clicking on it. If you click on a file and your browser cannot open it, it will download locally so you can view it using the appropriate software on your machine.
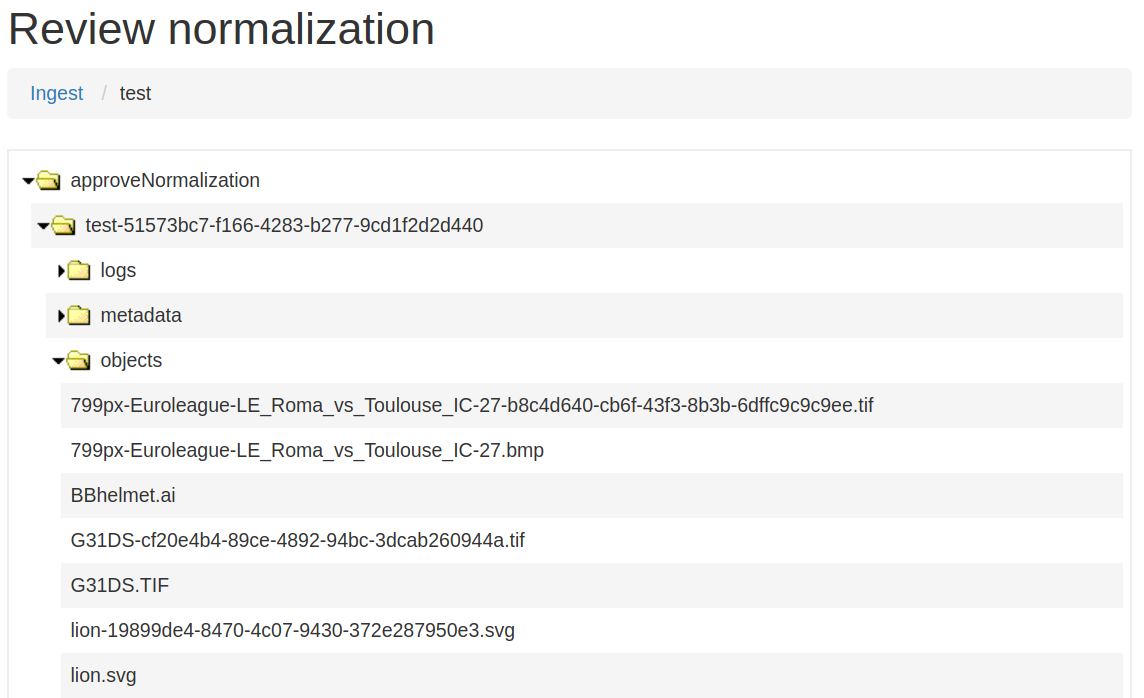
Examiner les résultats de la normalisation dans un nouvel onglet
Approuvez la normalisation dans le menu déroulant Actions afin de poursuivre le traitement du SIP. Vous pouvez aussi Rejeter le SIP ou refaire la normalisation. Si des erreurs se sont glissées dans la normalisation, suivez les instructions de la section Gestion des erreurs pour régler le problème.
Voir aussi
Bind PIDs
Bind PIDs refers to making use of Archivematica’s integration with Handle.Net, a registry that assigns persistent identifiers, or handles, to information resources. If you do not use Handle.Net, consider setting your default dashboard processing configuration setting for this Microservice to « No ».
If you do use Handle.Net, you can configure Archivematica to mint persistent identifiers (PIDs) for digital objects, directories, or AIPs by defining the PIDs in a configured Handle.Net registry. Handle.Net can then create persistent URLs (PURLs) from the PIDs and can reroute requests to the persistent URLs to a target URL that is configured in Handle.Net.
To configure Archivematica and Handle.Net, first fill in the Handle server config settings in the Administration tab.
During processing, selecting Yes at the Bind PIDs decision point will send a request to the Handle.Net HTTP REST API server to mint a PID. By default, the PID is based on the UUID of the object. You may also use the accession number if you entered an accession number on the transfer screen.
Important
If you are generating PIDs for the AIP as a whole, only use the accession number as the basis for the PID if you can guarantee that no other AIP will use the same accession number. If you will be creating multiple AIPs with the same accession number, set the AIP PID source to UUID.
Note that files and directories will always use the UUID of the file or directory as the basis for the PID.
Transcrire le contenu du SIP
Archivematica gives users the option to Transcribe SIP contents using Tesseract OCR tool. If Yes is selected by the user during this microservice, an OCR file will be included in the DIP and stored in the AIP.
Note
Tesseract transcribes the text from single images (e.g. individual pages of a book scanned as image files). It does not support transcription of multi-page objects or word processing files, PDF files, etc.
Stocker l’AIP
After normalization is complete, the SIP runs through a number of microservices, including submission documentation and metadata processing, METS file generation, indexing, DIP generation, and AIP packaging. Once the AIP is packaged, it is ready to be stored.
Archivematica can be configured with many AIP storage locations. Users can select the appropriate storage location for each AIP using the dropdown menu in the Archivematica interface. To configure AIP storage locations, see the Storage Service documentation.
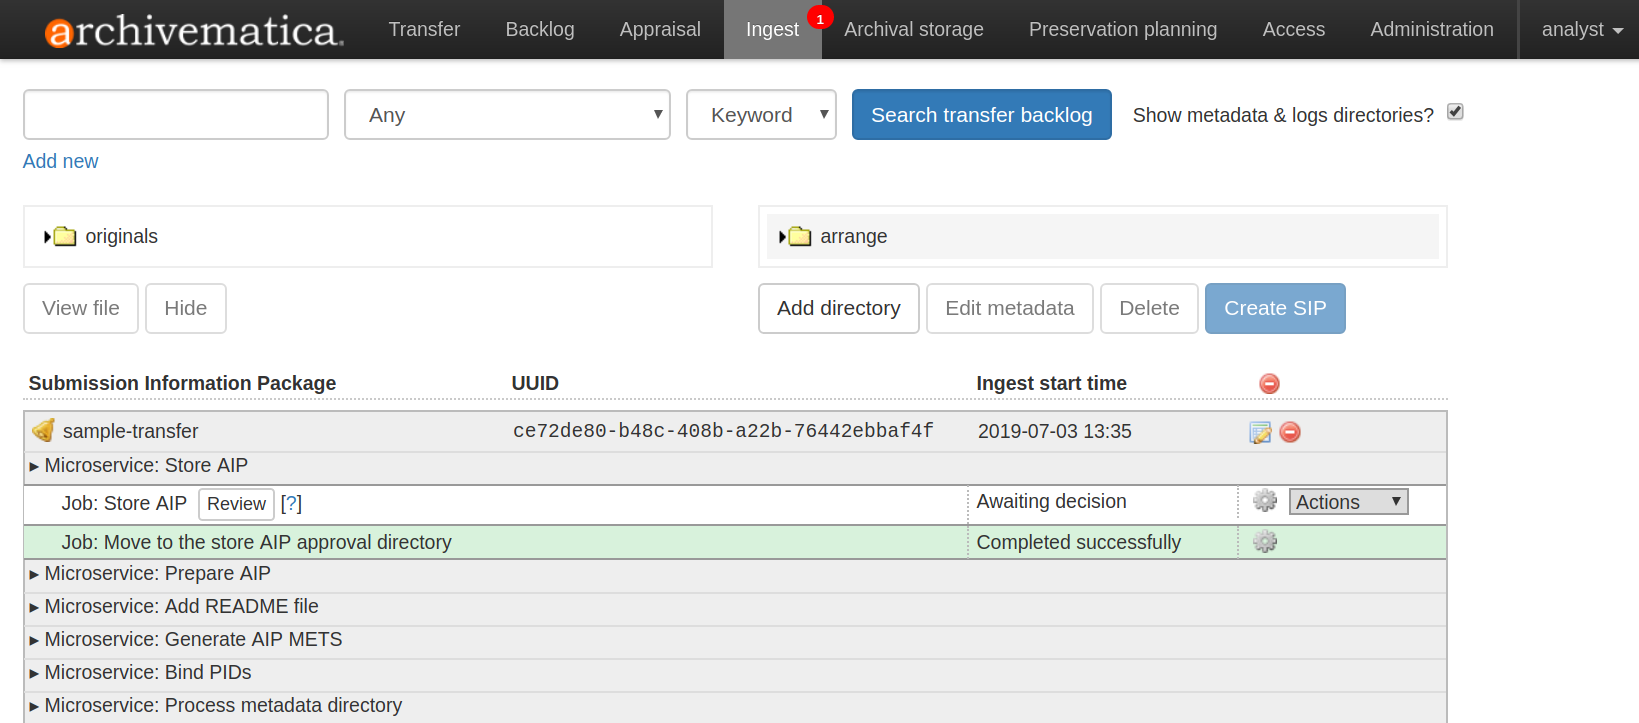
Archivematica ready to store an AIP
Before storing the AIP, you can review the contents of the AIP by clicking Review. A new tab will open where you can browse your AIP. To review the individual objects in the AIP, click on the 7z file to download it. You can also view the METS file (the file with the name
METS-uuid.xml) by clicking on it.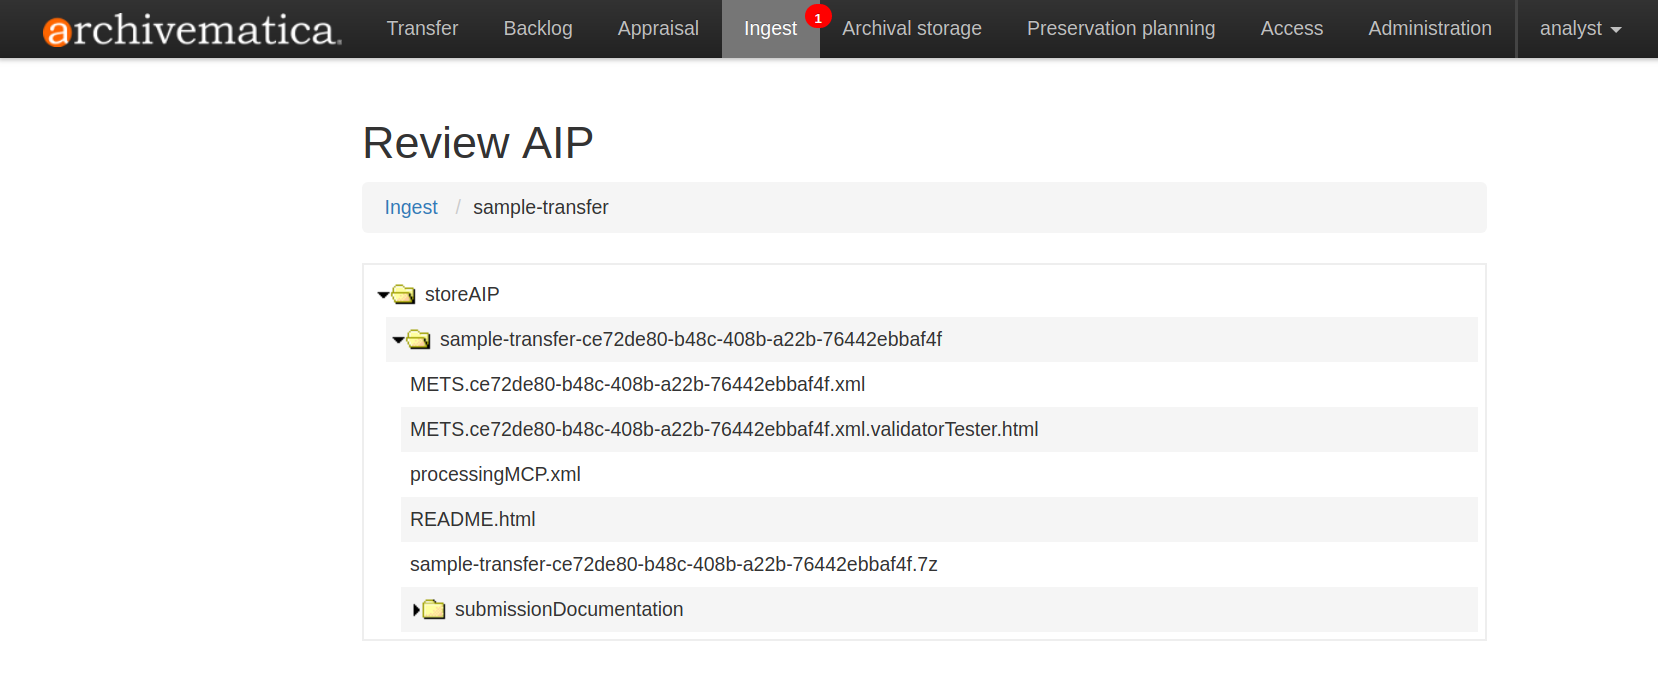
If you want to validate the METS file, you can click on the temporary file that ends in
validatorTester.html. This will open the METS file in a new window where you can validate it against the METS specification using the PREMIS in METS validator.For more information on Archivematica’s AIP structure and the METS file, see AIP structure.
Once you are ready to store the AIP, select Store AIP from the action dropdown menu. You can also reject the AIP, if needed.
When prompted, select the storage location where you would like to store the AIP.
Once your AIP has been stored, you can view and manage it on the Archival storage tab.
Note
It is possible to designate one storage location as the default location for
AIP storage in the Storage Service.
The default location is represented as Default location in the Store AIP
location dropdown menu, but the storage location will also be listed by name
alongside any other storage location options.
If there is only one AIP storage location, it will automatically be set asthe
default location, and both Default location and the storage location
itself will appear in the dropdown menu.
Télécharger le DIP
Archivematica supports DIP uploads to AtoM, Binder, ArchivesSpace, and CONTENTdm. For information about uploading DIPs to your access system, see Access.
DIPs can be stored similar to AIPs; however, DIPs can also be generated when required by doing a partial re-ingest of the AIP.
Note
We recommend storing the AIP before uploading the DIP. If there is a problem with the AIP during storage and the DIP has already been uploaded, you will have to delete the DIP from the upload location.
Note
It is possible to designate one storage location as the default location for
DIP storage in the Storage Service.
The default location is represented as Default location in the Store DIP
location dropdown menu, but the storage location will also be listed by name
alongside any other storage location options. If there is only one DIP
storage location, it will automatically be set as the default location, and
both Default location and the storage location itself will appear in the
dropdown menu.
Réacquistion de l’AIP
Il existe trois types différents de réacquisition d’AIP :
1. Métadonnées seulement
Cette méthode permet d’ajouter ou de mettre à jour des métadonnées de descriptions et/ou de privilèges. Ce faisant, le fichier dmdSec du fichier METS de l’AIP sera mis à jour. Notez que les métadonnées d’origine seront toujours présentes mais si vous faites défiler vers le bas, vous verrez également un autre fichier dmdSec identifié comme étant mis à jour (i.e. STATUS = « updated »), comme ceci:
<mets:dmdSec ID="dmdSec_792149" CREATED="2017-10-17T20:32:36"
STATUS="updated">
En choisissant de faire la réacquisition des métadonnées seulement , le système vous ramènera à l’onglet Acquisition.
2. Réacquisition partielle
Cette méthode est généralement utilisée par les institutions qui souhaitent créer un DIP après avoir créé un AIP. Ils peuvent ainsi envoyer leur DIP à leur système d’accès ou le stocker.
En choisissant de faire une réacquisition partielle , le système vous ramènera à l’onglet Acquisition.
3. Réacquisition intégrale
This method is for institutions who want to be able to run all the major microservices (including re-normalization for preservation if desired). A possible use case for full re-ingest might be that after a time new file characterization or validation tools have been developed and integrated with a future version of Archivematica. Running the microservices with these updated tools will result in a updated and better AIP.
Vous pouvez effectuer une réacquisition intégrale afin d’actualiser les métadonnées et de renormaliser aux fins d’accès.
Lorsque vous effectuez une réacquisition intégrale, vous devez saisir le nom de la configuration de traitement à utiliser. Pour ajouter de nouvelles configurations de traitement, reportez-vous à Configuration de traitement.
Important
Les flux de travail suivants ne sont pas pris en charge pour la réacquisition intégrale de l’AIP :
- Examiner le contenu si cela n’a pas été fait au moment de l’acquisition initiale
- Transfert du rapport de structure si cela n’a pas été fait au moment de l’acquisition initiale
- Extraire des paquets de l’AIP et les supprimer par la suite
- Acheminer l’AIP au backlog pour reclassement durant la réacquisition
En choisissant de faire une réacquisition intégrale , le système vous ramènera à l’onglet Transfert.
Comment vérifier le fichier METS pour voir si un AIP a subi une réacquisition
1. Look at the Header of the METS file, which will display a CREATEDATE and
a LASTMODDATE: <mets:metsHdr CREATEDATE="2017-10-17T20:29:21"
LASTMODDATE="2017-10-17T20:32:36"/>
2. You can also search for the re-ingest premis:event
<premis:eventType>reingestion</premis:eventType>
3. If you’ve updated the descriptive or rights metadata you will find an updated
dmdSec: <mets:dmdSec ID="dmdSec_792149" CREATED="2017-10-17T20:32:36"
STATUS="updated">
Où commencer le processus de réacquisition
Vous pouvez démarrer le processus de réacquisition via l’onglet Dossier de stockage des archives du Tableau de bord, le Service de stockage ou l’API.
Onglet Dossier de stockage des archives du Tableau de bord
Go to the Archival Storage tab and find the AIP you wish to re-ingest by searching or browsing.
1. Click on the name of the AIP or View to open that AIP’s view page. Under Actions, click on Re-ingest.
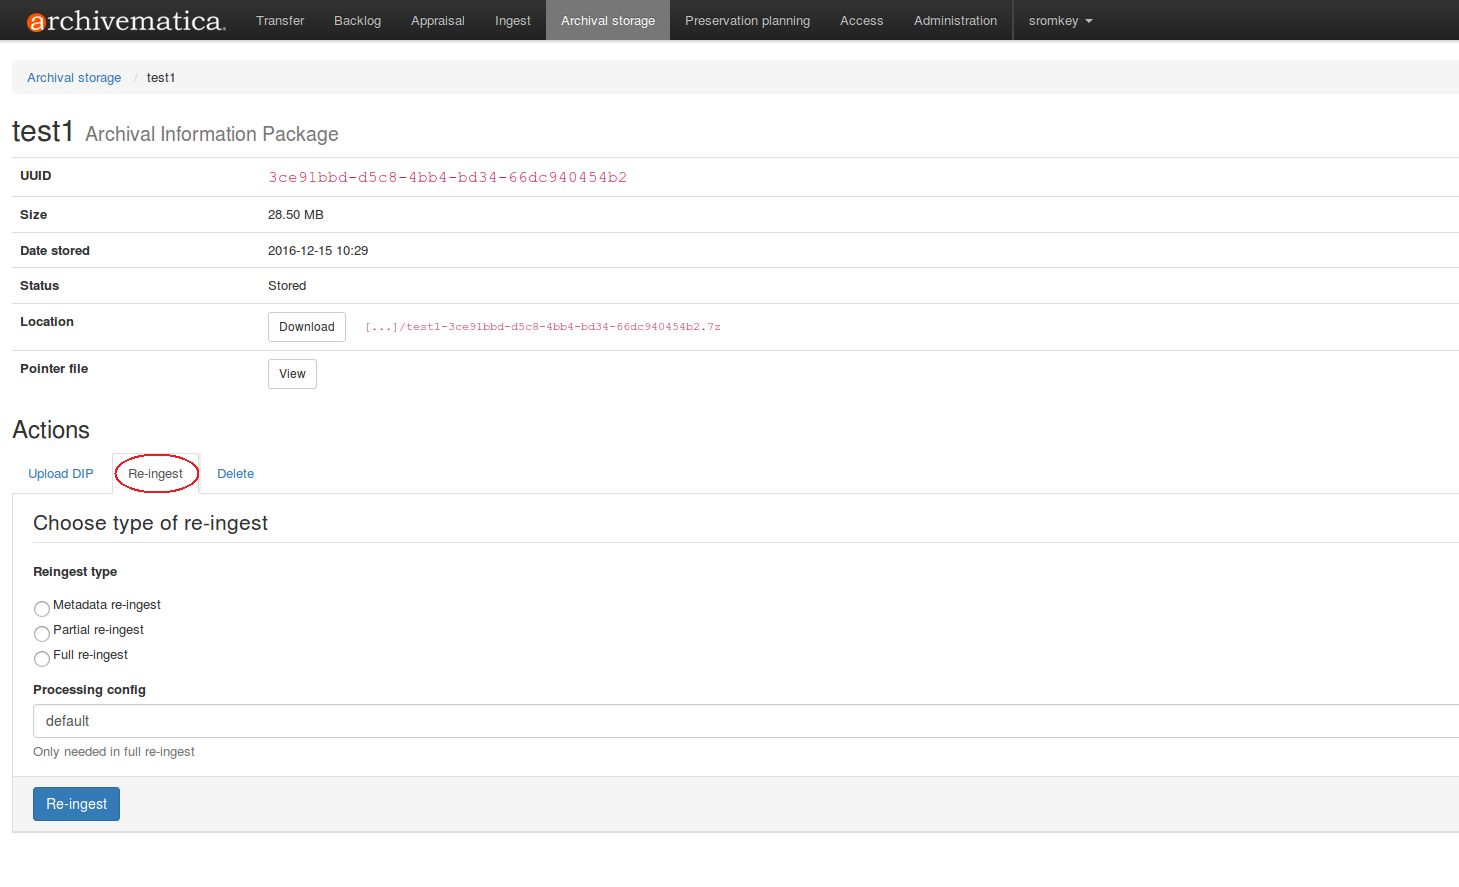
- Choisir le type de réacquisition (métadonnées, partielle ou intégrale).
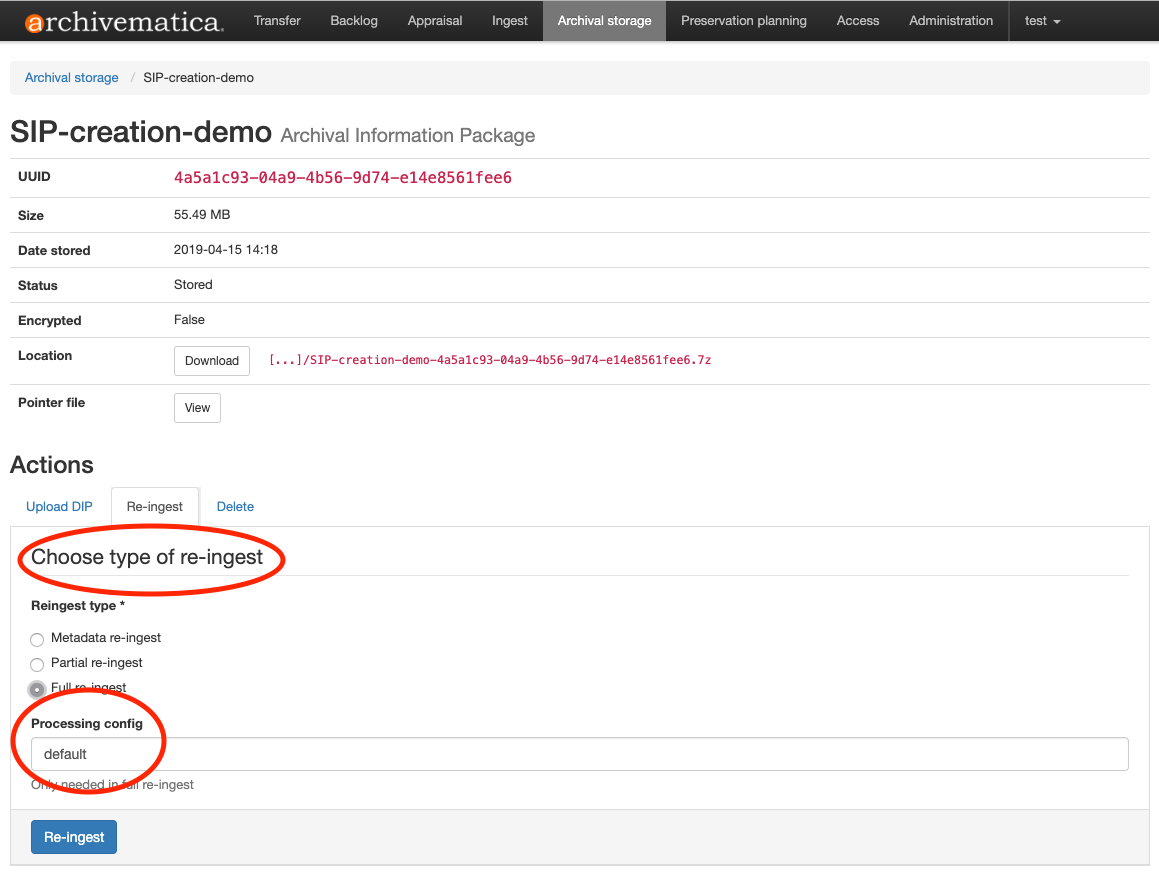
- Click on Re-ingest. Archivematica will tell you that the AIP has been sent to the pipeline for re-ingest.
Note
Si vous tentez de faire la réacquisition d’un AIP qui se trouve déjà dans le pipeline pour réacquisition, Archivematica affichera un message d’erreur.
Note
Archivematica will appear to allow you to extract and then delete packages. However, the resulting AIP will still actually contain the packages, and in the METS file they will not have re-ingestion events correctly associated with them. This is documented as issue #%s10699.
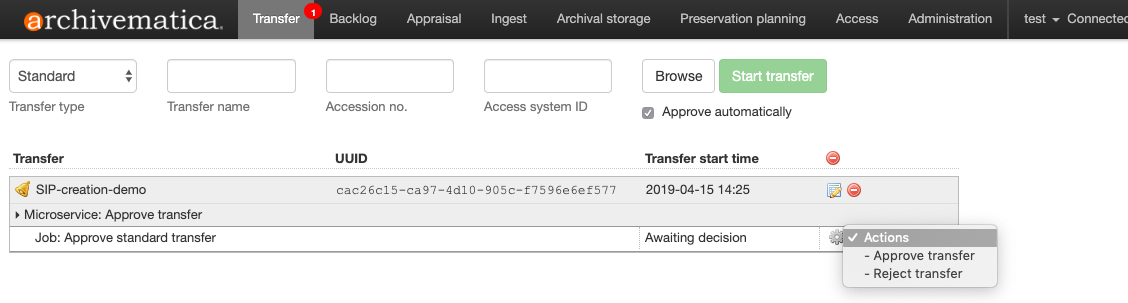
- Allez à l’onglet Transfert ou Acquisition et approuvez la réacquisition de l’AIP.
At the Normalization microservice you will make different choices depending on the type of AIP re-ingest you’ve selected.
Réacquisition des métadonnées seulement
- Ajouter ou mettez à jour les métadonnées avant d’approuver la normalisation pour vous assurer de l’enregistrement des métadonnées dans la base de données avant la préparation de l’AIP METS. Il existe deux façons d’ajouter ou de mettre à jour les métadonnées :
- Ajouter des métadonnées directement dans Archivematica
- Cliquez sur l’icône du papier et crayon sur la même ligne que le nom du SIP pour accéder à la page « Ajouter des métadonnées ».
- Cliquez sur « Ajouter », situé sous « Privilèges », si vous avez des métadonnées de privilèges à ajouter.
- Cliquez sur « Ajouter », situé sous « Métadonnées », si vous avez des métadonnées descriptives à ajouter.
- Tapez vos métadonnées.
- Cliquez sur « Réacquisition » (en haut à gauche) pour revenir à l’onglet Réacquisition lorsque vous avez terminé.
- Add metadata files
- Cliquez sur l’icône de rapport sur la même ligne que le nom du SIP pour accéder à la page « Ajouter des métadonnées ».
- Cliquez sur « Ajouter des fichiers de métadonnées », situé sous « Métadonnées ».
- Cliquez sur « Naviguer »
- Sélectionnez un fichier
metadata.csv. Notez que le nom du fichier doit littéralement se nommermetadata.csvet le fichier doit suivre la structure décrite dans Importer les métadonnées. Le fichier doit également être situé dans le même Emplacement du transfert source que vous avez utilisé pour vos objets lors du transfert vers Archivematica.
- Ajouter des métadonnées directement dans Archivematica
- Sélectionnez « Ne pas normaliser » lorsque vous avez terminé d’ajouter vos métadonnées.
- Continuez le traitement du SIP comme d’habitude.
- Ajouter ou mettez à jour les métadonnées avant d’approuver la normalisation pour vous assurer de l’enregistrement des métadonnées dans la base de données avant la préparation de l’AIP METS. Il existe deux façons d’ajouter ou de mettre à jour les métadonnées :
Note
Lorsque vous effectuez une réacquisition de métadonnées seulement, il n’y aura pas d’objets à l’étape de l’examen dans votre AIP - Archivematica remplace le fichier METS de l’AIP existant au moment du stockage.
Réacquisition partielle
- Au besoin, ajouter des métadonnées. Pour obtenir les instructions, consulter Réacquisition des métadonnées seulement.
- Sélectionnez « Normaliser aux fins d’accès ».
- Continuez le traitement du SIP comme d’habitude.
Réacquisition intégrale
- Au besoin, ajouter des métadonnées. Pour obtenir les instructions, consulter Réacquisition des métadonnées seulement
- Sélectionnez la voie de normalisation désirée.
- Continuez le traitement du SIP comme d’habitude.
Important
Toutes les options de normalisation seront affichées pour les SIP normalisés. Mais pour les métadonnées seulement ou la réacquisition partielle, seules les voies de normalisation ci-haut sont prises en charge.
Astuce
Vous pouvez ajouter des métadonnées ou les mettre à jour avant ou après la Normalisation. Mais pour veiller à ce que les métadonnées soient enregistrées dans la base de données avant la préparation de l’AIP METS, il est recommandé d’ajouter les métadonnées avant la Normalisation ou de ne pas cocher le rappel de métadonnées dans la Configuration de traitement.
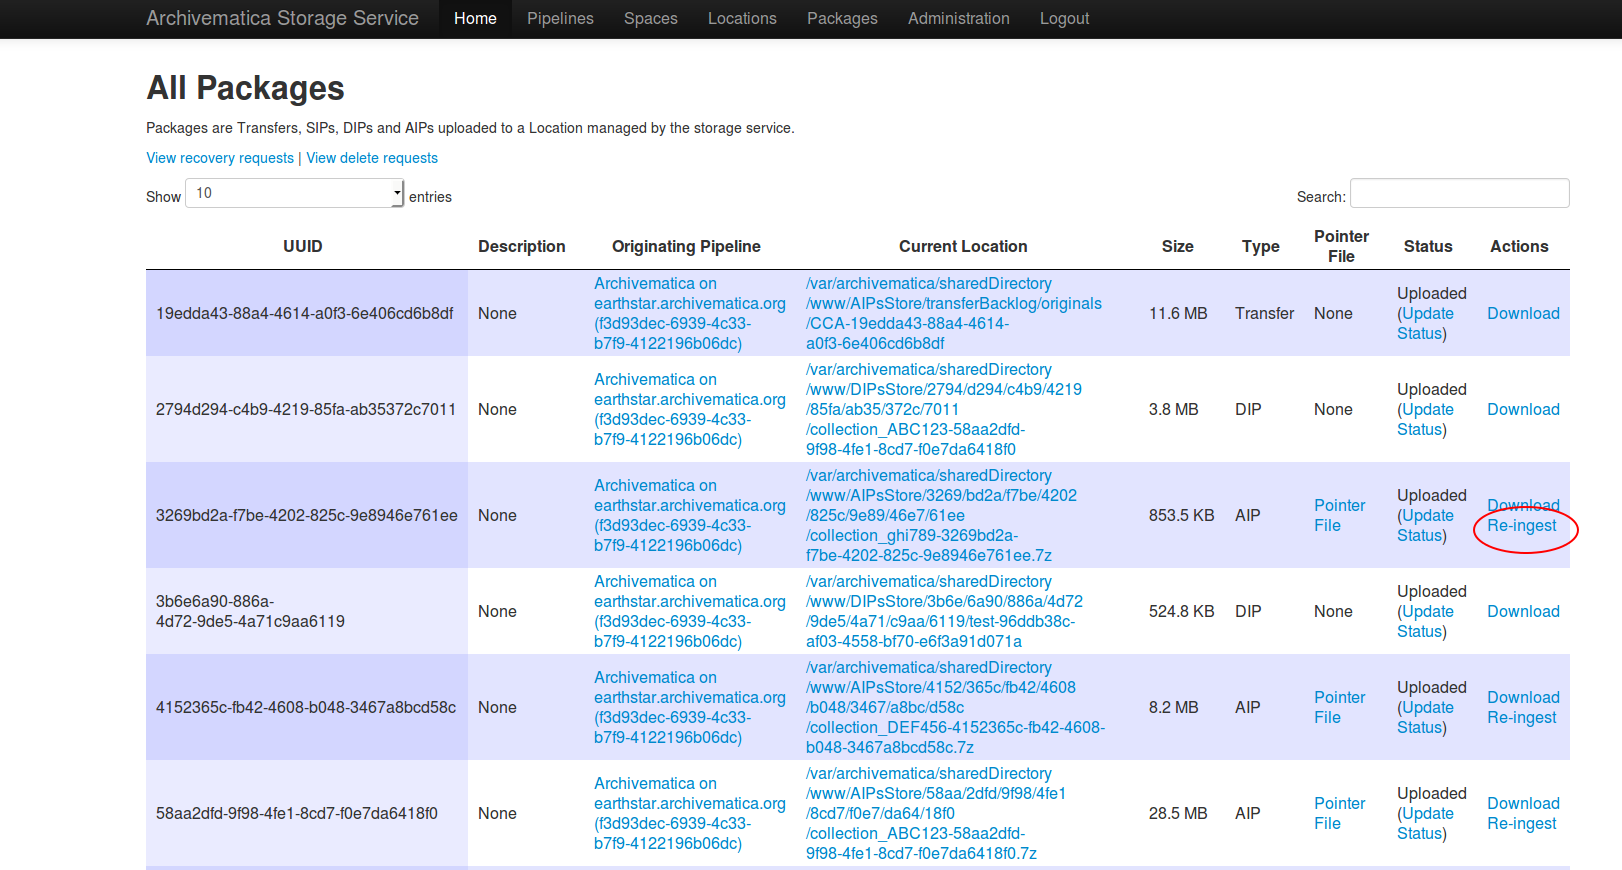
Service de stockage
- Dans l’onglet Paquets du Service de stockage, cliquez sur Réacquisition à côté de l’AIP donné.
- The Storage Service will ask you to choose a pipeline, the types of re-ingest (see above for thorough descriptions of each), and for full re-ingest, the name of the processing configuration.
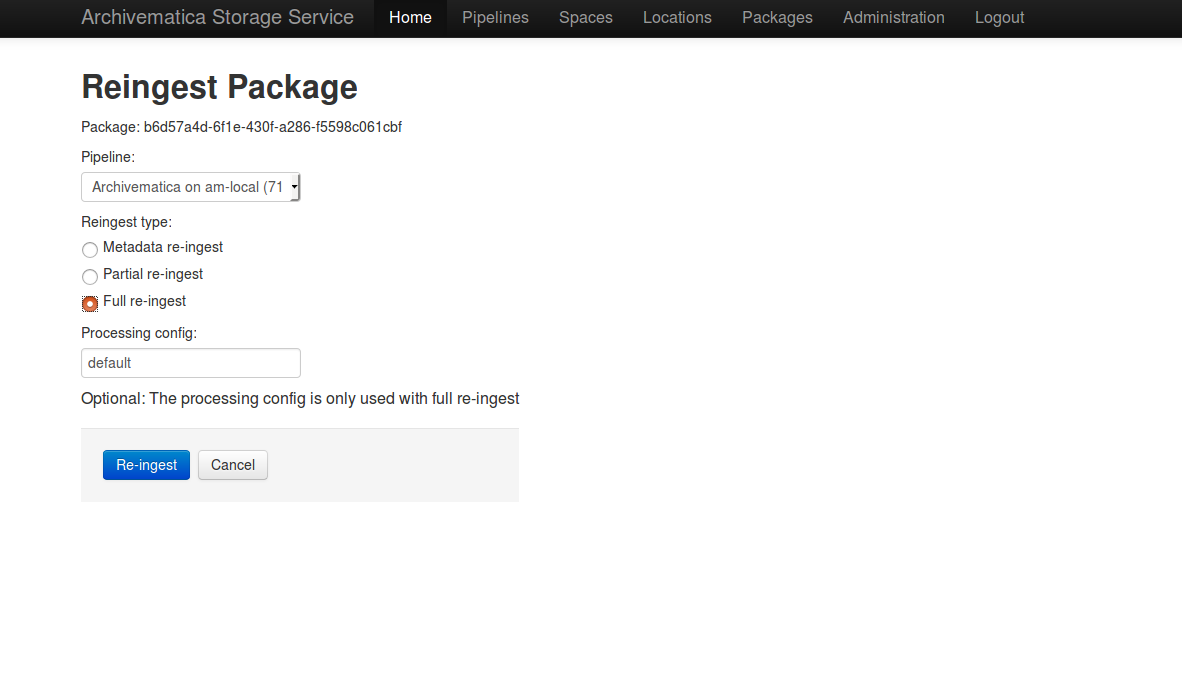
- The Storage Service will confirm that the AIP has been sent to the pipeline for re-ingest. Proceed to the Transfer or Ingest tab of your pipeline, and follow steps 3-6 above.
API
Documentation à venir.
Clean up the ingest dashboard
The dashboard in the Ingest tab should be cleaned up from time to time. As the list of SIPs grows, it takes Archivematica longer and longer to parse this information which can create browser timeout issues.
Note
This does not delete the SIP or related entities. It merely removes them from the dashboard.
Remove a single ingest
- Ensure that the SIP you want to remove doesn’t require any user input. You must complete all user inputs and either complete the SIP (i.e. AIPs/DIPs are created and stored/uploaded) or reject the SIP before it can be removed from the dashboard.
- When you are ready to remove a SIP from the dashboard, click the red circle icon found next to the add metadata icon, to the right of the SIP name.
- Click the Confirm button to remove the SIP from the dashboard.
Remove all completed ingests
- Ensure that the SIPs you want to remove are complete (i.e. AIPs/DIPs are created and stored/uploaded). Note that this feature only works on completed SIPs; rejected SIPs will have to be removed one at a time.
- When you are ready to remove all completed SIPs, click the red circle icon in the table header of the list of SIPs.
- Click the Confirm button to remove all completed SIPs from the dashboard.
Archivematica 1.13.2
Contenu
Faire une recherche
Open the general index or type your search in the search box.
Projets disponibles
Archivematica
- Version 1.18.0 (stable-current)
- Version 1.17.1 (stable-previous)
- Version 1.16.0 (legacy)
- Version 1.15.1 (legacy)
- Version 1.14.1 (legacy)
- Version 1.13.2 (legacy)
- Version 1.12.2 (legacy)
- Version 1.11.2 (legacy)
- Version 1.10.2 (legacy)
- Version 1.9.3 (legacy)
- Version 1.8.1 (legacy)
- Version 1.7.2 (legacy)
- Version 1.6.1 (legacy)
- Version 1.5 (legacy)
- Version 1.4 (legacy)
Archivematica Storage Service
- Version 0.24.0 (stable-current)
- Version 0.23.0 (stable-previous)
- Version 0.22.0 (legacy)
- Version 0.21.1 (legacy)
- Version 0.20.1 (legacy)
- Version 0.19.0 (legacy)
- Version 0.18.1 (legacy)
- Version 0.17.1 (legacy)
- Version 0.16.1 (legacy)
- Version 0.15.1 (legacy)
- Version 0.14.1 (legacy)
- Version 0.13.0 (legacy)
- Version 0.12.0 (legacy)
- Version 0.11.1 (legacy)
- Version 0.10 (legacy)
- Version 0.9 (legacy)
- Version 0.8 (legacy)
License
Archivematica documentation by Artefactual Systems Inc. is licensed under a Creative Commons Attribution-ShareAlike 4.0 International License.
