Entretien
This page contains information relevant to maintaining your Archivematica installation.
**Sur cette page*
- Elasticsearch
- Programmatic access to indexed AIP data
- Supprimer l’index Elasticsearch
- Reconstituer l’index d’AIP ou de transfert
- Sauvegarder les données
- FAQ
Maintaining Elasticsearch
Depuis la version 0.9, Archivematica conserve les données concernant les fichiers AIP, par exemple les données METS, grâce à Elasticsearch. On peut effectuer une recherche dans ces données à partir de la zone Dossier de stockage des archives du Tableau de bord, ou bien programmer un mode d’accès.
Programmatic access to indexed AIP data
To access indexed AIP data using a custom script or application, find an Elasticsearch interface library for the programming language you’ve chosen to use. In Archivematica we use Python with the pyes library. In our developer documentation, we’ll outline the use of pyes to access AIP data, but any programming language/interface library, such as PHP and Elastica, should work.
Se connecter à Elasticsearch
Cette partie explore un exemple d’interaction avec les données d’Elasticsearch grâce à un script Python écrit à l’aide de la bibliothèque pyes.
La première étape, lorsqu’on utilise pyes, est de quérir le module. Le code qui suit permet d’importer les fonctionnalités de pyes dans un système où Archivematica est installé.
import sys
sys.path.append("/home/demo/archivematica/src/archivematicaCommon/lib/externals")
from pyes import *
Ensuite, il faut établir la connexion avec Elasticsearch.
conn = ES('127.0.0.1:9200')
Recherche plein texte
Une fois connecté à Elasticsearch, on peut lancer des recherches. Voici le code qui permet de faire une recherche « générique » dans tous les fichiers AIP indexés par Elasticsearch et faire ressortir les 20 premiers résultats. Il est également possible de lancer une recherche par mot clé, par exemple l’UUID d’un AIP.
start_page     = 1
items_per_page = 20

q = StringQuery('*')

try:
  results = conn.search_raw(
     query=q,
     indices='aips',
     type='aip',
     start=start_page - 1,
     size=items_per_page
  )
except:
   print 'Query error.'
Lancer une requête de données spécifiques
Le type de requête « StringQuery » convient bien aux recherches générales, mais « TermQuery » convient mieux pour limiter la recherche à un champ particulier et réduire les faux positifs. Par défaut, Elasticsearch conserve, les termes de recherche en minuscules; il faut donc veiller à saisir les termes de recherche en minuscules également.
import sys
sys.path.append("/usr/lib/archivematica/archivematicaCommon/externals")
import pyes

conn = pyes.ES('127.0.0.1:9200')

q = pyes.TermQuery("METS.amdSec.ns0:amdSec_list.@ID", "amdsec_8")

try:
    results = conn.search_raw(query=q, indices='aips')
except:
  print 'Query failed.'
Afficher les résultats d’une recherche
Une fois les requêtes lancées, on peut en afficher les résultats. La logique qui suit passe en revue chaque résultat au sein d’un groupe (représentant un fichier AIP), et imprime l’UUID de l’AIP auquel il appartient, le numéro (ID) de document dans Elasticsearch correspondant aux données indexées et le chemin d’accès qui mène au fichier dans l’AIP.
if results:
    document_ids = []
    for item in results.hits.hits:
        aip = item._source
        print 'AIP ID: ' + aip['AIPUUID'] + ' / Document ID: ' + item._id
        print 'Filepath: ' + aip['filePath']
        print
        document_ids.append(item._id)
Récupérer des documents spécifiques
Pour trouver un fichier AIP particulier dans Elasticsearch, on peut utiliser le numéro de document (ID) Elasticsearch. Le code ci-dessus produit les numéros de documents document_ids, et le code ci-dessous utilise ces données pour extraire des documents ou des données spécifiques contenues dans chaque document.
for document_id in document_ids:
    data = conn.get(index_name, type_name, document_id)

    format = data['METS']['amdSec']['ns0:amdSec_list'][0]['ns0:techMD_list'][0]['ns0:mdWrap_list'][0]['ns0:xmlData_list'][0]['ns1:object_list'][0]['ns1:objectCharacteristics_list'][0]['ns1:format_list'][0]['ns1:formatDesignation_list'][0]['ns1:formatName']

    print 'Format for document ID ' + document_id + ' is ' + format
Augmenter un document
Pour ajouter des données (augmenter) à un document Elasticsearch, le numéro de document (ID) est requis. Le code qui suit montre une requête dans Elasticsearch visant à extraire un document et à y ajouter des données. N. B. Le nom du champ de données à ajouter est précédé de deux tirets de soulignement : « __public ». Cela évite d’effacer accidentellement des données du système ou d’Archivematica. Les données du système sont précédées d’un seul tiret de soulignement.
import sys
sys.path.append("/usr/lib/archivematica/archivematicaCommon/externals")
import pyes

conn = pyes.ES('127.0.0.1:9200')

q = pyes.TermQuery("METS.amdSec.ns0:amdSec_list.@ID", "amdsec_8")

results = conn.search_raw(query=q, indices='aips')

try:
  if results:
    for item in results.hits.hits:
        print 'Updating ID: ' + item['_id']

        document = item['_source']
        document['__public'] = 'yes'
        conn.index(document, 'aips', 'aip', item['_id'])
except:
  print 'Query failed.'
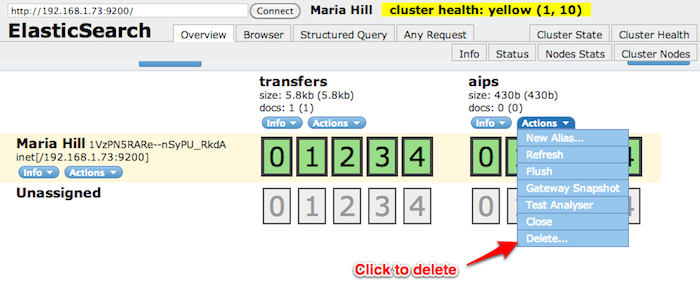
Delete the Elasticsearch index through the GUI
To help with Elasticsearch development, Archivematica comes with a plugin for Elasticsearch, called Elasticsearch Head, that provides a web application for browsing and administering Elasticsearch data. It can be accessed at http://your.host.name:9200/_plugin/head/.
Elasticsearch Head permet de supprimer un index, au besoin.
Programmer la suppression d’index dans Elasticsearch
Pour programmer l’opération de suppression d’un index, on peut saisir le code pyes suivant :
import sys
sys.path.append("/home/demo/archivematica/src/archivematicaCommon/lib/externals")
from pyes import *
conn = ES('127.0.0.1:9200')

try:
    conn.delete_index('aips')
except:
    print "Error deleting index or index already deleted."
Reconstituer l’index d’un AIP
Pour reconstituer l’index d’un AIP dans Elasticsearch, saisir le code suivant pour localiser le script de reconstitution :
locate rebuild-elasticsearch-aip-index-from-files
Copier l’adresse du script voulu et saisir le code suivant pour procéder à la reconstitution (en remplaçant « /your/script/location/rebuild-elasticsearch-aip-index- from-files » par l’adresse du fichier concerné).
/your/script/location/rebuild-elasticsearch-aip-index-from-files <location of your AIP store>
Reconstituer l’index d’un transfert
De même, pour reconstituer l’index de données d’un transfert dans Elasticsearch, saisir le code suivant pour localiser le script de reconstitution :
locate rebuild-elasticsearch-transfer-index-from-files
Copier l’adresse du script voulu et saisir le code suivant pour procéder à la reconstitution (en remplaçant « /your/script/location/rebuild-elasticsearch-transfer- index-from-files » par l’adresse du fichier concerné) :
/your/script/location/rebuild-elasticsearch-transfer-index-from-files <location of your AIP store>
Voir aussi
Elasticsearch troubleshooting help from AtoM documentation.
Sauvegarde de données
Dans Archivematica, on recommande de sauvegarder les trois types de données suivantes :
- Filesystem (en particulier les répertoires de stockage)
- MySQL
- Elasticsearch
MySQL sert à entreposer à court terme les données de traitement. On peut sauvegarder la base de données MySQL en utilisant le code de commande suivant :
mysqldump -u <your username> -p<your password> -c MCP > <filename of backup>
Elasticsearch is used to store long-term data. Instructions and scripts for backing up and restoring Elasticsearch are available in the Elasticsearch documentation.
FAQ
Comment redémarrer les services Archivematica
Relancer tous les services
am services
Notez que l’action par défaut consiste à redémarrer tous les services. Pour voir les autres paramètres disponibles, tapez :
am services help
Arrêter
sudo stop archivematica-mcp-server
sudo stop archivematica-mcp-client
sudo /etc/init.d/apache2 stop
sudo /etc/init.d/gearman-job-server stop
sudo stop mysql
sudo /etc/init.d/elasticsearch stop
Démarrer
sudo /etc/init.d/elasticsearch start
sudo start mysql
sudo /etc/init.d/gearman-job-server start
sudo /etc/init.d/apache2 start
sudo start archivematica-mcp-server
sudo start archivematica-mcp-client
Retracer une séquence d’erreurs
« Mon Tableau de bord affiche une page d’erreur vide. Comment localiser le problème? »
Pour retracer une séquence d’erreur dans le Tableau de bord, il est nécessaire de savoir comment modifier un fichier de configuration à partir de la ligne de commande.
Connexion SSH au serveur Archivematica
Dans votre logiciel de traitement de texte, ouvrez le fichier des paramètres du Tableau de bord (ici l’exemple montre le vim; utiliser sudo pour modifier le fichier).
sudo vim /usr/share/archivematica/dashboard/settings/common.py
Activer l’attribut « DEBUG » en remplaçant la valeur « False » par « True »
DEBUG = True
Sauvegarder le fileservices
Redémarrer Apache.
sudo apache2ctl restart
Rafraîchir la page de séquence d’erreur du Tableau de bord dans le navigateur.
Déboguer ou signaler l’erreur
Désactiver l’attribut « DEBUG » (« false ») et relancer Apache pour désactiver les rapports d’erreur.
Resolve hanging decisions
« My Transfer or Ingest tab has a red circle indicating that a decision is awaiting user input, but there are no decisions to be made on the screen. How do I get rid of the red circle? »

Any time a decision in the Transfer or Ingest tab is awaiting user input, Archivematica visually indicates the need for user input by placing a red circle on the tab. The numeral inside the circle indicates how many decisions are awaiting user input on the tab.
It is possible to remove transfers or SIPs from the Transfer or Ingest tab without resolving a decision, which results in the red circle remaining even if there is no decision awaiting user input on the tab. While this isn’t a critical issue, it is annoying. To get rid of the red circle, you need to use a command line tool to resolve the user input first and then either complete or reject the transfer/SIP. In the Archivematica source code, there is a python module containing an RPC client that can give you information about the transfers and SIPs that you have in your dashboard. It also allows you to add user inputs, as an alternative to using the dashboard.
Important
The tool that is currently being used for this workflow, mcp-rpc-cli, may be deprecated or replaced in future releases. These instructions are accurate as of Archivematica 1.7.2.
Note
These instructions work on Archivematica 1.7.x, deployed on either CentOS or Ubuntu via ansible or RPMs. If you are using this tool on a vagrant deployment, please note the specific instructions related to vagrant. For more information about installation methods, please see Installer Archivematica.
Clone the archivematica-devtools repository into your Archivematica source repository and follow the installation instructions found within the repository. On Ubuntu or CentOS, clone the repository to /opt/archivematica. On vagrant, clone the repository to /vagrant/src/. You should be able to access the devtools by running the am command.
Navigate to the Archivematica MCP Client directory and start the mcp-rpc-cli.
Ubuntu or CentOS:
sudo -u archivematica bash -c " \
   set -a -e -x
     source /etc/default/archivematica-mcp-client || \
         source /etc/sysconfig/archivematica-mcp-client \
             || (echo 'Environment file not found'; exit 1)
     cd /opt/archivematica/archivematica-devtools/bin/
     ./am mcp-rpc-cli
 ";
Vagrant:
sudo -u archivematica bash -c " \
   set -a -e -x
     source /etc/default/archivematica-mcp-client || \
         source /etc/sysconfig/archivematica-mcp-client \
             || (echo 'Environment file not found'; exit 1)
     cd /vagrant/src/archivematica-devtools/bin/
     ./am mcp-rpc-cli
 ";
You should see an output that looks like the snippet here:
0
<choicesAvailableForUnit>
 <UUID>a62cf1bc-caf4-4656-94bb-da6713bea572</UUID>
 <unit>
   <type>SIP</type>
   <unitXML>
     <UUID>8bcd6bd8-3f8b-4673-b309-bb98d84b43bb</UUID>
     <currentPath>%sharedPath%watchedDirectories/storeAIP/diptest4-8bcd6bd8-3f8b-4673-b309-bb98d84b43bb/</currentPath>
   </unitXML>
 </unit>
 <choices>
   <choice>
     <chainAvailable>433f4e6b-1ef4-49f8-b1e4-49693791a806</chainAvailable>
     <description>Reject AIP</description>
   </choice>
   <choice>
     <chainAvailable>9efab23c-31dc-4cbd-a39d-bb1665460cbe</chainAvailable>
     <description>Store AIP</description>
   </choice>
 </choices>
</choicesAvailableForUnit>
1
<choicesAvailableForUnit>
 <UUID>b4b8aed1-13be-4174-a3a4-806bc993c861</UUID>
 <unit>
   <type>SIP</type>
   <unitXML>
     <UUID>04c62e5e-0d00-4bf8-9298-18eeb2df0df8</UUID>
     <currentPath>%sharedPath%watchedDirectories/storeAIP/diptest4-8bcd6bd8-3f8b-4673-b309-bb98d84b43bb/</currentPath>
   </unitXML>
 </unit>
 <choices>
   <choice>
     <chainAvailable>c5488a27-fef8-4338-9355-bbdde821c957</chainAvailable>
     <description>Reject AIP</description>
   </choice>
   <choice>
     <chainAvailable>97866125-ddd1-4811-8e9d-ebae48fd11d0</chainAvailable>
     <description>Store AIP</description>
   </choice>
 </choices>
</choicesAvailableForUnit>

q to quit
u to update List
number to approve Job
Please enter a value:
The above is showing two SIPs that were cleared from the Ingest tab while waiting for user input at the Store AIP decision point. Each SIP is given an entry number, beginning with 0. Note that transfers that were cleared from the Transfer tab while waiting for user input would also appear in this list.
Below the entry number, we get some basic information about the SIP within the <unit> element (the type, UUID, and the current location). Following that, we have the <choices> element, which presents the currently-available choices for the SIP. The Store AIP decision point gives the user two choices: Reject AIP or Store AIP.
Select the transfer or SIP that you would like to work with by entering the entry number.
Please enter a value: 0You should now see a list of the available choices for the transfer or SIP. Each choice is preceded by an entry number.
0
<choice>
 <chainAvailable>433f4e6b-1ef4-49f8-b1e4-49693791a806</chainAvailable>
 <description>Reject AIP</description>
</choice>
1
<choice>
 <chainAvailable>9efab23c-31dc-4cbd-a39d-bb1665460cbe</chainAvailable>
 <description>Store AIP</description>
</choice>

q to quit
u to update List
number to approve Job
Please enter a value:
Make the decision by entering the choice’s entry number.
Please enter a value: 1In this example, we have chosen to store the AIP by selecting the Store AIP choice. We could now confirm that this action worked by checking the Archivematica instance’s Storage tab to confirm that the AIP was stored.
To update the list and continue, enter u when prompted to enter a value. Repeat the steps above until there are no more choices left to make.
Transfer won’t start
« I try to create a new transfer, but nothing happens. What can I do? »
Sometimes a user may attempt to start a transfer and it will never seem to initiate the Archivematica processes. There are a few issues to look out for and investigate if this happens.
- File permissions
First, the issue may be related to file permissions in the transfer source directory. Check the permissions in the directory and on the files to ensure that all files can be read by Archivematica.
- System timeouts
If it is a large transfer, it may just be taking a long time to copy the files and initially load them into the system, and the user can wait a bit longer and see if the processes begin after a bit of time. It is also possible that it is taking a long time because some of the system timeouts are being exceeded and the transfer has failed. This can be verified by checking the Storage Service logs and by checking where the transfer exists on the filesystem.
For inadequate timeouts, check the Storage Service configuration and adjust if necessary.
- Communication between Dashboard and Gearman
If the transfer has successfully moved to the shared Directory (i.e. it can be found in
sharedDirectory/watchedDirectories/activeTransfer/folders), but is still not showing up in the dashboard, there could have been a problem with the communication between the dashboard and Gearman. Restarting all of the services can resolve this problem and the transfer will appear.Restart services in the follow order:
gearmand,archivematica-mcp-server,archivematica-mcp-client, andarchivematica-dashboard.Note that on some installations,
gearmandmay be calledgearman-job-server.
Archivematica 1.8.1
Faire une recherche
Open the general index or type your search in the search box.
Projets disponibles
Archivematica
- Version 1.17.1 (stable-current)
- Version 1.16.0 (stable-previous)
- Version 1.15.1 (legacy)
- Version 1.14.1 (legacy)
- Version 1.13.2 (legacy)
- Version 1.12.2 (legacy)
- Version 1.11.2 (legacy)
- Version 1.10.2 (legacy)
- Version 1.9.3 (legacy)
- Version 1.8.1 (legacy)
- Version 1.7.2 (legacy)
- Version 1.6.1 (legacy)
- Version 1.5 (legacy)
- Version 1.4 (legacy)
Archivematica Storage Service
- Version 0.23.0 (stable-current)
- Version 0.22.0 (stable-previous)
- Version 0.21.1 (legacy)
- Version 0.20.1 (legacy)
- Version 0.19.0 (legacy)
- Version 0.18.1 (legacy)
- Version 0.17.1 (legacy)
- Version 0.16.1 (legacy)
- Version 0.15.1 (legacy)
- Version 0.14.1 (legacy)
- Version 0.13.0 (legacy)
- Version 0.12.0 (legacy)
- Version 0.11.1 (legacy)
- Version 0.10 (legacy)
- Version 0.9 (legacy)
- Version 0.8 (legacy)
License
Archivematica documentation by Artefactual Systems Inc. is licensed under a Creative Commons Attribution-ShareAlike 4.0 International License.
